GZ-MG50E/EK GZ-MG40E/EK GZ-MG30E/EK GZ-MG20E/EK
Built-in Hard Disk
Enjoying Various Playback Features
Various Recording Modes
Editing Files on your PC
Contents
Safety Precautions
Some DO’S and DON’TS on the Safe USE of Equipment
Above ALL
Before Using this Camera
Lens Cap See page 8 for attachment
Provided Accessories
Attaching the Lens Cap
Attaching the Shoulder Strap
Video/Audio/Video/USB cable
Attaching the Core Filter
DC cord
Close the core filter until it clicks shut
Index
Connectors
Indicators
Controls
Other Parts
Indications on LCD Monitor
During Video Recording only
During Still Image Recording only
During Still Image Playback
During Video Playback
Power
Charging the Battery Pack
Required charging time
Using the Battery Pack
Perform steps 2 3 in Charging the Battery Pack
Maximum continuous recording time
About Batteries
Data Battery System
Recording/Playback Mode
Operation Mode
Power Switch Position
Power-Linked Operation
Built-in Clock’s Rechargeable Lithium Battery
Language Setting Date/Time Settings
Day, then press
Repeat to input Month, year, hour
Grip Adjustment
Brightness Adjustment of the Display
Tripod Mounting
To protect valuable files
Inserting/Removing an SD Card Formatting a Recording Medium
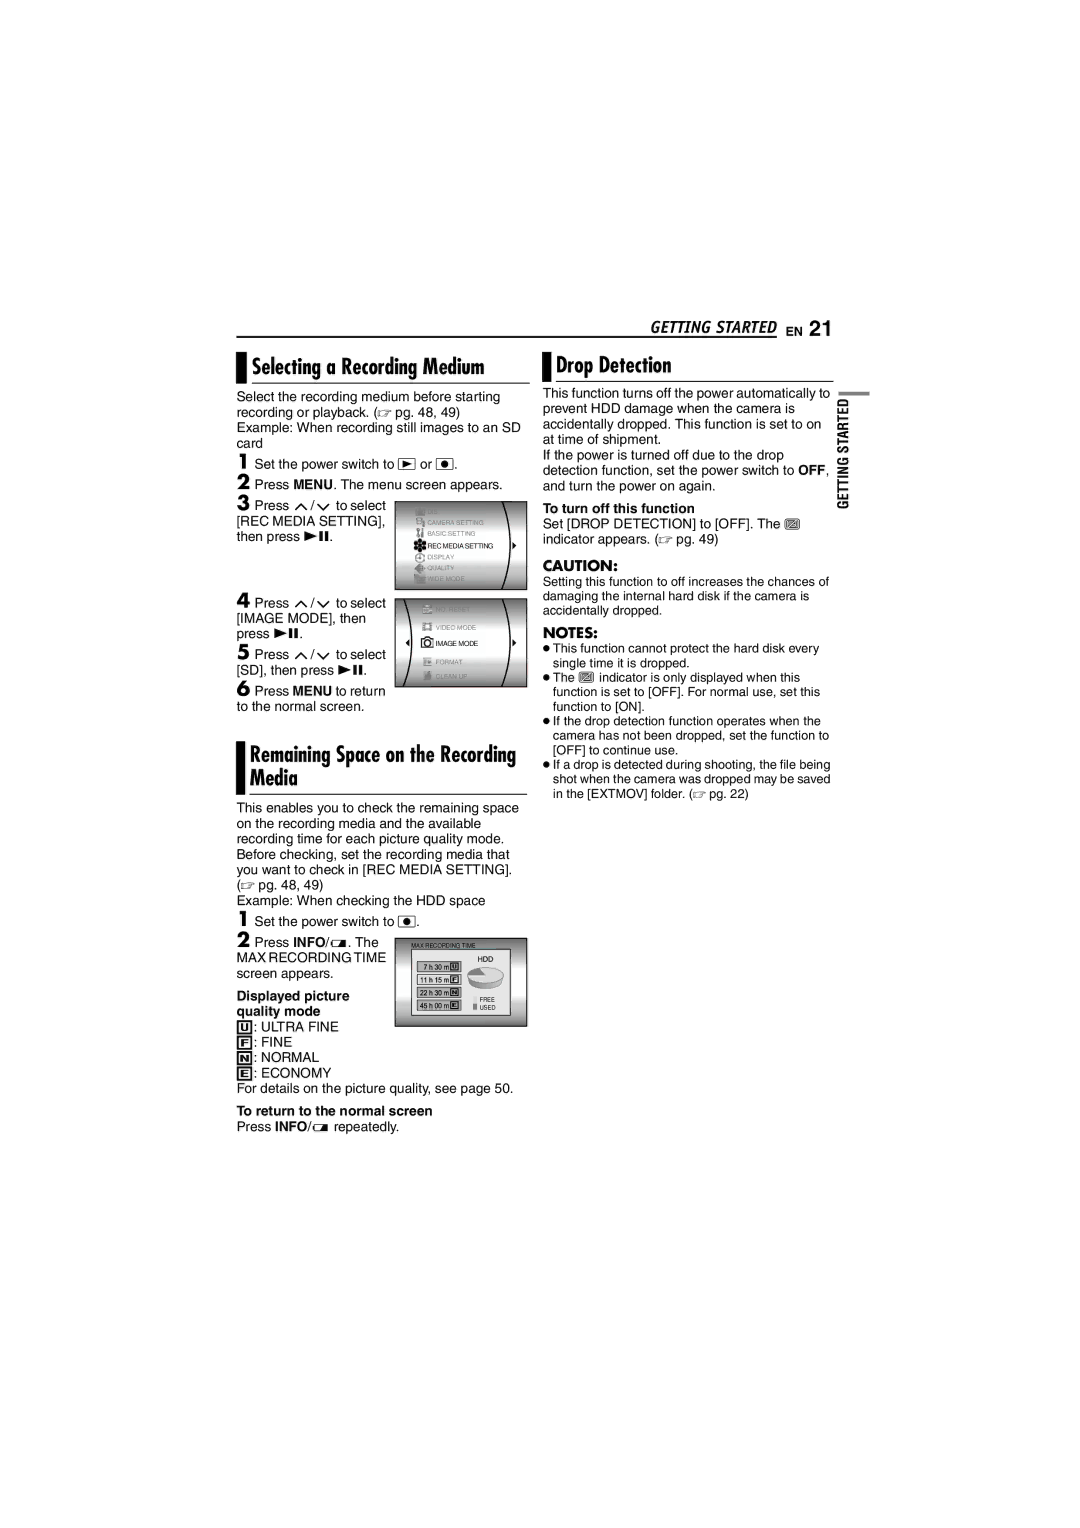
Drop Detection
Remaining Space on the Recording Media
Selecting a Recording Medium
Video Recording
Press the recording start/stop button to start recording
To stop recording, press Recording start/stop button again
Deleting Files
Zooming
To zoom
To zoom out
Video Playback
To adjust the speaker volume
To play back files in the Extmov folder
To return to the index screen
Date Index Screen
How to Use the Scroll Bar
Playback Zoom
Various Playback Operations
If using a VCR or VDR , go to step
Connecting to a TV, VCR or VDR Playback on a TV
Dubbing to a VCR or DVD Recorder
To choose whether or not the following
Playback Using the Remote Control Buttons and Functions
Installing the Battery
Beam Effective Area
Continuous Shooting
Still Image Recording
Still Image Playback
Slide Show
Index Screen of Still Image Files
Deleting Still Image Files
Image Rotation
Press / / / to move to the magnified
Press to rotate 90 clockwise
LED Light
Spot Exposure Control
Backlight Compensation
Manual Exposure Menu
Manual Settings in Mset
Manual Focus
When a dark object is barely visible in the display
To return to automatic focus
Select Auto in step
Halogen When a video light or similar
Cloud When shooting outdoors on a
Type of lighting is used
Press To close the Mset menu
Shutter Speed
To change the shutter speed
To return to automatic shutter speed
To turn off the program AE function
Program AE
To turn off the effect
Select OFF in step
Wipe or Fader Effects
Playback Effects
Consecutive snapshots
Information on Video Files
Viewing File Information
Protecting Files
Information on Still Image Files
Deleting Files
Button
Deleting on the Menu Screen
Medium
Cleaning Up a Recording
To delete by selecting multiple files
To delete all files
Copying/Moving Still Image
Files
To copy or move by selecting files
Before proceeding to following steps
Creating Play List
Resetting the File Number
To check the play list by playing back
Playing Back Play List
Video
To check only the scene transition
Add/Delete Files in Play List Changing Play List Name
Deleting Play List Dubbing Using Play List
To confirm the Dpof setting
Dpof Print Setting
To reset the Dpof setting
To print all still images One print for each
To print using the Dpof setting
To cancel print setting
Printer
Direct Printing with a PictBridge
Select the operation mode
Changing the Menu Settings
Common Menus for All Modes
For Recording Menus
HDD / SD
Video Recording Menus
Video Playback Menus
Still Image Playback Menus
Still Image Recording Menus
OFF / 2SEC / 10SEC
Troubleshooting
Power
Recording
Playback
Advanced features
Other problems
Appears when no SD card is inserted in the SD slot. � pg
Battery indicator
Lock position. � pg
Attempt still image playback
Memory Card Cannot be Played Back Correctly
Battery Packs
Cleaning the Camera
LCD Monitor
Recording Medium
Main Unit How to Handle a CD-ROM
Camera
Specifications
Recording mode video
Format Power requirement
Battery life
Recording mode audio
SD card
Compatible recording media
GZ-MG30E/EK GZ-MG20E/EK
Approximate number of storable images for still image
42 45
Terms
Software Installation and USB Connection Guide
Contents
Restriction on the Program
Victor Company of Japan, Limited
Export Control
How to handle a CD-ROM
Location
CyberLink
AixTeMa
Zealand
Pixela
Windows Digital Photo Navigator
System Requirements
Supported media
CyberLink DVD Solution
Macintosh Capty Mpeg Edit EX
PowerDVD 5 NE
Software Installation Windows
Load the provided CD-ROM into the PC
Select the desired language and click OK
Click Next
Select the programs you want to install, then click Next
Click Yes
Confirm your information and click Next
Connections Windows
Connecting the USB cable
To close Windows Messenger
Click Processes tab Select msmsgs.exe Click End process
Viewing the Contents of a Recording Medium Windows
Dcim Contains folders with still images Jpeg extension .jpg
Accident such as when dropped
Copying Files to the PC Windows
Folders in the recording medium appear
For example, create a new folder in the My Pictures folder
Playing Back Files on the PC Windows
Disconnecting the USB cable Windows
Still images
Video files
Click OK
User’s Guide/Help/Readme Windows
Create a new folder with a selected name on the desktop
Backing Up Video files Windows
Click File Mode
Creating play lists using multiple files and viewing video
Viewing the video for a single file
Copy the entire Sdvideo folder
Select Produce a Disc, and then click Next
How To Create DVDs simply Windows
Select DVD Format and click Next
Creating a DVD with Titles Windows
Page
Click Start
12Insert a check mark for Include Menu
DVD video
Read Me screen appears
Software Installation Macintosh
Read the Important Information carefully and click Continue
License screen appears
Click Agree if you agree with the license agreement
Select the desitination volume and click Continue
Connections Macintosh
Viewing the Contents of a Recording Medium Macintosh
Extension .jpg
Double-click the memory card icon on the desktop
Copying Files to the PC Macintosh
Disconnecting the USB cable Macintosh
File Combination Macintosh
Help/Readme Macintosh
Help
ReadMe
Click Open to import the file Click View Click Combine Files
File Trimming Macintosh
Skip to if you do not edit video files
Select File screen appears
Delete trimming range
Saving
Combine range and create
Create individual ranges
Creating DVDs
Software Installation and USB Connection Guide
Read this first