24 EN VIDEO RECORDING & PLAYBACK

Video Playback

To play back files in the [EXTMOV] folder

If the data cannot be recorded properly, the


video files are saved to the [EXTMOV] folder.


( pg. 22)

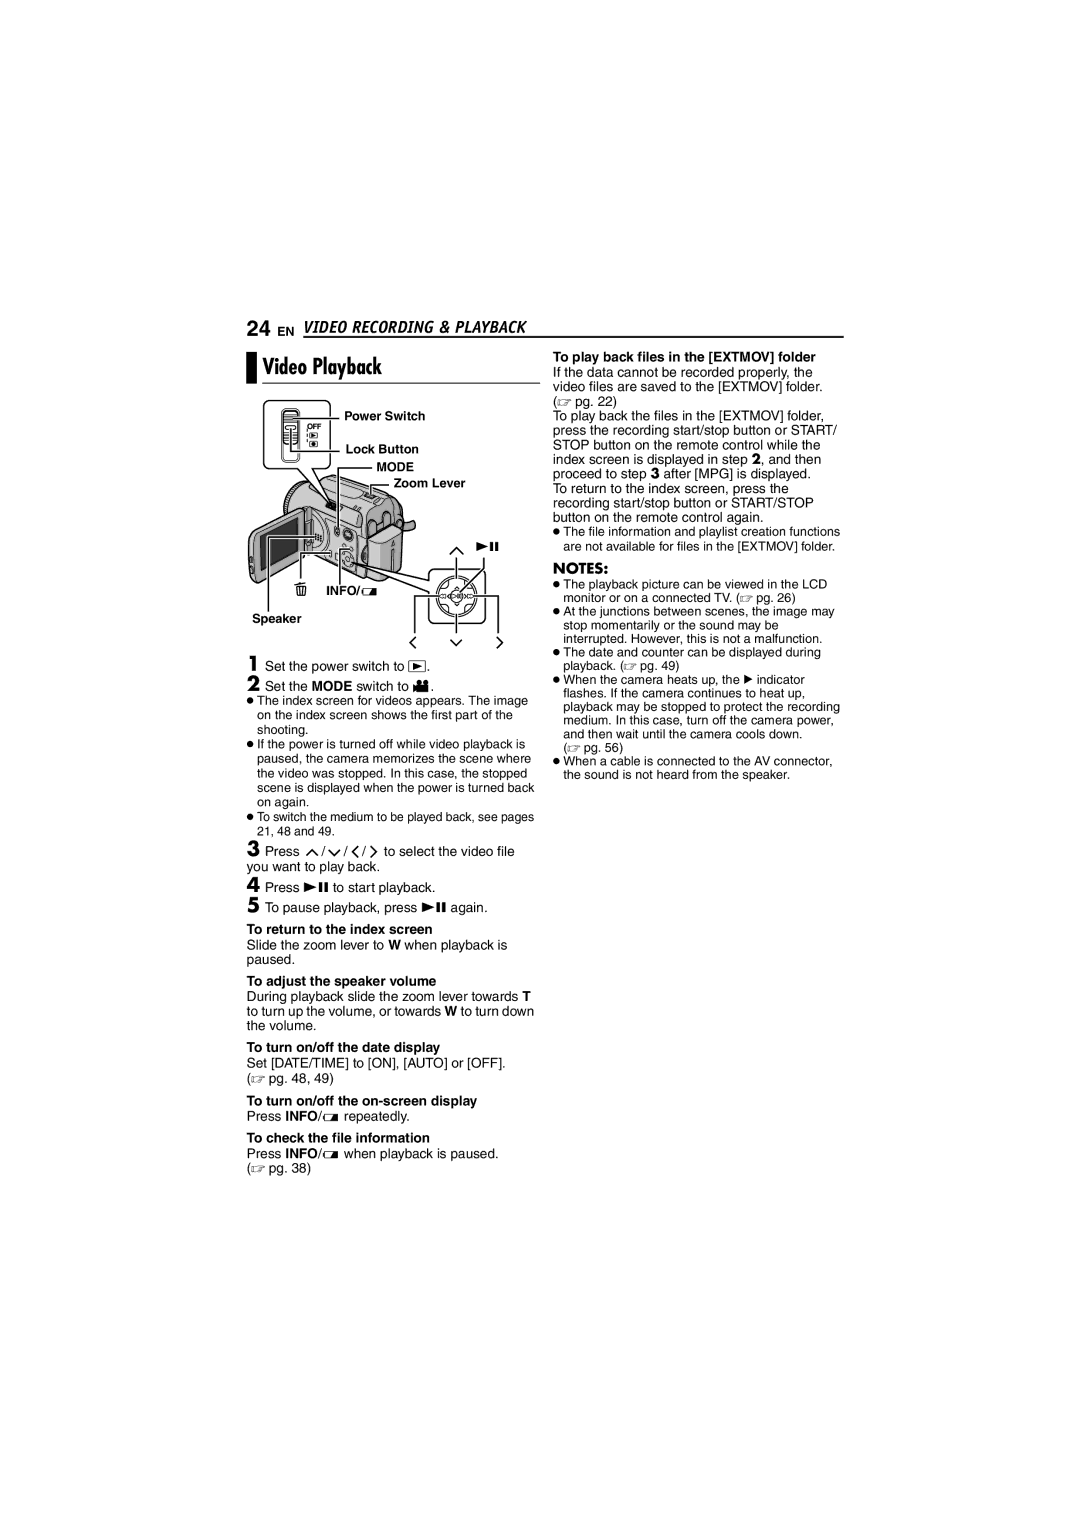
Power Switch

To play back the files in the [EXTMOV] folder,


press the recording start/stop button or START/

Lock Button

STOP button on the remote control while the

index screen is displayed in step 2, and then

MODE

proceed to step 3 after [MPG] is displayed.

Zoom Lever

To return to the index screen, press the


recording start/stop button or START/STOP


button on the remote control again.


The file information and playlist creation functions

49

are not available for files in the [EXTMOV] folder.

INFO/

Speaker

1 Set the power switch to . 2 Set the MODE switch to .

The index screen for videos appears. The image on the index screen shows the first part of the shooting.

If the power is turned off while video playback is paused, the camera memorizes the scene where the video was stopped. In this case, the stopped scene is displayed when the power is turned back on again.

To switch the medium to be played back, see pages 21, 48 and 49.

NOTES:

The playback picture can be viewed in the LCD monitor or on a connected TV. ( pg. 26)

At the junctions between scenes, the image may stop momentarily or the sound may be interrupted. However, this is not a malfunction.

The date and counter can be displayed during playback. ( pg. 49)

When the camera heats up, the U indicator flashes. If the camera continues to heat up, playback may be stopped to protect the recording medium. In this case, turn off the camera power, and then wait until the camera cools down.

( pg. 56)

When a cable is connected to the AV connector, the sound is not heard from the speaker.

3 Press / / / to select the video file you want to play back.

4

5

Press 49 to start playback.

To pause playback, press 49 again.

To return to the index screen

Slide the zoom lever to W when playback is paused.

To adjust the speaker volume

During playback slide the zoom lever towards T to turn up the volume, or towards W to turn down the volume.

To turn on/off the date display

Set [DATE/TIME] to [ON], [AUTO] or [OFF]. ( pg. 48, 49)

To turn on/off the on-screen display Press INFO/ repeatedly.

To check the file information

Press INFO/ when playback is paused. ( pg. 38)

Page 24
Image 24
JVC GZ-MG40EK, GZ-MG20EK, GZ-MG30E Video Playback, To play back files in the Extmov folder, To return to the index screen

GZ-MG50EK, GZ-MG20E, GZ-MG50E, GZ-MG30EK, GZ-MG30E specifications

The JVC GZ series of hard disk camcorders, including the GZ-MG40E, GZ-MG20EK, GZ-MG40EK, GZ-MG30E, and GZ-MG30EK, reflects a unique blend of innovative features and user-friendly design. These models are part of JVC’s efforts to provide high-definition video recording capabilities with the convenience of internal storage.

The GZ-MG40E offers a substantial 40GB hard disk drive, enabling users to capture up to 30 hours of video footage at lower quality settings. It features a 1/6-inch CCD sensor, which delivers decent image quality and effective low-light performance. The model is equipped with a 32x optical zoom, which empowers users to get closer to their subjects without sacrificing clarity.

Similarly, the GZ-MG20EK comes with a 20GB hard disk drive, ideal for casual users who need an efficient, lightweight option for recording everyday moments. It provides much of the same functionality as the GZ-MG40E but with reduced storage capacity, making it more affordable and accessible.

In contrast, the GZ-MG40EK model steps up with additional features, including enhanced audio quality and a broader range of video formats. It is especially suitable for those looking to capture high-quality footage for professional or semi-professional use.

Meanwhile, the GZ-MG30E and GZ-MG30EK models balance affordability with performance. Both feature a 30GB hard disk drive, allowing for ample recording time. They incorporate a 35x optical zoom and advanced image stabilization technology that helps minimize shake, ensuring users capture smooth, steady videos even during movement.

All models in this series support various shooting modes, making it easy for videographers of all skill levels to achieve the desired results. The user-friendly interface simplifies the navigation of settings, allowing users to focus on their creativity rather than technical complexities.

Moreover, these camcorders include playback options for easy viewing of recorded content. They are equipped with USB connectivity for straightforward transferring of videos to computers, facilitating editing and sharing. The battery life is optimized for extended use, ensuring that users can record significant footage without frequent interruptions.

In summary, the JVC GZ-MG series combines convenient storage solutions, versatile video capabilities, and user-friendly operation, making them excellent choices for anyone looking to document their life’s moments in style.