– Other Functions –
 SEPARATE AUDIO PROGRAM (SAP)
Your VCR is fitted with an SAP broadcast system which enables you to switch to a SEPARATE AUDIO PROGRAM when viewing a selected channel.
This function applies only when the program is broadcast in
When a TV is connected with an audio/video cable, turn the TV and this VCR on, and select the video input mode the TV.
| Press MENU on the Remote. |
|
| AUTOTIMERMENUREEATRECSET |
| ONOFF |
1 |
| |||||
|
| |||||
|
| |||||
|
| |||||
| Press SET |
|
| AP |
| |
|
|
|
| CHSETUP |
|
|
| option. | · | ONOFF | |||
2 | Press ENTER to select “ON” |
| ||||
|
| CHAUTOTIMERAPSETUPREEATRECSET |
| |||
| position. |
|
|
| ||
|
|
|
|
| ||
3 |
|
| ||||
|
|
|
| |||
|
|
|
| |||
|
|
|
| |||
|
|
|
| |||
|
| · |
| Ò |
| |
| Press MENU to return to |
|
|
|
|
|
| normal screen. |
|
|
|
|
|
 LISTENING TO SAP
When the VCR is turned on or a channel selection is made, make certain "SAP" appears on the screen for about 4 seconds.
This means that the "Separate Audio Program" broadcasting is available.
STEREO SAP | OR | SAP |
|
|
You can set the Daylight saving time automatically or manually.
DAYLIGHT SAVING TIME SETTINGAUTOTIMERAPMENUSETUPREEATRECSETONOFF
1 Press MENU. Press SET |
|
| CH |
|
| |||
|
|
|
|
|
|
| ||
|
|
|
|
|
| |||
|
|
|
|
|
| |||
|
|
|
|
|
| |||
|
|
|
|
|
| |||
|
|
|
|
|
| |||
|
|
|
|
|
| |||
| “SYSTEM SETUP” option, then press |
|
| SYSTEMSETUP |
|
| ||
| ENTER. |
|
|
| NONOISETUPBACKGROUND | |||
2 | Press SET |
|
| |||||
|
| |||||||
| MENU until the MENU screen is |
|
| |||||
| SAVING TIME” option, then press | |||||||
| cleared. |
|
|
| AUTOCLOCK | ONOFF | ||
| ENTER. |
|
|
| STANDARDTIME |
|
| |
|
|
|
|
|
|
| ||
|
|
|
|
|
|
| ||
|
|
|
|
|
|
| ||
|
|
|
|
|
|
| ||
|
|
|
|
|
|
| ||
|
|
|
|
|
|
| ||
|
|
|
|
|
|
| ||
| ON: | for manual setting | S |
|
|
| ||
3 | Press SET | YSTEMCLOCK |
|
| ||||
|
| (forward one hour) | · |
| ||||
| options, then press ENTER. Press |
|
| LANGUAGE/IDIOMA/LAGUE | ||||
| OFF: | for manual setting |
|
|
|
|
|
|
|
| (back one hour) |
|
|
|
|
|
|
| AUTO: for automatic setting |
|
|
|
|
|
| |
|
|
|
|
|
|
| ||
|
| (read XDS in the signal) |
|
|
|
|
|
|
When you want to set the Daylight Saving Time manually, on the first Sunday in April you set to “ON”, and on the last Sunday in October you set to “OFF”.
NOTES: • When shipped from factory, the DAYLIGHT SAVING TIME option is set to AUTO position.
•When the clock is not set, Daylight Saving Time setting is not available.
•When there is no Daylight Saving Time in your area, al- ways select OFF position in step 3.
JVC TV Remote Control
This Remote can control some functions (TV POWER, INPUT, TV CH
NOTE:
•It’s not possible to operate a unit not equipped with a remote sensor.
•This Remote can control a JVC TV only.
Editing
You can use your VCR as the playback or recording VCR. You can use a camcorder as the playback VCR and your VCR as the recording VCR. Refer also to the other components’ instruction manuals for connection and its operations.
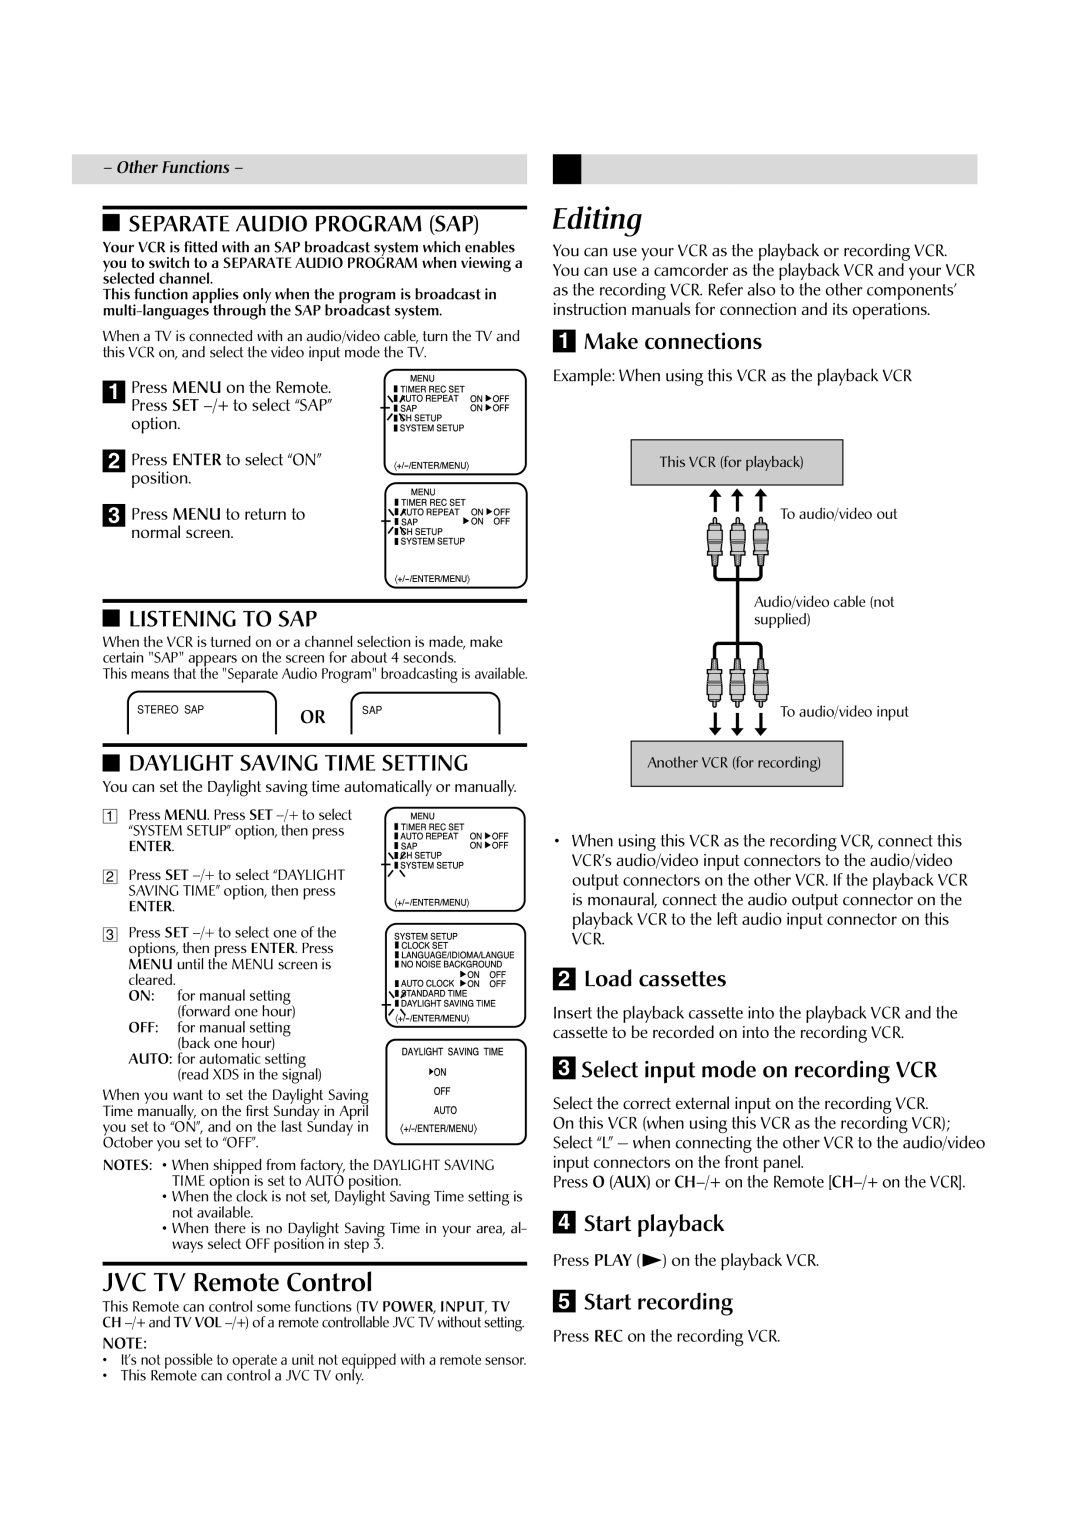
1Make connections
Example: When using this VCR as the playback VCR
This VCR (for playback)
To audio/video out
Audio/video cable (not supplied)
To audio/video input
Another VCR (for recording)
•When using this VCR as the recording VCR, connect this VCR’s audio/video input connectors to the audio/video output connectors on the other VCR. If the playback VCR is monaural, connect the audio output connector on the playback VCR to the left audio input connector on this VCR.
2Load cassettes
Insert the playback cassette into the playback VCR and the cassette to be recorded on into the recording VCR.
3Select input mode on recording VCR
Select the correct external input on the recording VCR. On this VCR (when using this VCR as the recording VCR); Select “L” — when connecting the other VCR to the audio/video input connectors on the front panel.
Press O (AUX) or
4Start playback
Press PLAY (![]() ) on the playback VCR.
) on the playback VCR.
5Start recording
Press REC on the recording VCR.