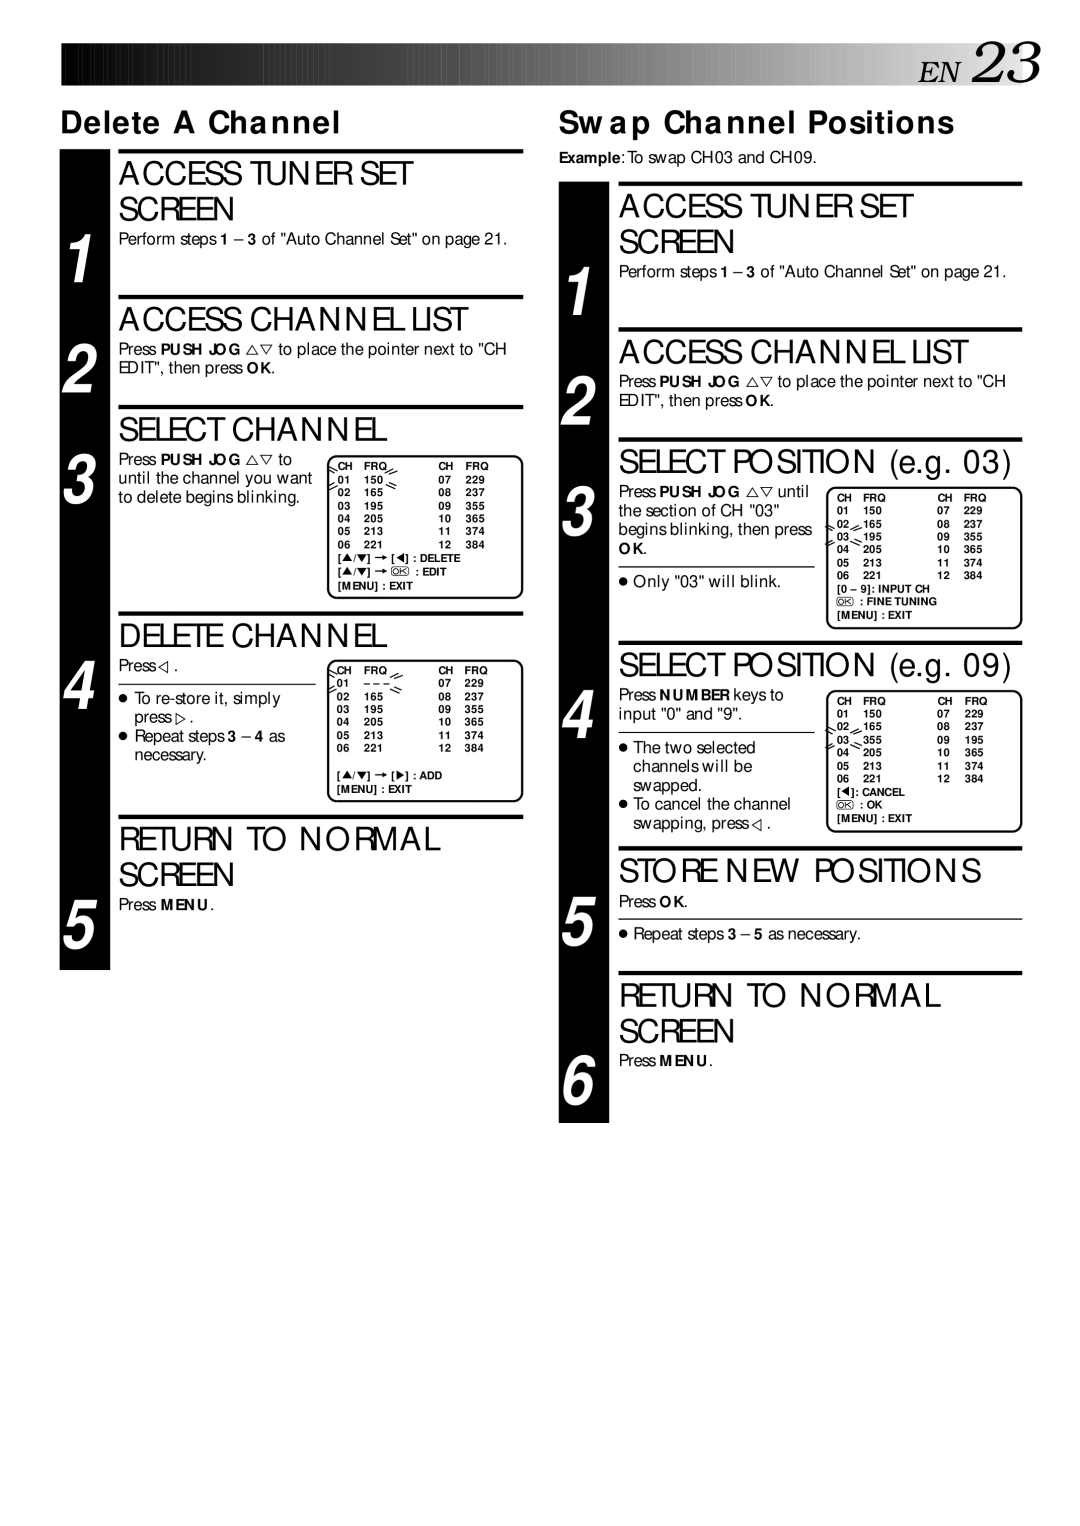
Delete A Channel
|
| ACCESS TUNER SET |
| |||
1 |
| SCREEN |
|
|
|
|
| Perform steps 1 – 3 of "Auto Channel Set" on page 21. | |||||
2 |
| ACCESS CHANNEL LIST | ||||
| Press PUSH JOG %Þ to place the pointer next to "CH | |||||
| EDIT", then press OK. |
|
|
|
| |
3 |
| SELECT CHANNEL |
|
| ||
| Press PUSH JOG %Þ to | CH | FRQ | CH | FRQ | |
| until the channel you want | 01 | 150 | 07 | 229 | |
| to delete begins blinking. | 02 | 165 | 08 | 237 | |
| 03 | 195 | 09 | 355 | ||
|
|
| 04 | 205 | 10 | 365 |
|
|
| 05 | 213 | 11 | 374 |
|
|
| 06 | 221 | 12 | 384 |
|
|
| [5/°] = [5 | ] : DELETE |
| |
|
|
| [5/°] = | : EDIT |
| |
|
|
| [MENU] : EXIT |
| ||
4 |
| DELETE CHANNEL |
|
| ||
| Press%. | CH | FRQ | CH | FRQ | |
|
| 01 | – – – | 07 | 229 | |
| ● To | 02 | 165 | 08 | 237 | |
| press%. | 03 | 195 | 09 | 355 | |
| 04 | 205 | 10 | 365 | ||
|
| ● Repeat steps 3 – 4 as | 05 | 213 | 11 | 374 |
|
| necessary. | 06 | 221 | 12 | 384 |
|
| [5/°] = [5] : ADD |
| |||
|
|
|
| |||
|
|
| [MENU] : EXIT |
| ||
|
| RETURN TO NORMAL |
| |||
5 |
| SCREEN |
|
|
|
|
| Press MENU. |
|
|
|
| |
![]()
![]()
![]()
![]()
![]()
![]()
![]()
![]()
![]()
![]()
![]()
![]()
![]()
![]()
![]()
![]()
![]()
![]()
![]()
![]()
![]()
![]()
![]()
![]()
![]()
![]()
![]()
![]()
![]()
![]()
![]()
![]()
![]()
![]()
![]()
![]()
![]()
![]()
![]()
![]()
![]()
![]()
![]()
![]()
![]()
![]()
![]() E
E![]() N
N![]()
![]() 23
23![]()
Swap Channel Positions
Example:To swap CH03 and CH09.
|
| ACCESS TUNER SET |
|
| ||
1 |
| SCREEN |
|
|
|
|
| Perform steps 1 – 3 of "Auto Channel Set" on page 21. | |||||
2 |
| ACCESS CHANNEL LIST | ||||
| Press PUSH JOG %Þto place the pointer next to "CH | |||||
EDIT", then press OK. |
|
|
|
| ||
3 |
| SELECT POSITION (e.g. 03) | ||||
| Press PUSH JOG %Þuntil | CH FRQ | CH FRQ | |||
the section of CH "03" | 01 | 150 | 07 | 229 | ||
begins blinking, then press | 02 | 165 | 08 | 237 | ||
03 | 195 | 09 | 355 | |||
OK. | 04 | 205 | 10 | 365 | ||
|
|
| 05 | 213 | 11 | 374 |
|
| ● Only "03" will blink. | 06 | 221 | 12 | 384 |
|
| [0 – 9]: INPUT CH |
|
| ||
|
|
|
| : FINE TUNING |
|
|
|
|
| [MENU] : EXIT |
|
| |
|
|
| ||||
4 |
| SELECT POSITION (e.g. 09) | ||||
| Press NUMBER keys to | CH FRQ | CH FRQ | |||
| input "0" and "9". | 01 | 150 | 07 | 229 | |
|
| 02 | 165 | 08 | 237 | |
| ● The two selected | 03 | 355 | 09 | 195 | |
| 04 | 205 | 10 | 365 | ||
|
| channels will be | 05 | 213 | 11 | 374 |
|
| swapped. | 06 | 221 | 12 | 384 |
|
| [5 | ]: CANCEL |
|
| |
|
| ● To cancel the channel |
| : OK |
|
|
|
| swapping, press%. | [MENU] : EXIT |
|
| |
|
|
| ||||
5 |
| STORE NEW POSITIONS | ||||
| Press OK. |
|
|
|
| |
|
|
|
|
|
| |
|
|
|
|
| ||
|
| ● Repeat steps 3 – 5 as necessary. |
|
| ||
|
|
|
|
| ||
|
| RETURN TO NORMAL |
|
| ||
6 |
| SCREEN |
|
|
|
|
| Press MENU. |
|
|
|
| |
|
|
|
|
|
|
|
