POWER | MENU | OK |
|
|
| 5/8 |
|
|
| – | + |
|
| 6 ª | £ |
|
| q |
|
|
| CH | PLAY |
|
|
|
POWER
1 2 3
4 | 5 | 6 |
7 | 8 | 9 |
| 0 | OK |
|
|
MENU
CH
LAY
|
| Example |
|
|
|
|
|
|
|
|
|
| Your VCR | ||||||||||||
|
|
|
|
|
|
|
|
|
|
|
|
|
|
|
|
|
|
|
|
|
|
|
|
|
|
|
|
|
|
|
|
|
|
|
|
|
|
|
|
|
|
|
|
|
|
|
|
|
|
|
|
|
|
|
|
|
|
|
|
|
|
|
|
|
|
|
|
|
|
|
|
|
|
|
|
|
|
|
|
|
|
|
|
|
|
|
|
|
|
|
|
|
|
|
|
|
|
|
|
|
|
|
|
|
|
|
|
|
|
|
|
|
|
|
|
|
|
|
|
|
|
|
|
|
|
|
|
|
|
|
|
|
|
|
|
|
|
|
|
|
|
|
|
|
|
|
|
|
|
|
|
|
|
|
|
|
|
|
|
|
|
|
|
|
|
|
|
|
|
|
|
|
|
|
|
|
|
|
|
|
|
|
|
|
|
|
|
|
|
|
|
|
|
|
|
|
|
|
|
|
|
|
|
|
|
|
|
|
|
|
|
|
|
|
|
|
|
|
|
|
|
|
|
|
|
|
|
|
|
|
|
|
|
|
|
|
|
|
|
|
|
|
|
|
|
|
|
|
|
|
|
|
|
|
|
|
|
|
|
|
|
|
|
|
|
|
|
|
|
|
|
|
|
|
|
|
|
|
|
|
|
|
|
|
|
|
|
|
|
|
|
|
|
|
|
|
|
|
|
|
|
|
|
|
|
|
|
|
|
|
|
|
|
|
|
|
|
|
|
|
|
|
|
|
|
|
|
|
|
|
|
|
|
|
|
|
|
|
|
|
|
|
|
|
|
|
|
|
|
|
|
|
|
|
|
|
|
|
|
|
|
|
|
|
|
|
|
|
|
|
|
|
|
|
|
|
|
|
|
|
|
|
|
|
|
|
|
|
|
|
|
|
|
|
|
|
|
|
|
|
|
|
|
|
|
|
|
|
|
|
|
|
|
|
|
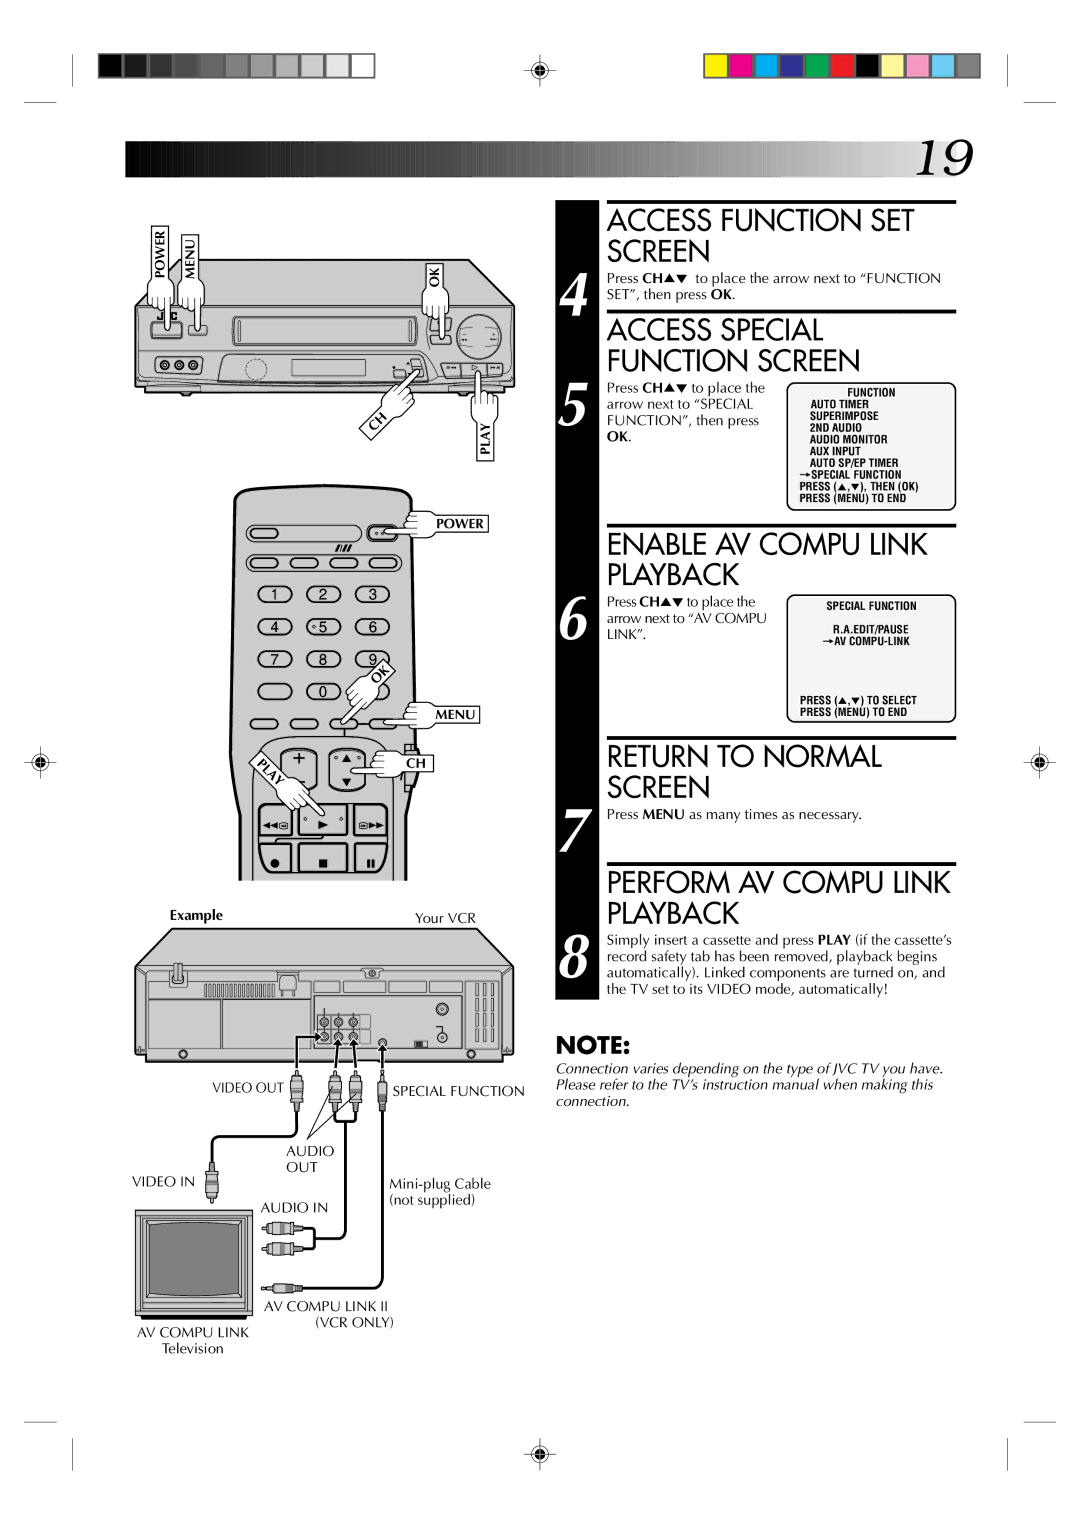
VIDEO OUT | SPECIAL FUNCTION |
AUDIO |
|
OUT |
|
VIDEO IN | |
AUDIO IN | (not supplied) |
|
![]()
![]()
![]()
![]()
![]()
![]()
![]()
![]()
![]()
![]()
![]()
![]()
![]()
![]()
![]()
![]()
![]()
![]()
![]()
![]()
![]()
![]()
![]()
![]()
![]()
![]()
![]()
![]()
![]()
![]()
![]()
![]()
![]()
![]()
![]()
![]()
![]()
![]()
![]()
![]()
![]()
![]()
![]() 19
19![]()
ACCESS FUNCTION SET
SCREEN
4 | Press CH5° to place the arrow next to “FUNCTION | ||
SET”, then press OK. |
| ||
| |||
ACCESS SPECIAL | |||
| FUNCTION SCREEN | ||
| Press CH5° to place the | FUNCTION | |
| arrow next to “SPECIAL | AUTO TIMER | |
5 FUNCTION”, then press | SUPERIMPOSE | ||
2ND AUDIO | |||
| OK. | AUDIO MONITOR | |
|
| AUX INPUT | |
|
| AUTO SP/EP TIMER | |
|
| =SPECIAL FUNCTION | |
|
| PRESS (5,°), THEN (OK) | |
|
| PRESS (MENU) TO END | |
|
| ||
| ENABLE AV COMPU LINK | ||
| PLAYBACK |
| |
| Press CH5°to place the | SPECIAL FUNCTION | |
| arrow next to “AV COMPU | R.A.EDIT/PAUSE | |
6 LINK”. | |||
=AV | |||
|
| PRESS (5,°) TO SELECT | |
|
| PRESS (MENU) TO END | |
|
| ||
| RETURN TO NORMAL | ||
| SCREEN |
| |
7 Press MENU as many times as necessary. | |||
| PERFORM AV COMPU LINK | ||
| PLAYBACK |
| |
| Simply insert a cassette and press PLAY (if the cassette’s | ||
| record safety tab has been removed, playback begins | ||
8 automatically). Linked components are turned on, and | |||
| the TV set to its VIDEO mode, automatically! | ||
NOTE:
Connection varies depending on the type of JVC TV you have. Please refer to the TV’s instruction manual when making this connection.
AV COMPU LINK
Television
AV COMPU LINK II (VCR ONLY)