40ENSUBSIDIARYSETTINGS(cont.)

–:–

1 2 3

2

4 5 6

NUMBER

7 8 9

0

4

1

ENU

3

OK

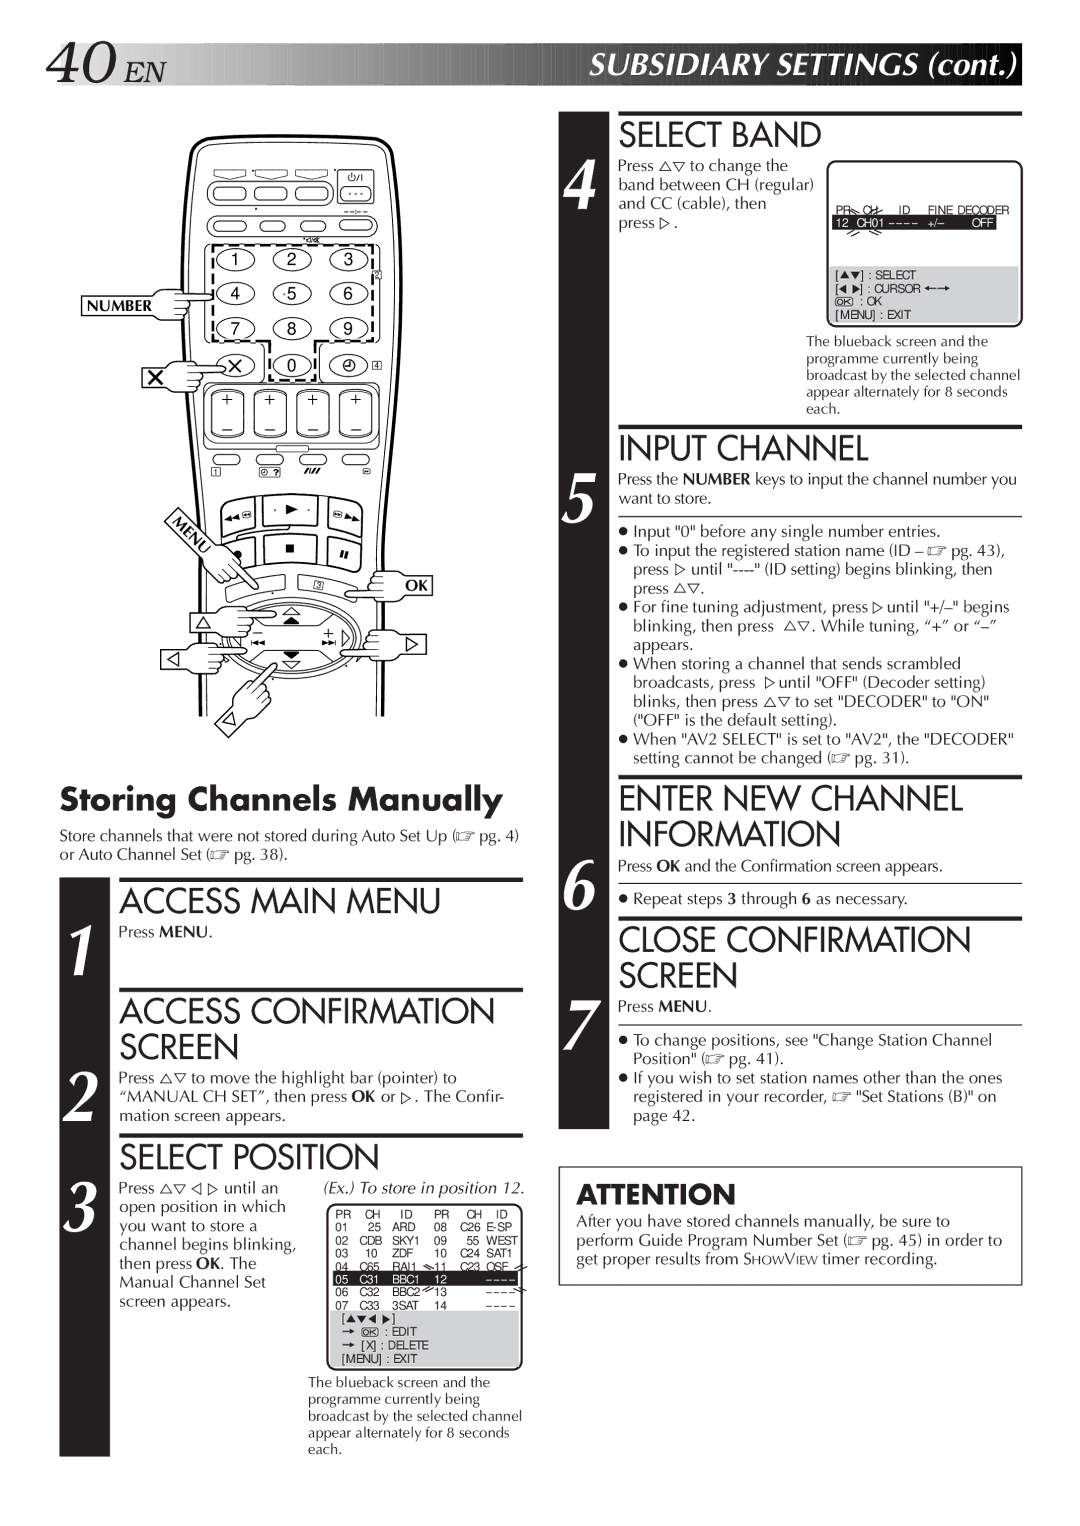
Storing Channels Manually

Store channels that were not stored during Auto Set Up (pg. 4) or Auto Channel Set (pg. 38).

1


ACCESS MAIN MENU


Press MENU.


ACCESS CONFIRMATION


2


SCREEN


Press to move the highlight bar (pointer) to


“MANUAL CH SET”, then press OK or%. The Confir-


mation screen appears.


3


SELECT POSITION


Press %Þ%%until an

(Ex.) To store in position 12.


open position in which


PR

CH

ID

PR

CH ID


you want to store a

02

CDB SKY1

09

55 WEST


01

25

ARD

08

C26 E-SP


channel begins blinking,

03

10

ZDF

10

C24 SAT1


then press OK. The


04

C65

RAI1

11

C23 OSF


Manual Channel Set


05

C31

BBC1

12

–Ê – –


06

C32

BBC2

13

–Ê – –


screen appears.


07

C33

3SAT

14

–Ê – –


[5°°°]


=


: EDIT


= [X] : DELETE


[MENU] : EXIT


The blueback screen and the


programme currently being


broadcast by the selected channel


appear alternately for 8 seconds


each.


SELECT BAND


Press to change the


band between CH (regular)


and CC (cable), then


PR

CH ID FINE DECODER

4 press%.


12

CH01 – –Ê – – +/– OFF


[] : SELECT


[°°] : CURSOR +=


: OK


[MENU] : EXIT


The blueback screen and the


programme currently being


broadcast by the selected channel


appear alternately for 8 seconds


each.


INPUT CHANNEL

Press the NUMBER keys to input the channel number you

5

want to store.


Input "0" before any single number entries.

To input the registered station name (ID – pg. 43),

press %until "----" (ID setting) begins blinking, then

press .

For fine tuning adjustment, press %until "+/–" begins blinking, then press . While tuning, “+” or “–” appears.

When storing a channel that sends scrambled

broadcasts, press %until "OFF" (Decoder setting) blinks, then press to set "DECODER" to "ON" ("OFF" is the default setting).

When "AV2 SELECT" is set to "AV2", the "DECODER" setting cannot be changed (pg. 31).

ENTER NEW CHANNEL

INFORMATION

6 Press OK and the Confirmation screen appears.

Repeat steps 3 through 6 as necessary.

CLOSE CONFIRMATION SCREEN

7 Press MENU.

To change positions, see "Change Station Channel Position" (pg. 41).

If you wish to set station names other than the ones registered in your recorder, "Set Stations (B)" on page 42.

ATTENTION

After you have stored channels manually, be sure to perform Guide Program Number Set (pg. 45) in order to get proper results from SHOWVIEW timer recording.

Page 40
Image 40
JVC HR-J700E, HR-J658EH specifications Enter NEW Channel Information, Storing Channels Manually

HR-J658EH, HR-J658E, HR-J700E specifications

The JVC HR-J700E, HR-J658E, and HR-J658EH are notable models in JVC's range of VHS VCRs that emerged during the height of VHS technology. Each of these models comes with impressive features and characteristics, catering to varied user needs and preferences.

The JVC HR-J700E is renowned for its advanced capabilities, including a 4-head system that enhances video playback quality. This model supports SP, LP, and SLP recording modes, allowing for flexible tape management. Notable features include an Auto Tracking function that ensures optimal tape alignment, reducing distortion during playback. The HR-J700E also integrates a digital noise reduction system, improving picture quality by minimizing unwanted artifacts. The video output is complemented by a set of audio outputs, including stereo, ensuring a richer sound experience.

The HR-J658E model offers a blend of performance and user-friendliness. This device shares many of the features of the HR-J700E, including the 4-head system and multi-speed recording capabilities. It features a simpler user interface, making it suitable for users who prefer straightforward operation without sacrificing quality. Additionally, the tape counter and clock features on this device make it easier to track recordings, while its external connections allow for easy integration with modern televisions and audio systems.

Meanwhile, the HR-J658EH is an enhanced version of the HR-J658E, which comes with more advanced functionalities. This model maintains the core features of its predecessor while introducing features like a built-in tuner. This allows for direct reception of television signals, making it convenient for recording live broadcasts without additional hardware. The HR-J658EH continues to focus on user experience with its programmable timer settings, enabling users to schedule recordings ahead of time, a crucial aspect for those who wish to record their favorite shows while away.

All three models boast robust build quality, with a design that reflects the era's style while ensuring longevity. They also incorporate JVC's commitment to quality, characterizing each unit with minimal tape wear, thanks to their well-engineered mechanisms. While VHS technology has largely been replaced by digital formats, the HR-J700E, HR-J658E, and HR-J658EH remain relevant for collectors, antique enthusiasts, and users who appreciate the analog format's warmth. With their features and user-oriented designs, these VCRs continue to hold a nostalgic pull for many users worldwide.