Editing

You can use your VCR as the playback or recording VCR. You can use a camcorder as the playback VCR and your VCR as the recording VCR. Refer also to the other components’ instruction manuals for connection and its operations.

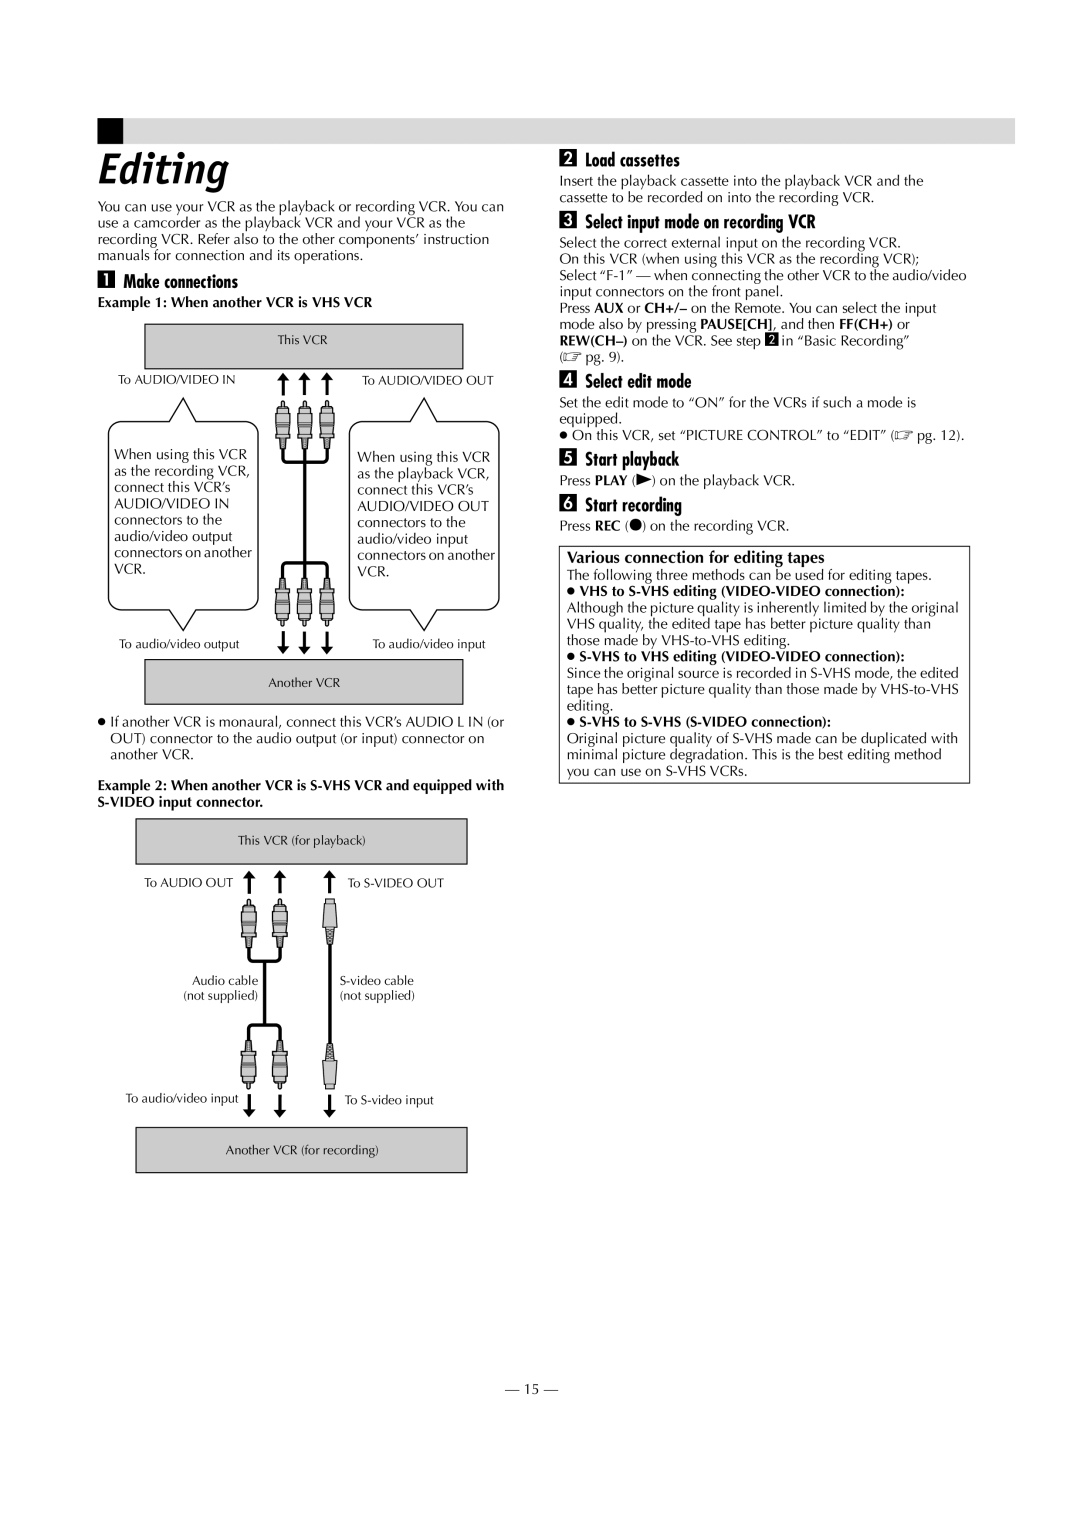
AMake connections

Example 1: When another VCR is VHS VCR

This VCR

To AUDIO/VIDEO IN


To AUDIO/VIDEO OUT


BLoad cassettes

Insert the playback cassette into the playback VCR and the cassette to be recorded on into the recording VCR.

CSelect input mode on recording VCR

Select the correct external input on the recording VCR. On this VCR (when using this VCR as the recording VCR);

Select “F-1” — when connecting the other VCR to the audio/video input connectors on the front panel.

Press AUX or CH+/– on the Remote. You can select the input mode also by pressing PAUSE[CH], and then FF(CH+) or REW(CH–)on the VCR. See step 2in “Basic Recording” ( pg. 9).

DSelect edit mode

Set the edit mode to “ON” for the VCRs if such a mode is equipped.

On this VCR, set “PICTURE CONTROL” to “EDIT” ( pg. 12).

When using this VCR as the recording VCR, connect this VCR’s

AUDIO/VIDEO IN connectors to the audio/video output connectors on another VCR.

To audio/video output

When using this VCR as the playback VCR, connect this VCR’s

AUDIO/VIDEO OUT connectors to the audio/video input connectors on another VCR.

To audio/video input

EStart playback

Press PLAY (4) on the playback VCR.

FStart recording

Press REC (7) on the recording VCR.

Various connection for editing tapes

The following three methods can be used for editing tapes.

VHS to S-VHS editing (VIDEO-VIDEO connection): Although the picture quality is inherently limited by the original VHS quality, the edited tape has better picture quality than those made by VHS-to-VHS editing.

S-VHS to VHS editing (VIDEO-VIDEO connection):

Another VCR

If another VCR is monaural, connect this VCR’s AUDIO L IN (or OUT) connector to the audio output (or input) connector on another VCR.

Example 2: When another VCR is S-VHS VCR and equipped with S-VIDEO input connector.


This VCR (for playback)


To AUDIO OUT


To S-VIDEO OUT


Audio cable

S-video cable

(not supplied)

(not supplied)


To audio/video input

To S-video input

Another VCR (for recording)

Since the original source is recorded in S-VHS mode, the edited tape has better picture quality than those made by VHS-to-VHS editing.

S-VHS to S-VHS (S-VIDEO connection):

Original picture quality of S-VHS made can be duplicated with minimal picture degradation. This is the best editing method you can use on S-VHS VCRs.

— 15 —

Page 15
Image 15
JVC HR-S8009UM manual Editing, Make connections, Load cassettes, Select input mode on recording VCR, Select edit mode

HR-S8009UM specifications

The JVC HR-S8009UM is a notable addition to the realm of S-VHS VCRs, offering a blend of advanced technology and user-friendly features. This device perfectly encapsulates the transition from analog to digital, catering to enthusiasts who appreciate the clarity and quality of S-VHS while delivering an array of functionalities that enhance the overall viewing experience.

One of the standout features of the HR-S8009UM is its S-VHS playback capability, which allows for significantly improved video quality compared to standard VHS. This results in sharper images and a higher fidelity in color, making it an excellent choice for anyone looking to preserve videotape collections in superior quality. Additionally, the VCR is compatible with standard VHS tapes, ensuring versatility for users with a variety of tape formats.

The HR-S8009UM incorporates JVC's proprietary DigiPure technology, which enhances video playback by reducing noise and improving color accuracy. This feature is particularly important for avid collectors and archivists who wish to maintain the original quality of their recordings over time. With a focus on reliability, the VCR is designed to handle tapes with care, minimizing wear and tear on both the tape and the machine.

Another significant characteristic of the HR-S8009UM is its time base corrector, which helps to stabilize the image during playback, eliminating jitter and providing a smoother viewing experience. This technology is especially useful for older tapes that may have degraded over time, ensuring that the end product is as close to the original recording as possible.

User convenience is also prioritized with features such as on-screen programming and a user-friendly remote control. The VCR allows for easy scheduling of recordings, making it simple to capture favorite shows and events without the hassle of manual setup each time. The built-in teletext function gives users access to additional information during playback, enhancing the overall viewing experience.

Incorporating composite and S-Video outputs, the JVC HR-S8009UM offers connection versatility, which results in easy integration with modern displays while maintaining high-quality output. This makes it a suitable choice for both vintage connoisseurs and those looking to utilize legacy media in current setups.

In summary, the JVC HR-S8009UM stands out as a top-tier S-VHS VCR, blending advanced video technologies with practical features that continue to appeal to users seeking quality recordings from their VHS collections. Its commitment to preserving video integrity while enhancing playback functionality cements its place among the best options in the market for VCR enthusiasts.