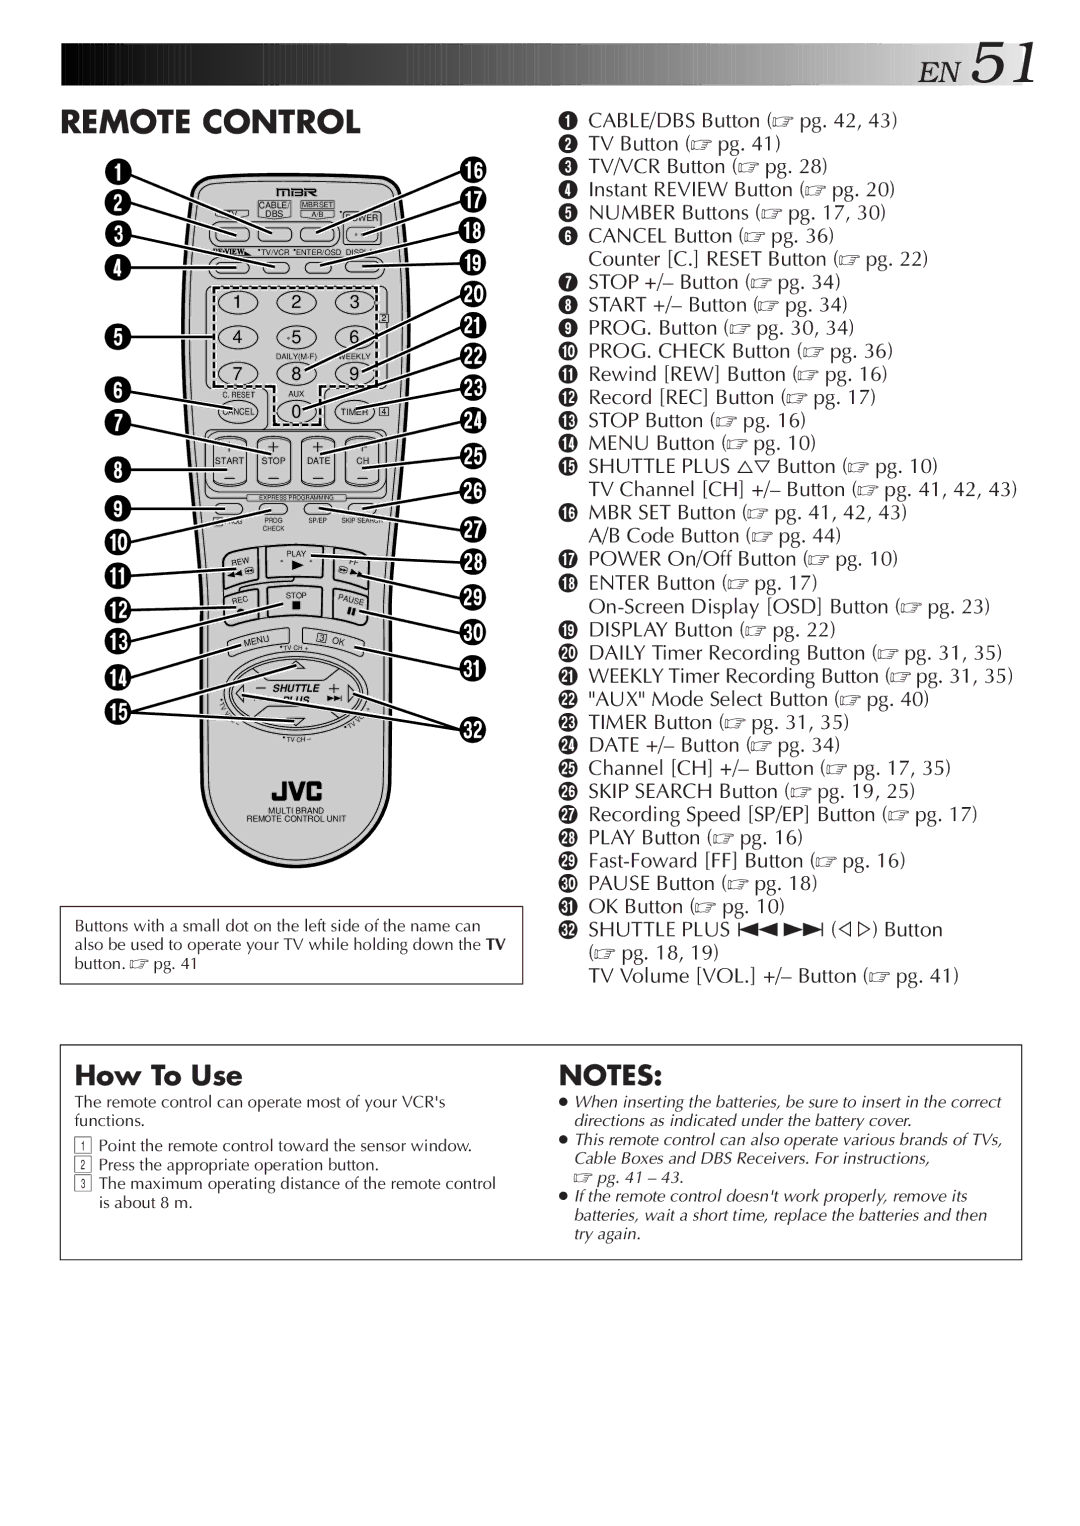
Buttons with a small dot on the left side of the name can also be used to operate your TV while holding down the TV button. pg. 41
MULTI BRAND
REMOTE CONTROL UNIT

EN51

REMOTE CONTROL

1

2CABLE/ MBR SET

TV DBS A/B POWER

3

1 CABLE/DBS Button (pg. 42, 43)

2 TV Button (pg. 41)

^3 TV/VCR Button (pg. 28)

&4 Instant REVIEW Button (pg. 20)

5 NUMBER Buttons (pg. 17, 30) * 6 CANCEL Button (pg. 36)

4

TV/VCR ENTER/OSD DISPLAY

(

Counter [C.] RESET Button (pg. 22)

)

7 STOP +/– Button (pg. 34)

1 2 3

2

5 4 5 6


DAILY(M-F)

WEEKLY

6

7


8


9


C. RESET


AUX


7

CANCEL


0


TIMER 4


8

START

STOP


DATE

CH

9


EXPRESS PROGRAMMING


1 PROG

PROG


SP/EP

SKIP SEARCH

0


CHECK


REW


PLAY


FF


!


STOP


PAUSE


@

REC


#

MENU


H


3

OK


TV C

+


$


SHUTTLE


%

V


PLUS

T


T


+


V


L


O


O


L


V


V


TV CH


8 START +/– Button (pg. 34)

q9 PROG. Button (pg. 30, 34)

w0 PROG. CHECK Button (pg. 36)

!Rewind [REW] Button (pg. 16) e @ Record [REC] Button (pg. 17)

r

# STOP Button (pg. 16)

t

$ MENU Button (pg. 10)

% SHUTTLE PLUS Button (pg. 10)

y

TV Channel [CH] +/– Button (pg. 41, 42, 43)

u

^ MBR SET Button (pg. 41, 42, 43)

A/B Code Button (pg. 44)

i

& POWER On/Off Button (pg. 10)

o

* ENTER Button (pg. 17)

On-Screen Display [OSD] Button (pg. 23)

p

( DISPLAY Button (pg. 22)

Q

) DAILY Timer Recording Button (pg. 31, 35)


q WEEKLY Timer Recording Button ( pg. 31, 35)


w "AUX" Mode Select Button (pg. 40)

We TIMER Button (pg. 31, 35) r DATE +/– Button (pg. 34)

t Channel [CH] +/– Button (pg. 17, 35) y SKIP SEARCH Button (pg. 19, 25)

u Recording Speed [SP/EP] Button (pg. 17) i PLAY Button (pg. 16)

oFast-Foward [FF] Button (pg. 16) p PAUSE Button (pg. 18)

Q OK Button (pg. 10)

W SHUTTLE PLUS ª£ (Þ%) Button (pg. 18, 19)

TV Volume [VOL.] +/– Button (pg. 41)

How To Use

NOTES:

The remote control can operate most of your VCR's

When inserting the batteries, be sure to insert in the correct

functions.

directions as indicated under the battery cover.

1 Point the remote control toward the sensor window.

This remote control can also operate various brands of TVs,

Cable Boxes and DBS Receivers. For instructions,

2 Press the appropriate operation button.

pg. 41 – 43.

3 The maximum operating distance of the remote control

If the remote control doesn't work properly, remove its

is about 8 m.

batteries, wait a short time, replace the batteries and then


try again.


Page 51
Image 51
JVC HR-VP450U Remote control can operate most of your VCRs, Functions, Point the remote control toward the sensor window

HR-VP650U, HR-VP450U specifications

The JVC HR-VP650U and HR-VP450U are two highly regarded VCR models that made their mark in the home entertainment landscape during the height of VHS technology. These models are notable for their unique features that catered to the needs of video enthusiasts and casual viewers alike.

The HR-VP650U, as the flagship model, provides a robust array of functionalities designed to enhance video playback and recording experiences. One of its standout features is the Super Color feature, which allows for vibrant and true-to-life color reproduction, enhancing the viewing experience for home movies, television shows, and other recorded content. In addition, the HR-VP650U comes equipped with a high-speed tape transport mechanism that ensures fast and reliable playback, minimizing the chances of tracking errors and maintaining steady picture quality.

Equally impressive is the HR-VP450U, which, while slightly lower in the lineup, incorporates many attributes that make it a worthy competitor. This model includes various playback formats and utilizes JVC's proprietary technology to maintain signal integrity, ensuring highly stable and reliable video playback. The HR-VP450U also features an advanced noise reduction system, optimizing audio and visual output for a more enjoyable viewing experience.

Both models are integrated with features aimed at improving user convenience. For example, they offer easy programming capabilities, enabling users to set up timed recordings with minimal effort. The on-screen programming guide is straightforward, allowing users to navigate and schedule their favorite shows effortlessly.

Moreover, both devices are designed with a variety of connectivity options, ensuring compatibility with different audio-video setups. They come with standard RCA outputs, as well as S-Video and audio inputs, facilitating seamless integration into existing home entertainment systems.

Another notable characteristic is their durability and build quality. The JVC HR-VP650U and HR-VP450U are crafted with robust materials designed to withstand regular use while providing a reliable performance.

Collectively, the JVC HR-VP650U and HR-VP450U represent a blend of ease of use and advanced technology. Their features, such as advanced video processing, improved color reproduction, and multi-format compatibility, solidify their place in the history of home video equipment, catering to both casual viewers and avid film enthusiasts. Even in the age of digital streaming, these VCRs remain a testament to JVC's enduring legacy in the home entertainment arena.