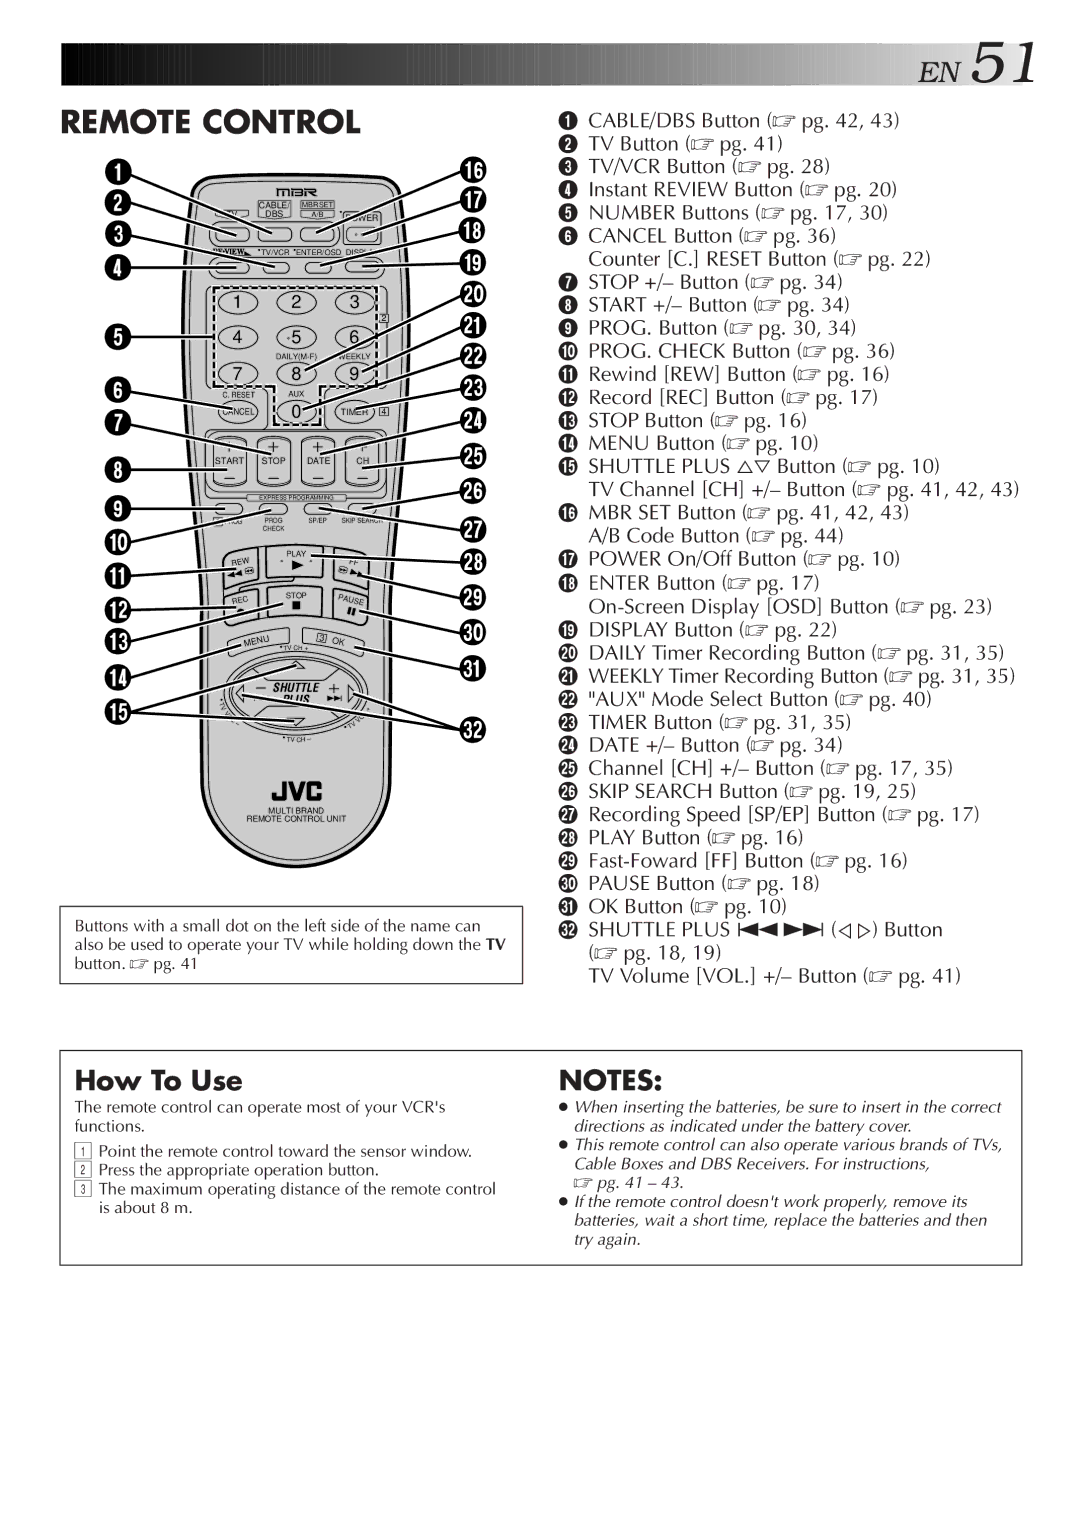
Buttons with a small dot on the left side of the name can also be used to operate your TV while holding down the TV button. pg. 41
MULTI BRAND
REMOTE CONTROL UNIT

EN51

REMOTE CONTROL

1

2CABLE/ MBR SET

TV DBS A/B POWER

3

1 CABLE/DBS Button (pg. 42, 43)

2 TV Button (pg. 41)

^3 TV/VCR Button (pg. 28)

&4 Instant REVIEW Button (pg. 20)

5 NUMBER Buttons (pg. 17, 30) * 6 CANCEL Button (pg. 36)

4

TV/VCR ENTER/OSD DISPLAY

(

Counter [C.] RESET Button (pg. 22)

)

7 STOP +/– Button (pg. 34)

1 2 3

2

5 4 5 6


DAILY(M-F)

WEEKLY

6

7


8


9


C. RESET


AUX


7

CANCEL


0


TIMER 4


8

START

STOP


DATE

CH

9


EXPRESS PROGRAMMING


1 PROG

PROG


SP/EP

SKIP SEARCH

0


CHECK


REW


PLAY


FF


!


STOP


PAUSE


@

REC


#

MENU


H


3

OK


TV C

+


$


SHUTTLE


%

V


PLUS

T


T


+


V


L


O


O


L


V


V


TV CH


8 START +/– Button (pg. 34)

q9 PROG. Button (pg. 30, 34)

w0 PROG. CHECK Button (pg. 36)

!Rewind [REW] Button (pg. 16) e @ Record [REC] Button (pg. 17)

r

# STOP Button (pg. 16)

t

$ MENU Button (pg. 10)

% SHUTTLE PLUS Button (pg. 10)

y

TV Channel [CH] +/– Button (pg. 41, 42, 43)

u

^ MBR SET Button (pg. 41, 42, 43)

A/B Code Button (pg. 44)

i

& POWER On/Off Button (pg. 10)

o

* ENTER Button (pg. 17)

On-Screen Display [OSD] Button (pg. 23)

p

( DISPLAY Button (pg. 22)

Q

) DAILY Timer Recording Button (pg. 31, 35)

q WEEKLY Timer Recording Button (pg. 31, 35)


w "AUX" Mode Select Button (pg. 40)

We TIMER Button (pg. 31, 35) r DATE +/– Button (pg. 34)

t Channel [CH] +/– Button (pg. 17, 35) y SKIP SEARCH Button (pg. 19, 25)

u Recording Speed [SP/EP] Button (pg. 17) i PLAY Button (pg. 16)

oFast-Foward [FF] Button (pg. 16) p PAUSE Button (pg. 18)

Q OK Button (pg. 10)

W SHUTTLE PLUS ª£ (Þ%) Button (pg. 18, 19)

TV Volume [VOL.] +/– Button (pg. 41)

How To Use

NOTES:

The remote control can operate most of your VCR's

When inserting the batteries, be sure to insert in the correct

functions.

directions as indicated under the battery cover.

1 Point the remote control toward the sensor window.

This remote control can also operate various brands of TVs,

Cable Boxes and DBS Receivers. For instructions,

2 Press the appropriate operation button.

pg. 41 – 43.

3 The maximum operating distance of the remote control

If the remote control doesn't work properly, remove its

is about 8 m.

batteries, wait a short time, replace the batteries and then


try again.


Page 51
Image 51
JVC HR-VP453U Remote control can operate most of your VCRs, Functions, Point the remote control toward the sensor window

HR-VP453U, HR-VP653U specifications

The JVC HR-VP453U and HR-VP653U are notable VCRs that cater to both convenience and quality in the realm of video playback. As part of JVC's enduring legacy in audio-visual technology, these models combine reliable performance with innovative features.

One of the standout characteristics of the HR-VP453U and HR-VP653U is their capability to provide high-quality video playback. Both models utilize JVC's innovative Super VHS technology, which enhances the clarity and sharpness of recorded images, making them ideal for users who appreciate vibrant visuals. This technology allows for superior image quality, especially when playing back older tapes, making the transition from standard VHS to Super VHS seamless.

In terms of convenience, both VCRs are equipped with a range of user-friendly features. The Auto Set/Programmable Feature provides an easy way to schedule recordings, ensuring users never miss their favorite shows. The built-in digital tuner allows users to access a variety of channels without the need for an external cable box, adding to the all-in-one functionality of these devices.

Another key feature is the composite video output, which ensures that video signals are transmitted with minimal interference. This is especially important for those who connect their VCRs to external devices such as televisions or projectors, as it maximizes the quality of the viewing experience. Additionally, both models include a wide range of playback options, allowing users to watch their favorite VHS tapes with ease.

The HR-VP653U, in particular, includes more advanced features such as an on-screen display, which makes navigating through menus simpler. It also offers enhanced audio features, ensuring that sound quality matches the high standards set by the video performance.

Both models are designed with durability in mind. Constructed with robust materials, they are built to last, making them a great investment for anyone who cherishes their videotape collection. With a sleek design that complements modern home entertainment systems, the JVC HR-VP453U and HR-VP653U stand out as solid choices for preserving and enjoying videotapes. In an era where digital playback dominates, these VCRs serve as a nostalgic reminder of the classic formats still cherished by many.