JVC HR-VP70U manual Basic Connections

Models: HR-VP70U

1 64
Download 64 pages 45.53 Kb
Page 6
Image 6

6ENINSTALLINGYOURNEWVCR

Basic Connections

Antenna or Cable

ANT. IN


(Antenna or Cable input)


Coaxial Cable


Flat Feeder

AC Power

Matching Transformer

Cord

(not supplied)


Back of VCR


AC


Audio Cable


Outlet


(not supplied)

RF OUT


Video Cable


(not supplied)


RF Cable


(supplied)

1

2

3

CHECK CONTENTS

Make sure the package contains all of the accessories listed in “SPECIFICATIONS” (pg. 60).

SITUATE VCR

Place the VCR on a stable, horizontal surface.

CONNECT VCR TO TV

The connection method you use depends on the type of TV you have.

RF Connection

To Connect To A TV With NO AV Input Terminals . . .

a– Disconnect the TV antenna from the TV.

b– Connect the TV antenna cable to the ANT. IN jack on the rear of the VCR.

c– Connect the supplied RF cable between the RF OUT jack on the rear of the VCR and the TV’s antenna terminal. Set TV on CH3 or CH4 corre- sponding to the CH3 – CH4 switch setting on the back of the VCR.

AV Connection

To Connect To A TV With AV Input Terminals . . .

a– Connect the antenna, VCR and TV as shown in the illustration.

b– Connect an Audio/Video Cable between the AUDIO OUT and VIDEO OUT jacks on the rear of the VCR and the AV IN jacks on the TV. Set your TV in video input mode or A/V input mode. Refer to the TV Instruction Manual.

TV

75 ohm terminal

Back of VCR

4

CONNECT VCR TO

POWER SOURCE

Connect the power plug to an AC outlet.

The clock and tuner channels will automatically be

set when the antenna is connected and when the AC

is first connected to the VCR (pg. 7).

CH3 CH4

NOTES:

The VCR channel is the channel on the TV which will display the audio and video signals from the VCR. The VCR's CH3- CH4 switch, on the back of the VCR, sets the VCR channel to CH3 or CH4.

The CH3–CH4 switch is preset to the CH3 position.

Set to CH4 if CH3 is used for broadcasting in your area and set the channel on the TV to correspond to the VCR's CH3– CH4 switch setting.

If RF connection to TV is used, when switching from VCR to TV mode and from TV to VCR it may be necessary to issue a CH UP and then CH DOWN on TV to obtain a good quality picture.

Even if you are using AV cables to connect your VCR to your TV, you must also connect it using the RF cable. This will ensure that you can record one show while watching another (pg. 36).

For full identification of the VCR's rear panel, refer to the Index (REAR VIEW pg. 58).

5

(If "Auto" or "CH" is displayed on the front display

panel before the VCR is powered on, the clock and

tuner channels are being set automatically. Wait for

the time to be displayed on the front display panel

before powering on the VCR.)

FINAL PREPARATION FOR USE

Power on the VCR and select the VCR channel (3 or 4) by setting the switch on the rear of the VCR as shown in the illustration.

You can now perform simple playback (pg. 23) or simple recording (pg. 24).

Page 6
Image 6
JVC HR-VP70U manual Basic Connections

HR-VP70U specifications

The JVC HR-VP70U is a versatile VHS VCR that was designed to meet the demands of consumers seeking both reliability and quality in video playback and recording. This model stands out due to its array of features and advanced technologies that offer a well-rounded video experience.

One of the most notable features of the HR-VP70U is its Super VHS playback capability, which allows for enhanced picture quality. Super VHS tapes can deliver a sharper and more detailed image compared to standard VHS tapes, making this model an excellent choice for users who value visual detail. The VCR also includes a built-in S-Video output, which contributes to improved video quality when connected to compatible displays.

The HR-VP70U incorporates JVC's renowned Digital Tracking technology. This technology automatically adjusts the tracking of the tape during playback to ensure that the picture remains stable and clear. This feature is particularly beneficial for older tapes which may have degraded over time, providing users with a more enjoyable viewing experience.

This model also comes equipped with a Time Base Corrector (TBC), which helps eliminate fluctuations in video playback. TBC technology is especially useful for restoring older recordings, ensuring smooth and clear footage. Additionally, the VCR includes a built-in video stabilizer that minimizes jitter and enhances overall playback smoothness.

The recording features of the HR-VP70U are particularly comprehensive. Users can take advantage of the One-Touch Recording function, which simplifies the recording process significantly. This feature allows users to start recording with just a single press of a button, making it easy to capture live broadcasts without hassle.

Another standout characteristic is the multi-language on-screen display, allowing users to navigate through settings and options in their preferred language. The user-friendly design is complemented by an intuitive remote control, which provides easy access to all functions and settings.

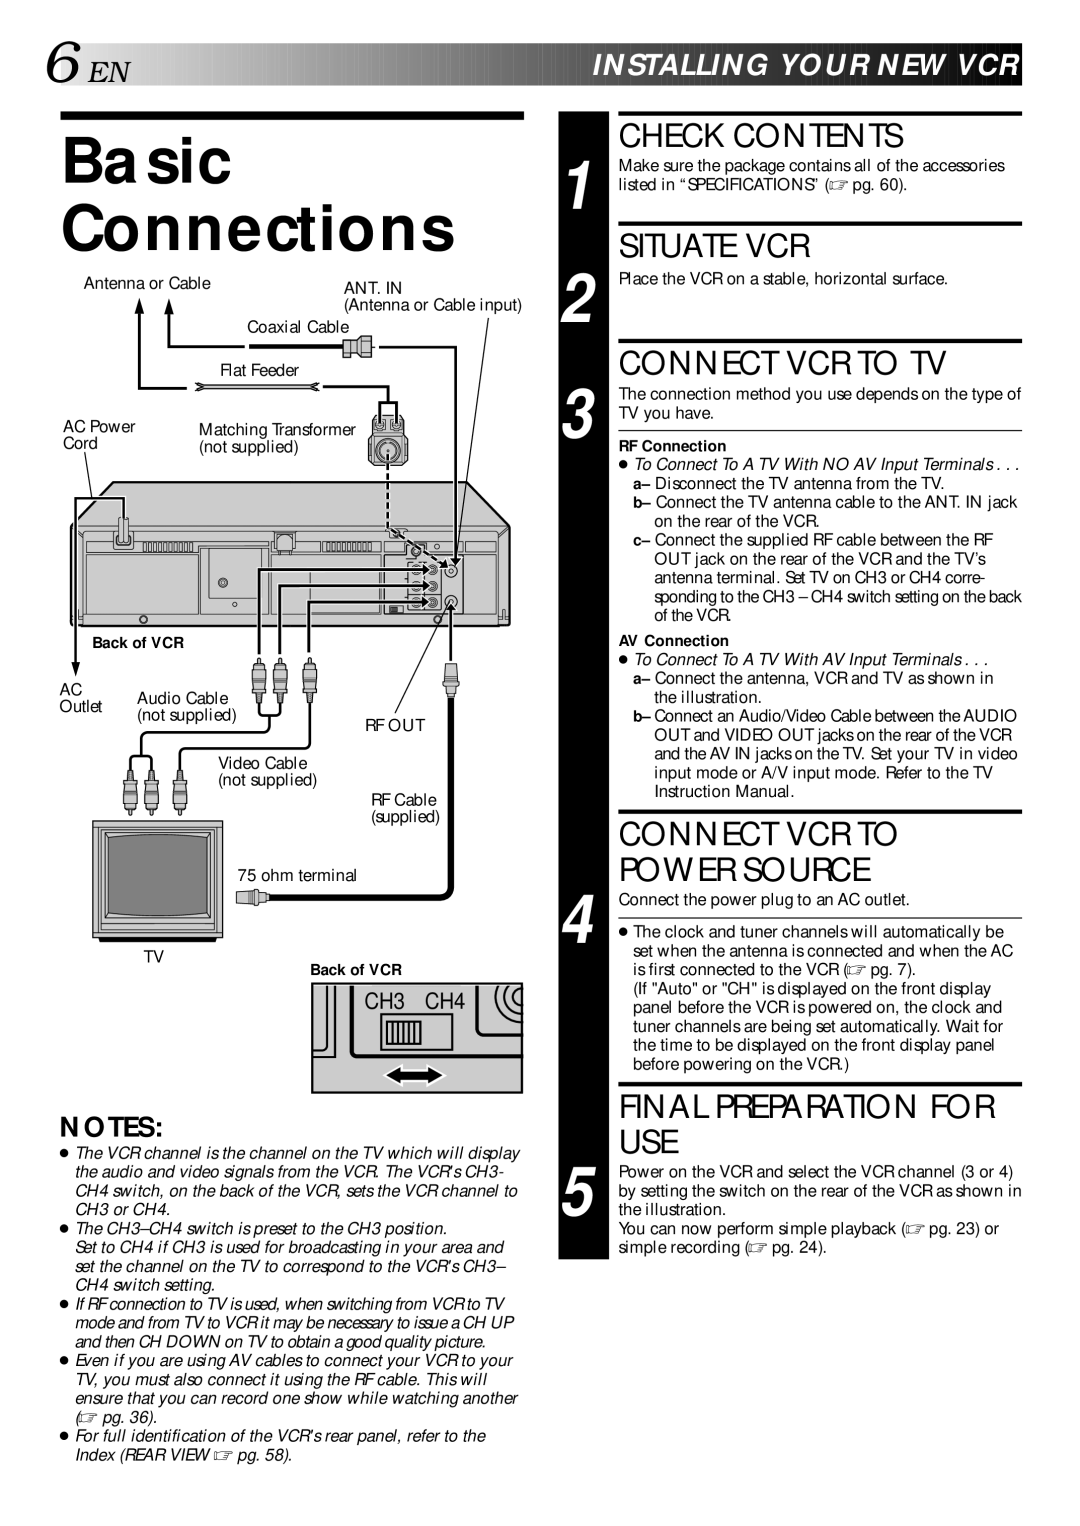
In terms of connectivity, the JVC HR-VP70U offers multiple input and output options, including composite video, stereo audio, and RF outputs. This versatility allows users to connect the VCR to a wide variety of devices, ensuring compatibility with different home entertainment systems.

Overall, the JVC HR-VP70U is a well-designed VHS VCR that combines high-quality playback with a host of user-friendly features. Whether users are looking to enjoy their existing VHS collection or make new recordings, this model is equipped to deliver a satisfying experience across the board.