KD-AR960/KD-LH910


KD-AR860/KD-LH810


Installation/Connection Manual

GET0271-002A

Manual de instalación/conexión

Manuel d’installation/raccordement

[J]


ENGLISH


ESPAÑOL


1204DTSMDTJEIN EN, SP, FR

FRANÇAIS

This receiver is designed to operate on 12 V DC, NEGATIVE ground electrical systems. If your vehicle does not have this system, a voltage inverter is required, which can be purchased at JVC car audio dealers.

Esta unidad está diseñada para funcionar con 12 V de CC, con sistemas eléctricos de masa NEGATIVA. Si su vehículo no posee este sistema, será necesario un inversor de tensión, que puede ser adquirido en los concesionarios de JVC de equipos de audio para automóviles.

Cet appareil est conçu pour fonctionner sur des sources de courant continu de 12 V à masse NEGATIVE. Si votre véhicule n’offre pas ce type d’alimentation, il vous faut un convertisseur de tension, que vous pouvez acheter chez un revendeur d’autoradios JVC.

Parts list for installation and connection

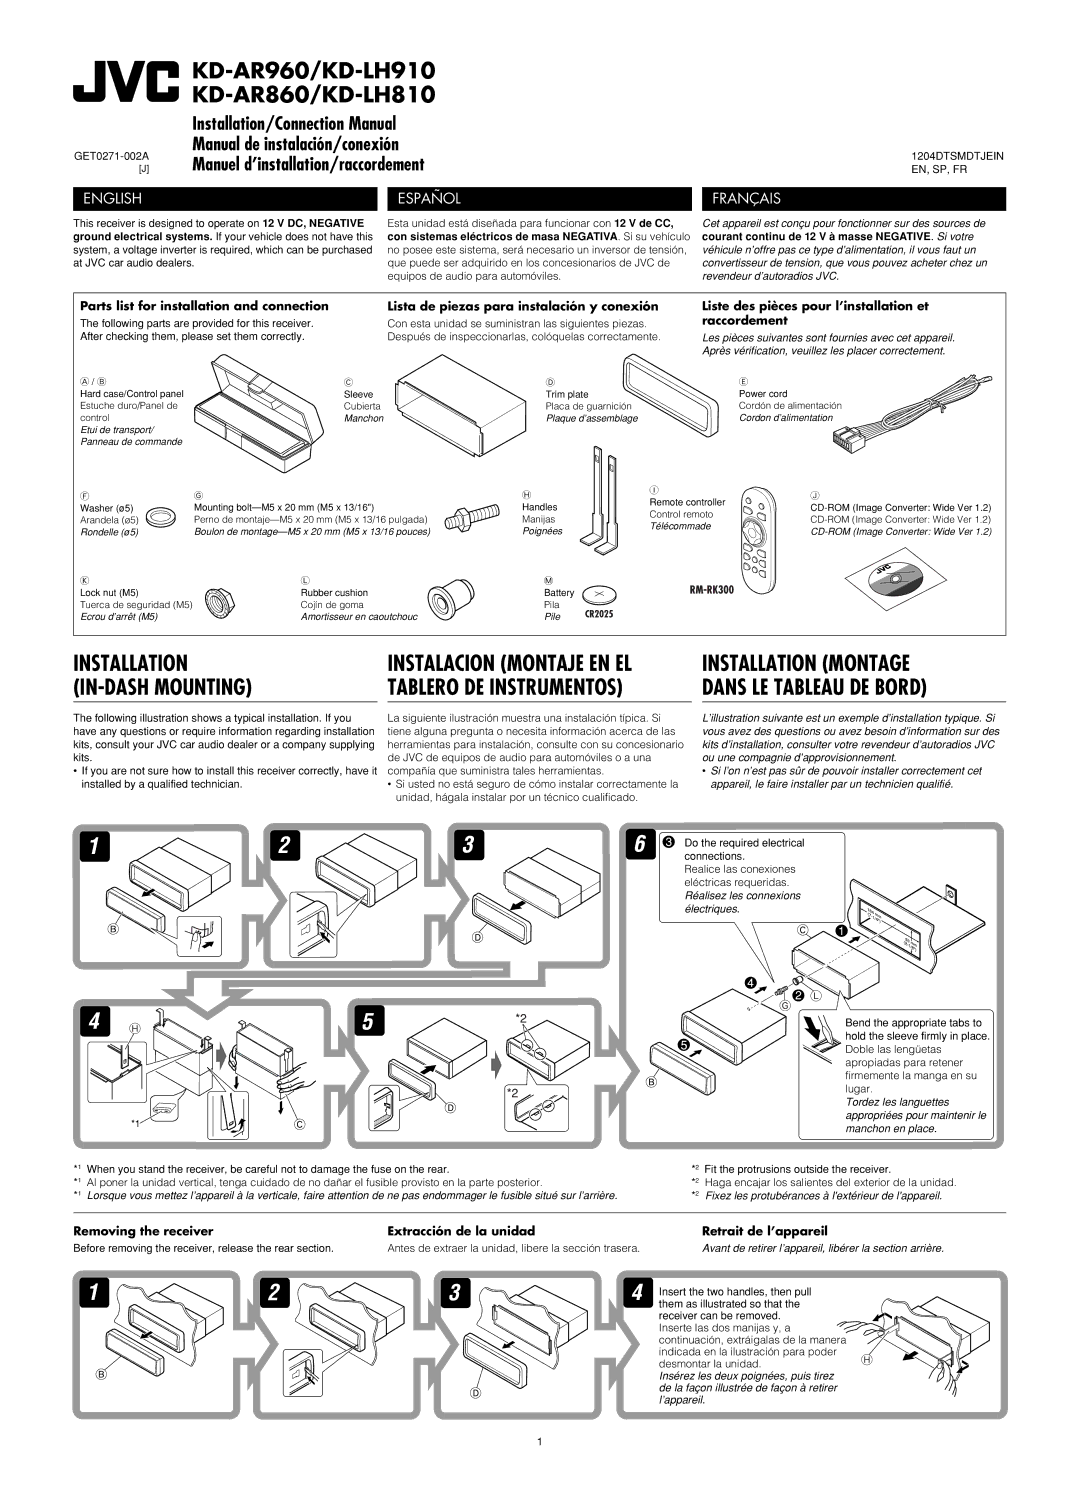
The following parts are provided for this receiver. After checking them, please set them correctly.

Lista de piezas para instalación y conexión

Con esta unidad se suministran las siguientes piezas. Después de inspeccionarlas, colóquelas correctamente.

Liste des pièces pour l’installation et raccordement

Les pièces suivantes sont fournies avec cet appareil. Après vérification, veuillez les placer correctement.

A/ B

Hard case/Control panel Estuche duro/Panel de control

Etui de transport/ Panneau de commande

F

Washer (ø5)

Arandela (ø5)

Rondelle (ø5)

K

Lock nut (M5)

Tuerca de seguridad (M5) Ecrou d’arrêt (M5)

C

D

E

Sleeve

Trim plate

Power cord

Cubierta

Placa de guarnición

Cordón de alimentación

Manchon

Plaque d’assemblage

Cordon d’alimentation

G

H

I

J

Remote controller

Mounting bolt—M5 x 20 mm (M5 x 13/16")

Handles

CD-ROM (Image Converter: Wide Ver 1.2)

Control remoto

Perno de montaje—M5 x 20 mm (M5 x 13/16 pulgada)

Manijas

CD-ROM (Image Converter: Wide Ver 1.2)

Télécommade

Boulon de montage—M5 x 20 mm (M5 x 13/16 pouces)

Poignées

CD-ROM (Image Converter: Wide Ver 1.2)


L

M


Rubber cushion

Battery


Cojín de goma

Pila


Amortisseur en caoutchouc

Pile


INSTALLATION

INSTALACION (MONTAJE EN EL

INSTALLATION (MONTAGE

(IN-DASH MOUNTING)

TABLERO DE INSTRUMENTOS)

DANS LE TABLEAU DE BORD)


The following illustration shows a typical installation. If you have any questions or require information regarding installation kits, consult your JVC car audio dealer or a company supplying kits.

If you are not sure how to install this receiver correctly, have it installed by a qualified technician.

La siguiente ilustración muestra una instalación típica. Si tiene alguna pregunta o necesita información acerca de las herramientas para instalación, consulte con su concesionario de JVC de equipos de audio para automóviles o a una compañía que suministra tales herramientas.

Si usted no está seguro de cómo instalar correctamente la unidad, hágala instalar por un técnico cualificado.

L’illustration suivante est un exemple d’installation typique. Si vous avez des questions ou avez besoin d’information sur des kits d’installation, consulter votre revendeur d’autoradios JVC ou une compagnie d’approvisionnement.

Si l’on n’est pas sûr de pouvoir installer correctement cet appareil, le faire installer par un technicien qualifié.

*1 When you stand the receiver, be careful not to damage the fuse on the rear.

*1 Al poner la unidad vertical, tenga cuidado de no dañar el fusible provisto en la parte posterior.

*1 Lorsque vous mettez l’appareil à la verticale, faire attention de ne pas endommager le fusible situé sur l’arrière.

Do the required electrical connections.

Realice las conexiones eléctricas requeridas. Réalisez les connexions électriques.

Bend the appropriate tabs to hold the sleeve firmly in place.

Doble las lengüetas apropiadas para retener firmemente la manga en su lugar.

Tordez les languettes appropriées pour maintenir le manchon en place.

*2 Fit the protrusions outside the receiver.

*2 Haga encajar los salientes del exterior de la unidad. *2 Fixez les protubérances à l'extérieur de l'appareil.

Removing the receiver

Extracción de la unidad

Retrait de l’appareil

Before removing the receiver, release the rear section.

Antes de extraer la unidad, libere la sección trasera.

Avant de retirer l’appareil, libérer la section arrière.


Insert the two handles, then pull


them as illustrated so that the


receiver can be removed.


Inserte las dos manijas y, a


continuación, extráigalas de la manera


indicada en la ilustración para poder


desmontar la unidad.


Insérez les deux poignées, puis tirez


de la façon illustrée de façon à retirer


l’appareil.

1

Page 55
Image 55
JVC KD-LH910, KD-AR960 Installation/Connection Manual, Manual de instalación/conexión, Manuel d’installation/raccordement

KD-LH910, KD-AR960 specifications

The JVC KD-AR960 and KD-LH910 are high-performance car audio receivers designed to enhance your in-car entertainment experience. Both models are renowned for their advanced features, cutting-edge technologies, and user-friendly interfaces that cater to various audio preferences.

The JVC KD-AR960 stands out with its robust audio capabilities. It supports a wide range of audio formats, including MP3, WMA, and WAV, enabling users to play their favorite tracks seamlessly. One of its key features is the built-in Bluetooth technology, which allows for hands-free calling and audio streaming directly from smartphones. The inclusion of a USB port ensures easy connectivity for flash drives and other devices, making it simple to access personal music libraries. With a powerful 50 watts per channel output, the KD-AR960 delivers rich and clear sound, enhancing the listening experience for all passengers.

On the other hand, the JVC KD-LH910 emphasizes superior connectivity and personalization options. This model also features Bluetooth, but it goes a step further by offering dual phone pairing. This feature allows two devices to be connected simultaneously, making it convenient for users who share the vehicle. The KD-LH910 is equipped with a high-resolution 6.8-inch touchscreen display, providing an intuitive interface to manage music and settings easily. The receiver supports a range of audio streaming services, including Pandora and Spotify, giving users access to millions of songs and playlists.

Both models incorporate advanced audio technologies such as Digital Signal Processing (DSP) and customizable equalizers, allowing users to fine-tune sound settings to match their preferences. The built-in crossover settings enable more accurate sound reproduction and clearer outputs for various audio frequencies, enhancing overall sound quality.

In terms of aesthetics, both receivers boast sleek designs that complement modern automobile interiors. Their user interfaces are designed for ease of use, with clear visuals and responsive touchscreen functionality in the KD-LH910, making navigation a breeze while driving.

In conclusion, the JVC KD-AR960 and KD-LH910 are exemplary choices for anyone seeking to upgrade their car audio system. With their blend of advanced features, superb sound quality, and user-friendly designs, these models provide everything a music lover could desire while on the road. Whether it's streaming tracks through Bluetooth or enjoying a rich audio experience via USB, JVC ensures that every drive is enjoyable.