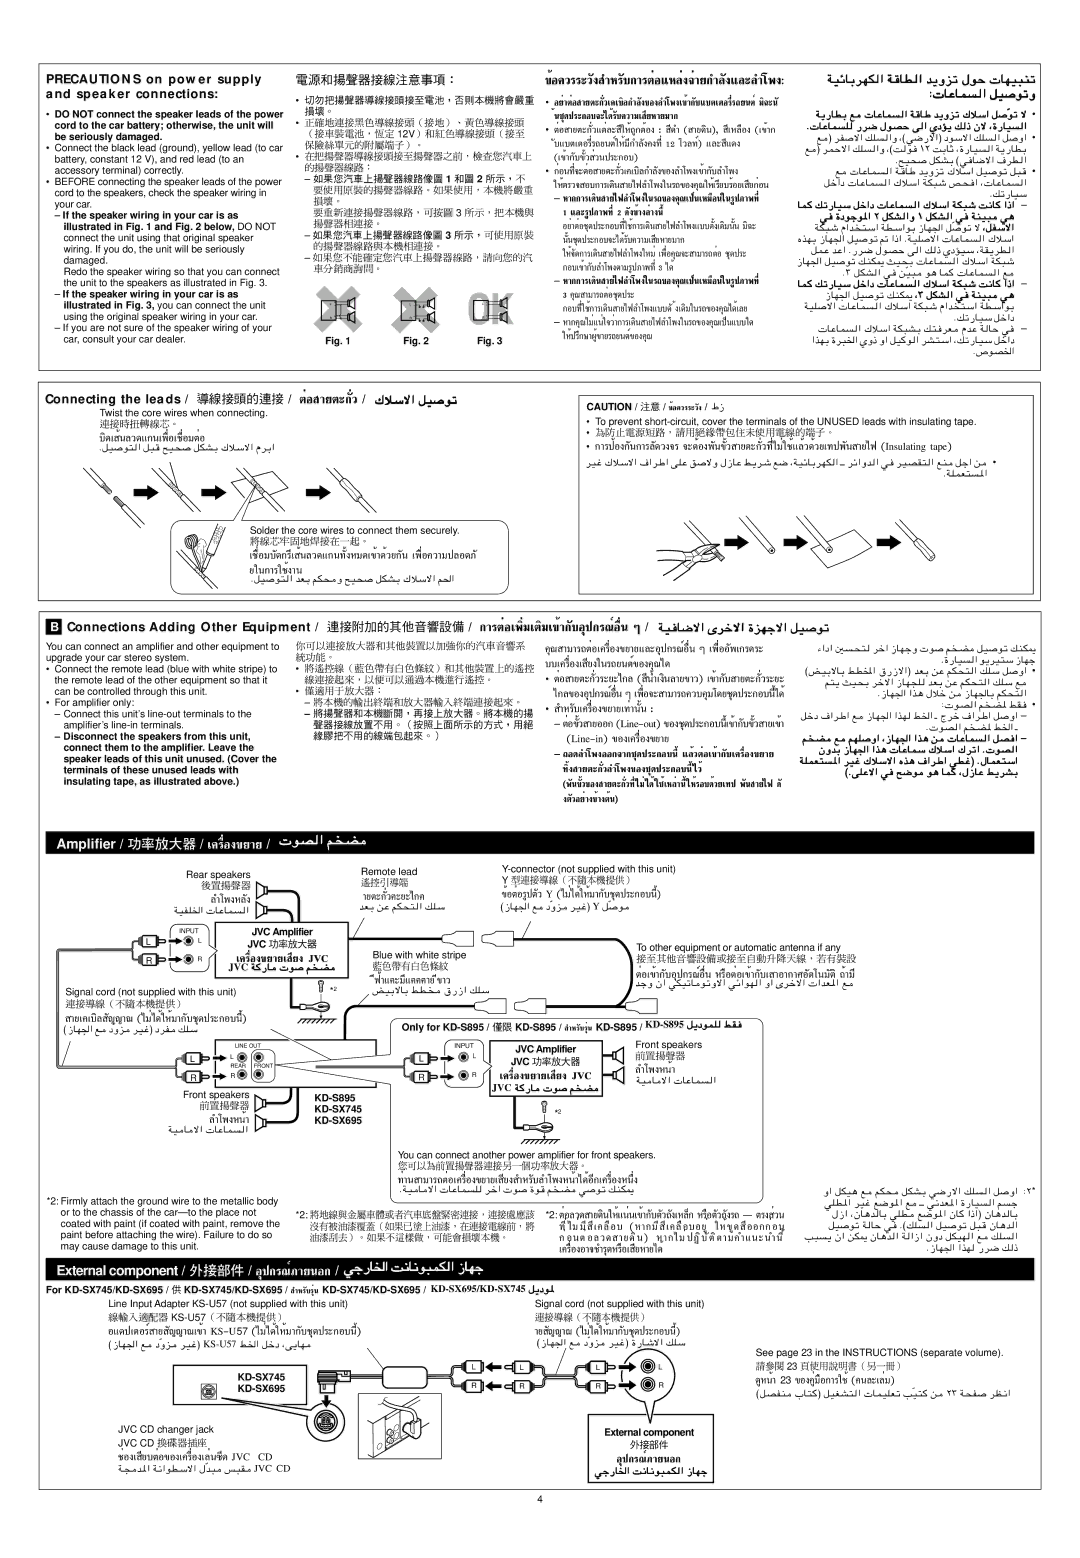
PRECAUTIONS on power supply and speaker connections:

DO NOT connect the speaker leads of the power cord to the car battery; otherwise, the unit will be seriously damaged.

Connect the black lead (ground), yellow lead (to car battery, constant 12 V), and red lead (to an accessory terminal) correctly.

BEFORE connecting the speaker leads of the power cord to the speakers, check the speaker wiring in your car.

If the speaker wiring in your car is as illustrated in Fig. 1 and Fig. 2 below, DO NOT connect the unit using that original speaker wiring. If you do, the unit will be seriously damaged.

Redo the speaker wiring so that you can connect the unit to the speakers as illustrated in Fig. 3.

If the speaker wiring in your car is as illustrated in Fig. 3, you can connect the unit using the original speaker wiring in your car.

If you are not sure of the speaker wiring of your car, consult your car dealer.

¢ÈÕ§«√√–«ß— ”À√∫°“√µËÕ·À≈Ë߮˓¬°”≈—ß·≈—–≈”‚æß:


լ˓µËÕ “¬µ–°«‡§‡∫‘≈°”≈Ë—ß—¢Õß≈”‚æ߇¢È“°∫·∫µ‡µÕ√’Ë√∂¬πµÏ—¡‘©–π—


π™ÿÈ ¥ª√–°Õ∫®–‰¥È√∫§«“¡‡— ¬À“¬¡“°’


12V


µËÕ “¬µ–°—Ë«·µË≈– ’„ÀÈ∂Ÿ°µÈÕß : ’¥” ( “¬¥‘π), ’‡À≈◊Õß (‡¢È“°


∫·∫µ‡µÕ√’Ë√∂¬πµÏ„ÀÈ¡’°”≈—

—ߧß∑’Ë12 ‚«≈∑Ï) ·≈– ’·¥ß


(‡¢È“°∫—¢«È— «πª√Ë

–°Õ∫)


1 ￿￿ 2


°ËÕπ∑’Ë®–µËÕ “¬µ–°«‡§‡∫‘≈°”≈Ë—ß—¢Õß≈”‚æ߇¢È“°∫≈”‚æß—


￿

„Àȵ√«® Õ∫°“√‡¥‘𠓬‰ø≈”‚æß„π√∂¢Õߧÿ≥„Àȇ√’¬∫√ÈÕ¬‡ ¬°ËÕπ’


À“°°“√‡¥‘𠓬‰ø≈”‚æß„π√∂¢Õߧÿ≥‡ªÁπ‡À¡◊Õπ„π√Ÿª¿“æ∑’Ë


3


1 ·≈–√Ÿª¿“æ∑’Ë2 ¥ß—¢È“ß≈Ë“ßπ’È


3


լ˓µËÕ™ÿ¥ª√–°Õ∫∑’Ë„™È°“√‡¥‘𠓬‰ø≈”‚æß·∫∫¥ß‡È— ¥‘¡ππÈ— ¡‘©–


ππ™ÿÈ— ¥ª√–°Õ∫®–‰¥È√∫§«“¡‡— ¬À“¬¡“°’


„ÀÈ®¥—°“√‡¥‘𠓬‰ø≈”‚æß„À¡Ë‡æ◊ËÕ§ÿ≥®– “¡“√∂µËÕ ™ÿ¥ª√–


°Õ∫‡¢È“°∫≈”‚æßµ“¡√Ÿª¿“æ∑’Ë—3 ‰¥È


À“°°“√‡¥‘𠓬‰ø≈”‚æß„π√∂¢Õߧÿ≥‡ªÁπ‡À¡◊Õπ„π√Ÿª¿“æ∑’Ë

+


+

+


+

+


+

3 §ÿ≥ “¡“√∂µËÕ™ÿ¥ª√–


L -


-

L -


-

L -


-

°Õ∫∑’Ë„™È°“√‡¥‘π

“¬‰ø≈”‚æß·∫∫¥—ß‡È ¥‘¡„π√∂¢Õߧÿ≥‰¥È‡≈¬


+

+

+

+

+


+


R -

-

R -

-

R -


-

À“°§ÿ≥‰¡Ë·πË„®«Ë“°“√‡¥‘π

“¬‰ø≈”‚æß„π√∂¢Õߧÿ≥‡ªÁπ·∫∫„¥


Fig. 1

Fig. 2

Fig. 3

„ÀȪ√÷°…“ºŸÈ¢“¬√∂¬πµÏ¢Õߧÿ≥

WOzUÐdNJ

UŽULqO


W¹—UDÐ l


Òuð ô

Æ UŽUL


ldHpK¨©w{—ô«® œuÝô« pKq


ldLŠô« pK¨©X±≤ XÐUŁ ¨…—UOW¹—UDÐ


l

Æ`O×qJAÐ ©w·dD


UŽULWb¹Ëeð „öÝ« qOq³

qš«œ

UŽUL


Æpð—UOÝ

UL


w


ôÒ

¨qHÝô«

WJ³ý «bWDÝ«uÐ “UN'« q

ÁcNÐ “UN'« qO- «–« ÆWOK

UŽUL„öÝ«


qLŽ bŽ« Æ—d{ ‰uBŠ vpÍœROÝ ¨WI¹dD

“UN'« qOpMJ1 YO×Ð

UŽUL„öÝ« WJ³ý


Æ≥ qJAws

ÒO³u¼ UL

UŽULl


UL


“UN'« qOpMJ1

¨≥ qJAwWMO³w¼

WOK UŽUL„öÝ« WJ³ý «bWDÝ«uÐ


Æpð—UOÝ qš«œ

UŽUL„öÝ« WJ³AÐ p²ÂbŽ Ww

«cNÐ …d³)« ÍË– Ë« qOdA²Ý« ¨pð—UOÝ qš«œ Æ’uB)«

Connecting the leads /

/ µËÕ “¬µ–°«Ë— /„öÝô« qO

Twist the core wires when connecting.

∫‘¥‡ π≈«È ¥·°π‡æ◊ËÕ‡™◊ËÕ¡µËÕ

ÆqOq³`O×qJAÐ „öÝô« ÂdЫ

Solder the core wires to connect them securely.

‡™◊ËÕ¡∫—¥°√’‡ Èπ≈«¥·°π∑—ÈßÀ¡¥‡¢È“¥È«¬°—π ‡æ◊ËÕ§«“¡ª≈Õ¥¿—

¬„π°“√„™Èß“π

ÆqObFÐ rJ×`O×qJAÐ „öÝô« r(«

CAUTION / ￿￿ / ¢ÈÕ§«√√–«ß— / ◊“

To prevent short-circuit, cover the terminals of the UNUSED leads with insulating tape.

°“√ªÈÕß°π°“√≈—¥—«ß®√ ®–µÈÕßæπ—¢«È— “¬µ–°«∑’ˉ¡Ë„™È·≈È«Ë— ¥È«¬‡∑ªæπ— “¬‰ø (Insulating tape)

dOž „öÝô« ·«dÞ« vKŽ o‰“UŽ j¹dý l{ ¨WOzUÐdNJ‡‡ dz«ËbwdOBI²lMqł« s


ÆWKLF²

BConnections Adding Other Equipment /

You can connect an amplifier and other equipment to


upgrade your car stereo system.

• Connect the remote lead (blue with white stripe) to

the remote lead of the other equipment so that it

can be controlled through this unit.

• For amplifier only:

– Connect this unit’s line-out terminals to the

amplifier’s line-in terminals.


Disconnect the speakers from this unit, connect them to the amplifier. Leave the speaker leads of this unit unused. (Cover the terminals of these unused leads with insulating tape, as illustrated above.)

/°“√µËÕ‡æ‘Ë¡‡µ‘¡‡¢È“°∫Õÿª°√≥ÏÕ◊Ëπ— Ê / WO

§ÿ≥ “¡“√∂µËÕ‡§√◊ËÕߢ¬“¬·≈–Õÿª°√≥ÏÕ◊Ëπ Ê ‡æ◊ËÕÕ懰√— ¥√–

∫∫‡§√◊ËÕ߇ ¬ß„π√∂¬πµÏ’ ¢Õߧÿ≥‰¥

µËÕ “¬µ–°«√Ë—–¬–‰°≈ ( πÈ”‡ß‘π≈“¬’ ¢“«) ‡¢È“°∫— “¬µ–°«√Ë—–¬– ‰°≈¢ÕßÕÿª°√≥ÏÕ◊Ëπ Ê ‡æ◊ËÕ®– “¡“√∂§«∫§ÿ¡‚¥¬™ÿ¥ª√–°Õ∫π’ȉ¥È

”À√∫‡§√◊ËÕß— ¢¬“¬‡∑Ë“ππÈ— :

µËÕ¢«È— “¬ÕÕ° (Line-out) ¢Õß™ÿ¥ª√–°Õ∫π’ȇ¢È“°∫—¢«È— “¬‡¢È“ (Line-in) ¢Õ߇§√◊ËÕߢ¬“¬

∂Õ¥≈”‚æßÕÕ°®“°™ÿ¥ª√–°Õ∫π’È·≈È«µËÕ‡¢È“°∫‡§√◊ËÕß— ¢¬“¬

∑‘Èß “¬µ–°«≈”‚æßË— ¢Õß™ÿ¥ª√–°Õ∫π’ȉ«È

(æπ—¢«È—¢Õß “¬µ–°«∑’ˉ¡Ë‰Ë— ¥È„™È‡À≈Ë“π’È„ÀÈ√Õ∫¥È«¬‡∑ª æπ— “¬‰ø ¥— ßµ«Õ¬Ë“ß— ¢È“ßµÈπ)

¡«œ« 5dš« “UNłË

urqOpMJ1


Æ…—UOu¹dO²Ý “UNł

©iOÐôUÐ jD<« ‚—“ô«® bFÐ sŽ rJײ

r²¹ YO×Ð dšô« “UN−KbFÐ sŽ rJײpKÝ l

Æ“UN'« «c¼ ‰öš s“UN'UÐ rJײ


∫ uBrjI

qšœ ·«dÞ« l“UN'« «cNj)« ‡ Ãdš ·«dÞ« q

r

Æ uBrj)« ‡

UŽULÝ „öÝ« „dð« Æ

ÊËbÐ “UN'« «c¼

uB

WKLF²


©ÆvKŽô« w


Amplifier /

/ ‡§√◊ËÕߢ¬“¬ /

uB


Rear speakers

Remote lead

Y-connector (not supplied with this unit)


Y


WOHK)«

≈”‚æßÀ≈ß—


UŽUL


L

INPUT

JVC Amplifier


L

JVC


R

R

‡§√◊ËÕߢ¬“¬‡ ’¬ß JVC


JVC W


Signal cord (not supplied with this unit)

*2

“¬‡§‡∫‘≈ ≠≠“≥— (‰¡Ë‰¥È„ÀÈ¡“°∫™ÿ— ¥ª√–°Õ∫π’È)

©“UN'« lœ ËedOž®Ò œdHpKÝ

LINE OUT

LL

REAR FRONT

R R

†“¬µ–°Ë«•—–¬–‰°•

bFÐ sŽ rJײ

Blue with white stripe

†’øÈ“·•–¡’·•••“¬†’¢“«

iOÐôUÐ jD

Only for KD-S895 /

INPUT

L L

R R

¢ÈÕµËÕ√Ÿªµ«— Y (‰¡Ë‰¥È„ÀÈ¡“°∫™ÿ— ¥ª√–°Õ∫π’È)

©“UN'« lœ ËedOž®Ò

Y

To other equipment or automatic antenna if any

µËÕ‡¢È“°∫Õÿª°√≥ÏÕ◊Ëπ— À√◊ÕµËÕ‡¢È“°∫‡— “Õ“°“»Õµ‚π¡—µ‘—∂È“¡’

błË Ê« wJOðU

￿￿KD-S895 / ”À√∫√ÿËπ— KD-S895 / KD-S895q¹œuLK

JVC Amplifier


Front speakers


JVC


≈”‚æßÀπÈ“

‡§√◊ËÕߢ¬“¬‡ ’¬ß JVC

WO UŽUL

Front speakers

KD-S895


≈”‚æßÀπÈ“

KD-SX745

KD-SX695

WO UŽUL


JVC W

*2

You can connect another power amplifier for front speakers.


∑Ë“π “¡“√∂µËÕ‡§√◊ËÕߢ¬“¬‡ ¬ß’ ”À√∫≈”‚æßÀπÈ“‰—

¥ÈÕ’°‡§√◊ËÕßÀπ÷Ëß

*2: Firmly attach the ground wire to the metallic body

ÆWO UŽULdš«

u…urwpMJ1


*2: µËÕ≈«¥ “¬¥‘π„ÀÈ·πËπ‡¢È“°∫µ—«∂—߇À≈Á°— À√◊Õµ«∂—ß√∂— ˙ µ√ß «πË

or to the chassis of the car— to the place not

*2:

coated with paint (if coated with paint, remove the


∑’ˉ¡Ë¡’ ’‡§≈◊Õ∫ (À“°¡’ ’‡§≈◊Õ∫Õ¬ŸË „ÀÈ¢Ÿ¥ ’ÕÕ°°ËÕπ

paint before attaching the wire). Failure to do so


°ËÕπµËÕ≈« ¥ “¬ ¥ ‘π) À“°‰¡ËªØ‘∫ —µ‘µ“¡§”·π – π”π’È

may cause damage to this unit.


‡§√◊ËÕßÕ“®™”√ÿ¥À√◊Õ‡ ’¬À“¬‰¥È


External component /

/ Õÿª°√≥Ï¿“¬πÕ° / wł—U)« X½U½u³LJ « “UNł


For KD-SX745/KD-SX695 / ￿ KD-SX745/KD-SX695 / ”À√∫√ÿËπ— KD-SX745/KD-SX695 / KD-SX695/KD-SX745q¹œu*


Line Input Adapter KS-U57 (not supplied with this unit)

Signal cord (not supplied with this unit)

KS-U57


Ë« qJO¼ l

∫≤*

wKD*« dOž l{u*« l


‰“« ¨ÊU¼b


qO


Æ“UN'« «cN


Õ·¥ª‡µÕ√Ï“¬ —≠≠“≥‡¢È“ KS-U57(‰¡Ë‰¥È„ÀÈ¡“°∫™ÿ— ¥ª√–°Õ∫π’È)

©“UN'« l ÒËe

KS-U57j)« qšœ ¨v¹UN

KD-SX745

KD-SX695

JVC CD changer jack

JVC CD

™ËÕ߇ ¬∫µËÕ’ ¢Õ߇§√◊ËÕ߇≈Ëπ´’¥ JVC CD

W−W½«uDÝô« ‰

Òb³f³I JVC CD

“¬ ≠≠“≥— (‰¡Ë‰¥È„ÀÈ¡“°∫™ÿ— ¥ª√–°Õ∫π’È)


©“UN'« l

ÒËe


See page 23 in the INSTRUCTIONS (separate volume).


L

L

L

L

23


R

R

R

R

¥ŸÀπÈ“ 23 ¢ÕߧŸË¡◊Õ°“√„™È(§π≈–‡≈Ë¡)

ÒO²s≤≥ W×HdE½«


©qBHM»U²qOGA² ULOKFð V

External component

Õÿª°√≥Ï¿“¬πÕ°

wł—U)« X½U½u³LJ

4

Page 33
Image 33
JVC manual Only for KD-S895, KD-S895 / À√√ÿËπ- KD-S895 / KD-S895q¹œuLK JVC Amplifier, Front speakers KD-S895, KD-SX745

KD-S895 specifications

The JVC KD-S895 is a feature-rich car stereo that combines advanced technology with user-friendly design, making it a standout choice for audiophiles and casual listeners alike. This model exemplifies JVC’s commitment to delivering high-quality sound and versatile connectivity in a compact form.

One of the key features of the KD-S895 is its 24-bit digital-to-analog converter (DAC), which enhances sound clarity and ensures a clean audio signal. This high-quality DAC is coupled with a powerful built-in amplifier that delivers up to 50 watts per channel, allowing for loud and clear playback that can fill any vehicle with rich, detailed sound.

In terms of connectivity, the KD-S895 offers an array of options to suit modern audio needs. It is equipped with both USB and AUX inputs, allowing users to connect their smartphones, tablets, or digital music players directly to the stereo. The USB port also supports high-current charging, ensuring your devices stay powered during long drives. Furthermore, the stereo is compatible with Bluetooth technology, enabling hands-free calling and audio streaming from compatible devices without the mess of cables.

The user interface of the KD-S895 is intuitive, featuring a bright and easy-to-read display that offers a wealth of information. The rotary knob and tactile buttons provide quick access to various functions, ensuring that you can adjust settings or change tracks with minimal distraction while driving. The stereo supports a variety of audio formats, including MP3, WMA, and WAV, providing flexibility in how you enjoy your music.

Another standout characteristic is its customizable sound settings. The KD-S895 allows users to fine-tune their listening experience with a 13-band graphic equalizer and multiple preset sound modes. This feature enables you to tailor the audio output to suit your personal preferences or the acoustics of your vehicle.

Additional technologies include a built-in AM/FM tuner with 18 presets, allowing you to quickly access your favorite radio stations. The stereo also features a removable faceplate to deter theft, ensuring that your investment is protected while the car is parked.

Overall, the JVC KD-S895 is a versatile car stereo that excels in both audio performance and connectivity, making it an excellent choice for anyone seeking to enhance their in-car listening experience. Whether you're a music lover or someone who enjoys podcasts and radio, this unit has the features to meet your needs.