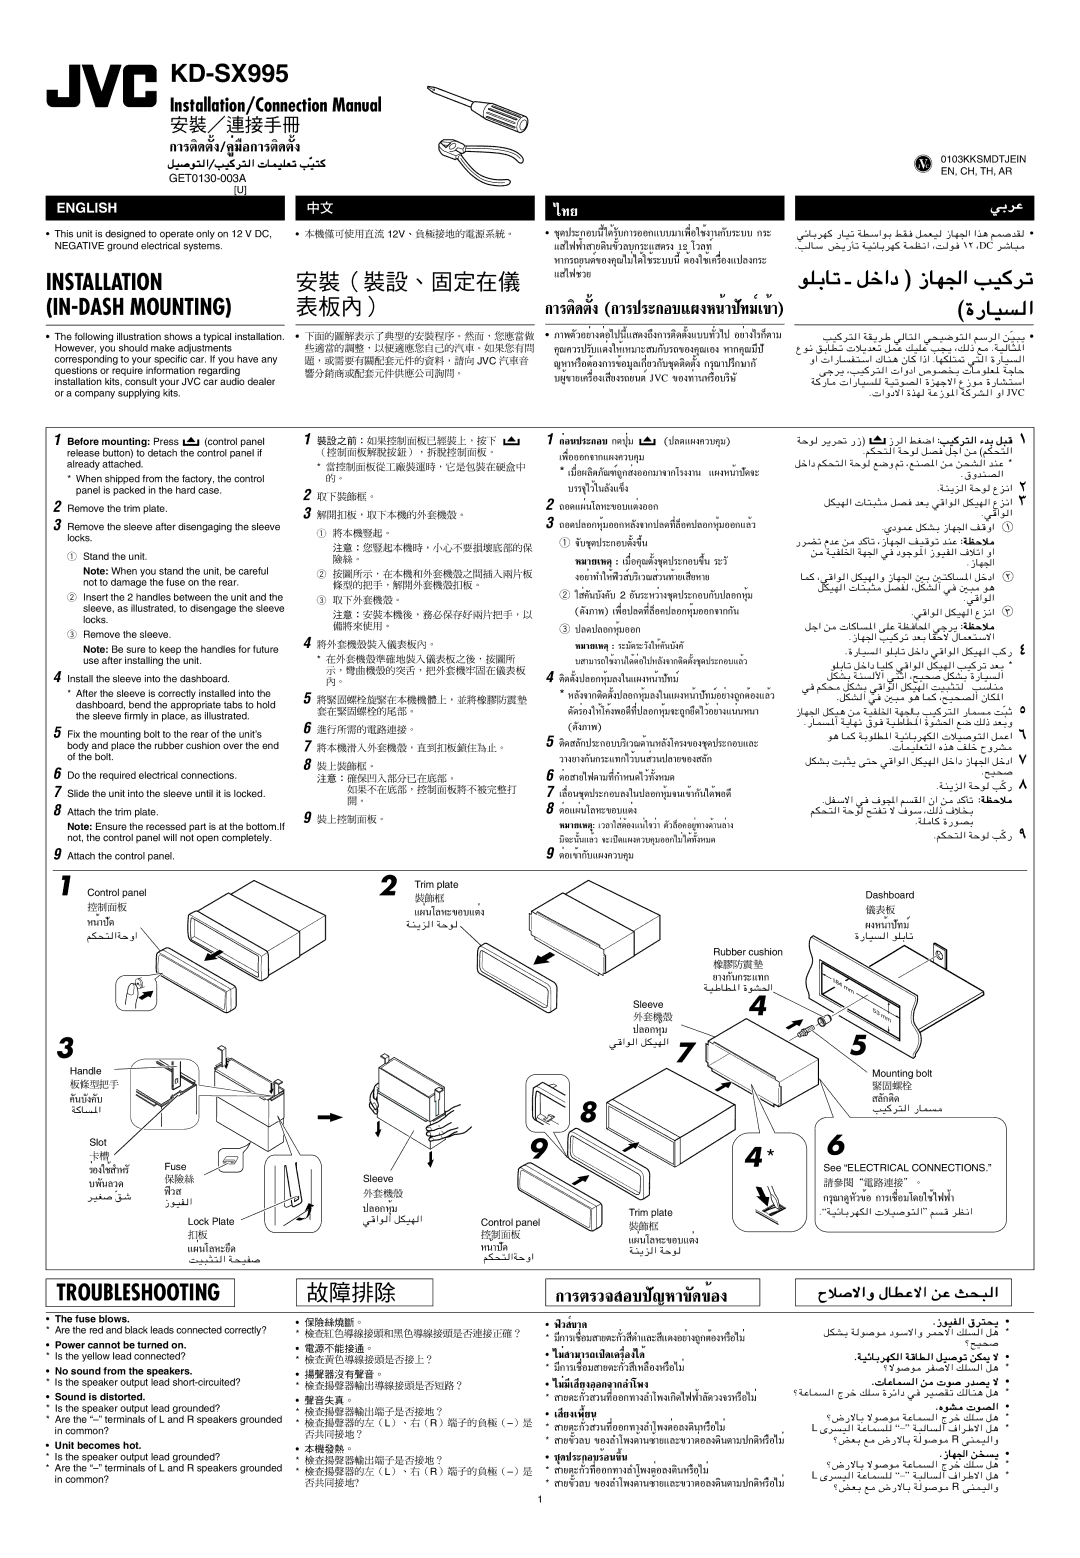
JVC KD-SX995 Before mounting Press, Fuse blows, Power cannot be turned on, Sound is distorted

Models: KD-SX995

1 45
Download 45 pages 7.62 Kb
Page 42
Image 42

KD-SX995

Installation/Connection Manual

°“√µ‘¥µß/§ŸË¡◊Õ°“√µ‘—È ¥µ—Èß

qOO²Ò

GET0130-003A [U]

ENGLISH


￿￿


• This unit is designed to operate only on 12 V DC, •

12V

NEGATIVE ground electrical systems.


INSTALLATION (IN-DASH MOUNTING)

The following illustration shows a typical installation. However, you should make adjustments

corresponding to your specific car. If you have anyJVC questions or require information regarding

installation kits, consult your JVC car audio dealer or a company supplying kits.


V

0103KKSMDTJEIN


J

C

EN, CH, TH, AR


‰∑¬


wÐdŽ


™ÿ¥ª√–°Õ∫π’ȉ¥È√∫°“√ÕÕ°·∫∫¡“‡æ◊ËÕ„™Èß“π°—∫√—–∫∫ °√–

wzUÐdN


· ‰øøÈ“ “¬¥‘π¢—È«≈∫°√–· µ√ß 12 ‚«≈∑Ï

ÆV


DC dýU³

À“°√∂¬πµÏ¢Õߧÿ≥‰¡Ë‰¥È„™È√–∫∫π’ȵÈÕß„™È‡§√◊ËÕß·ª≈ß°√–

uKÐUð ‡ qš«œ ® “UN'« VO

· ‰ø™Ë«¬


°“√µ‘¥µßÈ— (°“√ª√–°Õ∫·ºßÀπÈ“ª∑¡Ï‡— ¢È“)


©…—UO

¿“浫լ˓ߵËÕ‰ªπ’È·— ¥ß∂÷ß°“√µ‘¥µß·∫∫∑È—«‰ªË— լ˓߉√°Áµ“¡


VO


ÒO³¹

§ÿ≥§«√ª√∫·µËß„ÀȇÀ¡“—– ¡°∫√∂— ¢Õߧÿ≥‡Õß À“°§ÿ≥¡’ª—

Ÿu½ oÐUDð ö¹bFð qLŽ pOKŽ V−¹ ¨p

≠À“À√◊ÕµÈÕß°“√¢ÈÕ¡Ÿ≈‡°’ˬ«°∫™ÿ— ¥µ‘¥µßÈ— °√ÿ≥“ª√÷°…“°—

Ë« «—U


∫ºŸÈ¢“¬‡§√◊ËÕ߇ ¬ß√∂¬πµÏ’ JVC ¢Õß∑Ë“πÀ√◊Õ∫√‘…—

vłd¹ ¨VO


W


Æ «Ëœô« …cN


JVC

1 Before mounting: Press

(control panel

1

=

1 °ËÕπª√–°Õ∫ °¥ªÿË¡

=(ª≈¥·ºß§«∫§ÿ¡)

WŠu

d¹d% —“®

“d « jG{« ∫VO d² « ¡bÐ q³

±

release button) to detach the control panel if


‡æ◊ËÕÕÕ°®“°·ºß§«∫§ÿ¡


ÆrJײ « WŠu qB

qł« s ©rJײ «


already attached.


*


qš«œ rJײ « WŠu

l{Ë - ¨lMB*« s

s×A « bMŽ *


* ‡¡◊ËÕº≈‘µ¿≥±Ï∂Ÿ°— ßÕÕ°¡“®“°‚√ßß“πË


·ºßÀπÈ“ª¥—®–


* When shipped from the factory, the control


￿￿


Æ‚ËbMB «


panel is packed in the hard case.

2


∫√√®ÿ‰«È„π≈ß·— ¢Áß


ÆWM¹e « WŠu

Ÿe½«

2 Remove the trim plate.


2 ∂Õ¥·ºËπ‚≈À–¢Õ∫·µËßÕÕ°


qJON «

U²³¦ qB bFÐ w «u « qJON « Ÿe½«

3 Remove the sleeve after disengaging the sleeve

3


3 ∂Õ¥ª≈Õ°ÀÿÈ¡ÕÕ°À≈ß®“°ª≈—

¥∑’Ë≈ÁÕ§ª≈Õ°ÀÿÈ¡ÕÕ°·≈È«


Æw «u «


1

—dCð ÂbŽ s


ÆÍœuLŽ qJAÐ “UN'« n Ë«

±


locks.


1 ®∫™ÿ— ¥ª√–°Õ∫µßÈ—¢÷Èπ


b Q𠨓UN'« nO uð bMŽ ∫WEŠö


1 Stand the unit.


À¡“¬‡Àµÿ: ‡¡◊ËÕ§ÿ≥µß™ÿÈ— ¥ª√–°Õ∫¢÷Èπ √–«—

s WOHK)« WN'« w

œułu*« “uOH « ·öð« Ë«


Note: When you stand the unit, be careful


Æ“UN'«


2

ßլ˓∑”„ÀÈø‘« ∫√‘‡«≥Ï

«π∑È“¬‡Ë

¬À“¬’

UL

¨w «u « qJON «Ë “UN'« 5Ð 5² U


*« qšœ«


not to damage the fuse on the rear.


2 §Ëπ∫—ߧ—∫— 2 Õπ√—–À«Ë“ß™ÿ¥ª√–°Õ∫°∫ª≈Õ°ÀÿÈ¡—


qJON «

U²³¦ qBH ¨qJA « w

5³ u¼


2 Insert the 2 handles between the unit and the


3


Æw «u «


sleeve, as illustrated, to disengage the sleeve


(¥ß¿“æ)—

‡æ◊ËÕª≈¥∑’Ë≈ÁÕ§ª≈Õ°ÀÿÈ¡ÕÕ°®“°°π—


Æw «u « qJON « Ÿe½«


locks.


3 ª≈¥ª≈Õ°ÀÿÈ¡ÕÕ°


qł« s


U U

*« vKŽ WE U;« włd¹ ∫WEŠö


3 Remove the sleeve.


4


À¡“¬‡Àµÿ: √–¡¥—√–«ß„Àȧ—π∫—ߧ——


Æ“UN'« VO dð bFÐ UIŠô ‰ULF²Ýô«


¥

Note: Be sure to keep the handles for future

*


Æ…—UO

« uKÐUð qš«œ w «u « qJON « V —

use after installing the unit.


∫ “¡“√∂„™Èß“π‰¥ÈµËÕ‰ªÀ≈ß®“°µ‘— ¥µß™ÿÈ— ¥ª√–°Õ∫·≈È«


uKÐUð qš«œ UOK

w «u « qJON « VO dð bFÐ *


4 Install the sleeve into the dashboard.


￿￿

4 µ‘¥µßª≈Õ°ÀÿÈ¡≈ß„π·ºßÀπÈ“ªÈ—∑¡Ï—


w

qJAÐ WM

_« wMŁ« ¨`O×

qJAÐ …—UO

«


* After the sleeve is correctly installed into the


* À≈ß®“°µ‘— ¥µßª≈Õ°ÀÿÈ¡≈ß„π·ºßÀπÈ“ªÈ—

∑¡Ïլ˓ß∂Ÿ°µÈÕß·≈È«—

rJ×


qJAÐ w «u « qJON « XO³¦²

VÝUM


5


ÆqJA « w 5³ u¼ UL

¨`O×B « ÊUJ*«


µ

dashboard, bend the appropriate tabs to hold


¥¥—√ËÕß„ÀÈ‚§ÈßæÕ¥’∑’˪≈Õ°ÀÿÈ¡®–∂Ÿ°¬÷¥‰«Èլ˓߷πËπÀπ“

“UN'« qJO¼ s

WOHK)« WN'UÐ VO d² « —UL

X³ÒŁ

the sleeve firmly in place, as illustrated.


5 Fix the mounting bolt to the rear of the unit’s

6


(¥ß¿“æ)—


Æ—UL *« W¹UN½ ‚u WOÞUD*« …uA(« l{ p – bFÐË


u¼ UL

WÐuKD*« WOzUÐdNJ «

öO

u² « qLŽ«

7


5 µ‘¥ ≈°ª√—–°Õ∫∫√‘‡«≥¥È“πÀ≈ß‚§√ß—

¢Õß™ÿ¥ª√–°Õ∫·≈–


body and place the rubber cushion over the end


Æ

ULOKF² « Ác¼ nKš ÕËdA


of the bolt.


8


«“߬“ß°π°√—–·∑°‰«È∫π «πª≈“¬Ë

¢Õß ≈°—

qJAÐ X³¦¹ v²Š w «u « qJON « qš«œ “UN'« qšœ«

6 Do the required electrical connections.


6 µËÕ “¬‰øµ“¡∑’Ë°”À𥉫È∑ßÀ¡È— ¥


Æ`O×


7 Slide the unit into the sleeve until it is locked.


7 ‡≈◊ËÕπ™ÿ¥ª√–°Õ∫≈ß„πª≈Õ°ÀÿÈ¡®π‡¢È“°π‰— ¥ÈæÕ¥’


ÆqHÝô« w


ÆWM¹e « WŠu

VÒ—


￿￿


·u:« r I « Ê« s

b Qð ∫WEŠö


8 Attach the trim plate.


9


8 µËÕ·ºËπ‚≈À–¢Õ∫·µËß


rJײ « WŠu `²Hð ô ·uÝ ¨p – ·ö

Ð


Note: Ensure the recessed part is at the bottom.If


À¡“¬‡Àµÿ: ‡«≈“„ µÈÕß·πË„®«Ë“Ë

µ«≈ÁÕ§Õ¬ŸË∑“ß—

¥È“π≈Ë“ß


ÆWK U

…—uBÐ

VÒ— π


not, the control panel will not open completely.


¡‘©–ππ·≈È«È— ®–‡ª‘¥·ºß§«∫§ÿ¡ÕÕ°‰¡Ë‰¥È∑ßÀ¡È— ¥


ÆrJײ « WŠu

9 Attach the control panel.


9 µËÕ‡¢È“°∫·ºß§«∫§ÿ¡—


1 Control panel


2 Trim plate


Dashboard


ÀπÈ“ª—¥


·ºËπ‚≈À–¢Õ∫·µËß


ºßÀπÈ“ª∑¡Ï—


WM¹e


rJײ


…—UO


Rubber cushion


¬“ß°π°√—–·∑°


184


WOÞUD*« …uA(«


mm


Sleeve


4


53 mm


3

Handle

§π∫—ߧ—∫—

W

Slot

￿￿

√ËÕß„™È”À√— Fuse ∫æ—π≈«¥


w

ª≈Õ°ÀÿÈ¡


7


8


9


4 *

Sleeve


5

Mounting bolt

≈°µ‘— ¥

VO

6

See “ELECTRICAL CONNECTIONS.”

dOG Òoý

ø‘«

°√ÿ≥“¥ŸÀ«—¢ÈÕ °“√‡™◊ËÕ¡‚¥¬„™È‰øøÈ“

“uOH

Lock Plate

￿￿

·ºËπ‚≈À–¬÷¥

XO³¦²

ª≈Õ°ÀÿÈ¡


Trim plate

w

Control panel


ÀπÈ“ª¥—

·ºËπ‚≈À–¢Õ∫·µËß


WM¹e


rJײ


ÆWOzUÐdNJ

r

TROUBLESHOOTING

°“√µ√«® Õ∫ª≠À“— ¢¥—¢ÈÕß

Õö

The fuse blows.


ø‘« ¢Ï“¥


qJAÐ W


Æ“uOH

* Are the red and black leads connected correctly?


￿


Power cannot be turned on.

*


*

¡’°“√‡™◊ËÕ¡ “¬µ–°«Ë— ¥’”·≈– ·’¥ßլ˓ß∂Ÿ°µÈÕßÀ√◊Õ‰¡Ë


ø`O×

*


‰¡Ë“¡“√∂‡ª‘¥‡§√◊ËÕ߉¥È


ÆWOzUÐdNJ


* Is the yellow lead connected?

*


No sound from the speakers.


*

¡’°“√‡™◊ËÕ¡ “¬µ–°«Ë— ‡À≈◊ÕßÀ√◊Õ‰¡Ë’


øôu


*

*

Is the speaker output lead short-circuited?


‰¡Ë¡’‡ ¬ßÕÕ°®“°≈”‚æß’


Æ

UŽUL


*


Sound is distorted.


*

“¬µ–°«Ë— «π∑’ËÕÕ°∑“ß≈”‚æ߇°‘Ë¥‰øøÈ“≈¥—«ß®√À√◊Õ‰¡Ë

øWŽUL


ÆÁuA

*

* Is the speaker output lead grounded?

*


‡ ¬ß‡æ’Ȭπ’


ø÷—ôUÐ ôu


* Are the “–” terminals of L and R speakers grounded

*

L

R

￿￿


¥‘πÀ√◊Õ‰¡Ë


*


in common?

*

“¬µ–°«Ë— «π∑’ËÕÕ°∑“ß≈”‚æßµËÕ≈ßË

L Èd


*

Unit becomes hot.


*

“¬¢«≈∫È— ¢Õß≈”‚æߥȓπ´È“¬·≈–¢«“µËÕ≈ߥ‘πµ“¡ª°µ‘À√◊Õ‰¡Ë

øiFÐ l


R vMLO


* Is the speaker output lead grounded?


™ÿ¥ª√–°Õ∫√ÈÕπ¢÷Èπ


Æ“UN'« s

*


ø÷—ôUÐ ôu


* Are the “–” terminals of L and R speakers grounded

*

L

R

￿￿

*

“¬µ–°«∑’ËÕÕ°∑“ß≈”‚æßµËÕ≈ßË—

¥‘πÀ√◊Õ‰¡Ë


*


in common?

L Èd


*


\


*

“¬¢«≈∫È— ¢Õß≈”‚æߥȓπ´È“¬·≈–¢«“µËÕ≈ߥ‘πµ“¡ª°µ‘À√◊Õ‰¡Ë


øiFÐ l


R vMLO «Ë


1

Page 42
Image 42
JVC KD-SX995 Before mounting Press, Fuse blows, Power cannot be turned on, No sound from the speakers, Sound is distorted

KD-SX995 specifications

The JVC KD-SX995 is a high-performance car stereo receiver designed to elevate your in-car audio experience. This model seamlessly blends advanced technology with user-friendly features, making it a popular choice for car enthusiasts and casual listeners alike.

One of the standout characteristics of the KD-SX995 is its impressive sound quality. With a built-in MOSFET amplifier, it delivers 50 watts of power to each of the four channels, ensuring crisp highs, dynamic mids, and satisfying bass. The receiver also incorporates a 24-bit digital to analog converter (DAC), which enhances sound clarity and detail. Audiophiles will appreciate the customizable EQ settings, allowing users to fine-tune their sound profile to suit their musical preferences.

The KD-SX995 features a detachable faceplate, providing an added layer of security against theft. Its bright and clear LCD display makes it easy for users to navigate through their playlists and settings. The receiver supports various media formats, including CDs, MP3s, and WMA files, making it versatile for different audio sources.

Connectivity is another key aspect of the KD-SX995. It is equipped with USB ports and an auxiliary input, enabling users to connect their portable devices directly. The Bluetooth functionality offers wireless audio streaming and hands-free calling, making it convenient to use while driving.

Another notable technology in the KD-SX995 is its support for digital radio via the built-in HD Radio tuner. This feature provides improved sound quality and access to additional radio stations, enriching the entertainment options for users. Additionally, the receiver includes compatibility with satellite radio, expanding the listening choices to suit every preference.

The KD-SX995 also comes with multiple preset equalizer settings, allowing listeners to choose between a flat sound, or specific enhancements for genres like rock, pop, or classical music. The intuitive interface and large buttons facilitate easy use, ensuring that drivers can adjust settings without distraction.

With its combination of sound quality, connectivity options, and user-friendly controls, the JVC KD-SX995 stands out as an exceptional car stereo receiver. Whether you’re an audiophile seeking superior sound or a casual user wanting a convenient and stylish audio system for your vehicle, the KD-SX995 provides a reliable solution that enhances every journey.