CONNECTIONS

ANSCHLÜSSE

CONNEXIONS

VERBINDINGEN

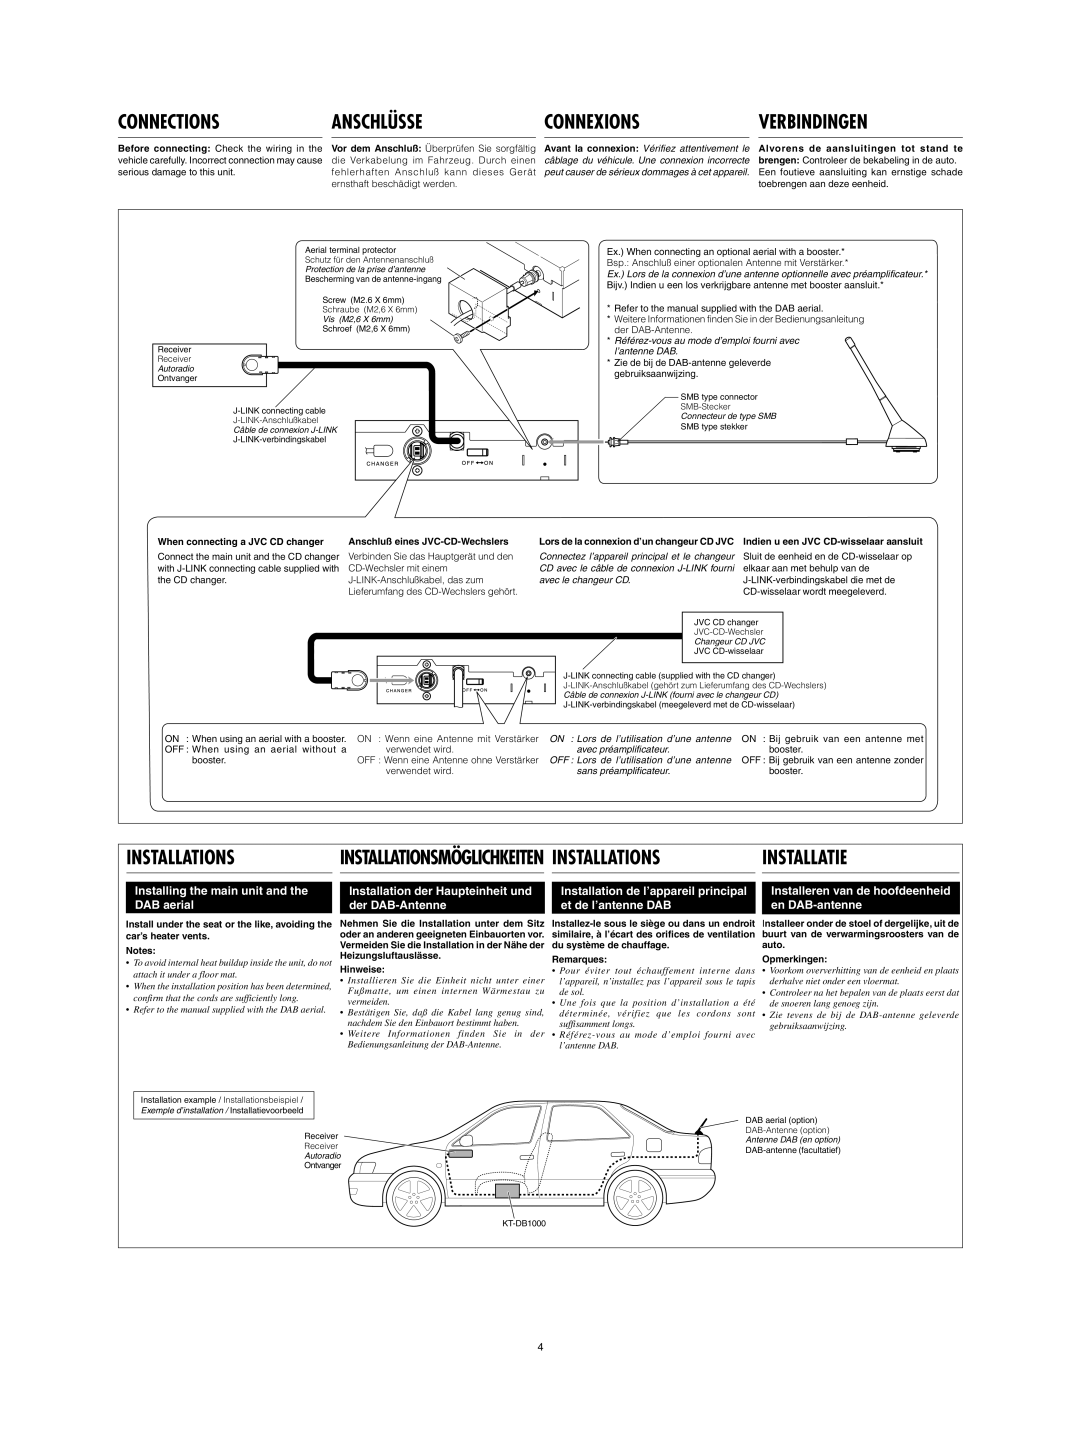
Before connecting: Check the wiring in the vehicle carefully. Incorrect connection may cause serious damage to this unit.

Vor dem Anschluß: Überprüfen Sie sorgfältig die Verkabelung im Fahrzeug. Durch einen fehlerhaften Anschluß kann dieses Gerät ernsthaft beschädigt werden.

Avant la connexion: Vérifiez attentivement le câblage du véhicule. Une connexion incorrecte peut causer de sérieux dommages à cet appareil.

Alvorens de aansluitingen tot stand te brengen: Controleer de bekabeling in de auto. Een foutieve aansluiting kan ernstige schade toebrengen aan deze eenheid.

Aerial terminal protector

Schutz für den Antennenanschluß

Protection de la prise d’antenne

Bescherming van de antenne-ingang

Screw (M2.6 X 6mm)

Schraube (M2,6 X 6mm)

Vis (M2,6 X 6mm)

Schroef (M2,6 X 6mm)

Receiver

Receiver

Autoradio

Ontvanger

J-LINK connecting cable

J-LINK-Anschlußkabel

Câble de connexion J-LINK

J-LINK-verbindingskabel

Ex.) When connecting an optional aerial with a booster.* Bsp.: Anschluß einer optionalen Antenne mit Verstärker.*

Ex.) Lors de la connexion d’une antenne optionnelle avec préamplificateur.* Bijv.) Indien u een los verkrijgbare antenne met booster aansluit.*

*Refer to the manual supplied with the DAB aerial.

*Weitere Informationen finden Sie in der Bedienungsanleitung der DAB-Antenne.

*Référez-vous au mode d’emploi fourni avec l’antenne DAB.

*Zie de bij de DAB-antenne geleverde gebruiksaanwijzing.

SMB type connector

SMB-Stecker

Connecteur de type SMB

SMB type stekker

When connecting a JVC CD changer

Connect the main unit and the CD changer with J-LINK connecting cable supplied with the CD changer.

Anschluß eines JVC-CD-Wechslers

Verbinden Sie das Hauptgerät und den CD-Wechsler mit einem J-LINK-Anschlußkabel, das zum Lieferumfang des CD-Wechslers gehört.

Lors de la connexion d’un changeur CD JVC

Indien u een JVC CD-wisselaar aansluit

Connectez l’appareil principal et le changeur

Sluit de eenheid en de CD-wisselaar op

CD avec le câble de connexion J-LINK fourni

elkaar aan met behulp van de

avec le changeur CD.

J-LINK-verbindingskabel die met de


CD-wisselaar wordt meegeleverd.

JVC CD changer

JVC-CD-Wechsler

Changeur CD JVC

JVC CD-wisselaar

J-LINK connecting cable (supplied with the CD changer)

J-LINK-Anschlußkabel (gehört zum Lieferumfang des CD-Wechslers)

Câble de connexion J-LINK (fourni avec le changeur CD)

J-LINK-verbindingskabel (meegeleverd met de CD-wisselaar)

ON : When using an aerial with a booster.

OFF : When using an aerial without a booster.

ON : Wenn eine Antenne mit Verstärker verwendet wird.

OFF : Wenn eine Antenne ohne Verstärker verwendet wird.

ON : Lors de l’utilisation d’une antenne avec préamplificateur.

OFF : Lors de l’utilisation d’une antenne sans préamplificateur.

ON : Bij gebruik van een antenne met booster.

OFF : Bij gebruik van een antenne zonder booster.

INSTALLATIONS

INSTALLATIONSMÖGLICHKEITEN INSTALLATIONS

INSTALLATIE


Installing the main unit and the DAB aerial

Installation der Haupteinheit und der DAB-Antenne

Installation de l’appareil principal


Installeren van de hoofdeenheid

et de l’antenne DAB


en DAB-antenne


Install under the seat or the like, avoiding the car’s heater vents.

Notes:

To avoid internal heat buildup inside the unit, do not attach it under a floor mat.

When the installation position has been determined, confirm that the cords are sufficiently long.

Refer to the manual supplied with the DAB aerial.

Nehmen Sie die Installation unter dem Sitz oder an anderen geeigneten Einbauorten vor. Vermeiden Sie die Installation in der Nähe der Heizungsluftauslässe.

Hinweise:

Installieren Sie die Einheit nicht unter einer Fußmatte, um einen internen Wärmestau zu vermeiden.

Bestätigen Sie, daß die Kabel lang genug sind, nachdem Sie den Einbauort bestimmt haben.

Weitere Informationen finden Sie in der Bedienungsanleitung der DAB-Antenne.

Installez-le sous le siège ou dans un endroit similaire, à l’écart des orifices de ventilation du système de chauffage.

Remarques:

Pour éviter tout échauffement interne dans l’appareil, n’installez pas l’appareil sous le tapis de sol.

Une fois que la position d’installation a été déterminée, vérifiez que les cordons sont suffisamment longs.

Référez-vous au mode d’emploi fourni avec l’antenne DAB.

Installeer onder de stoel of dergelijke, uit de buurt van de verwarmingsroosters van de auto.

Opmerkingen:

Voorkom oververhitting van de eenheid en plaats derhalve niet onder een vloermat.

Controleer na het bepalen van de plaats eerst dat de snoeren lang genoeg zijn.

Zie tevens de bij de DAB-antenne geleverde gebruiksaanwijzing.

Installation example / Installationsbeispiel /

Exemple d’installation / Installatievoorbeeld

Receiver

Receiver

Autoradio

Ontvanger

DAB aerial (option) DAB-Antenne (option) Antenne DAB (en option) DAB-antenne (facultatief)

KT-DB1000

4

Page 4
Image 4
JVC KT-DB1000 manual Connections Anschlüsse Connexions, Installations, Installatie, When connecting a JVC CD changer

KT-DB1000 specifications

The JVC KT-DB1000 is an advanced digital radio tuner that has garnered attention for its comprehensive feature set and robust capabilities. Designed for audiophiles and casual listeners alike, this tuner exemplifies JVC's commitment to providing high-quality audio experiences.

One of the most notable features of the KT-DB1000 is its ability to receive DAB (Digital Audio Broadcasting) and DAB+ stations. This means users can access a wide range of channels with crystal-clear sound quality, free from interference and static. The unit's support for DAB+ ensures compatibility with newer broadcasting standards, allowing users to enjoy an expanded selection of stations.

The tuner boasts an intuitive user interface with a large, backlit LCD display. This screen provides essential information such as station names, track titles, and signal strength, making it easy for users to navigate through their favorite stations. The digital display simplifies the tuning process, allowing for quick access to both preset and available channels.

Equipped with advanced RDS (Radio Data System) technology, the KT-DB1000 offers additional features such as traffic announcements, station identification, and dynamic label segment information. This enhances the listening experience by providing context and relevant updates in real-time.

In terms of connectivity, the KT-DB1000 is designed to seamlessly integrate into existing audio systems. It features various output options, such as RCA audio outputs and antenna terminals, catering to different setups. This flexibility ensures that users can incorporate the tuner without hassle, regardless of their existing equipment.

The tuner also comes with a robust memory function, allowing users to store up to 40 preset stations. This feature facilitates quick access to favorite channels, making everyday listening more convenient. The inclusion of a remote control further enhances the product’s usability, enabling users to adjust settings from the comfort of their seat.

On the technological front, the KT-DB1000 employs digital signal processing to deliver high-fidelity audio performance. This ensures that the tuner can produce rich soundscapes with impressive clarity and detail, making it suitable for music lovers who prioritize sound quality.

With its combination of modern digital features, user-friendly interface, and excellent sound quality, the JVC KT-DB1000 positions itself as an excellent choice for anyone looking to explore the world of digital radio broadcasting. Whether for home use or a more extensive audio system, it represents a significant step forward in radio technology, providing users with endless entertainment possibilities.