Daily Operations / Connections | 6 |
7Front panel
• “NO EFFECT” is displayed when you press a button which is not available for the current input or signal format (the lamp lights even when the function does not actually work).
•The items controlled by the MAKE system cannot be controlled by the buttons on the front panel (“REMOTE ON” is displayed and the lamps do not light).
1 | 2 | 3 | 4 | 5 | 6 | 7 | 8 | 9 | p |
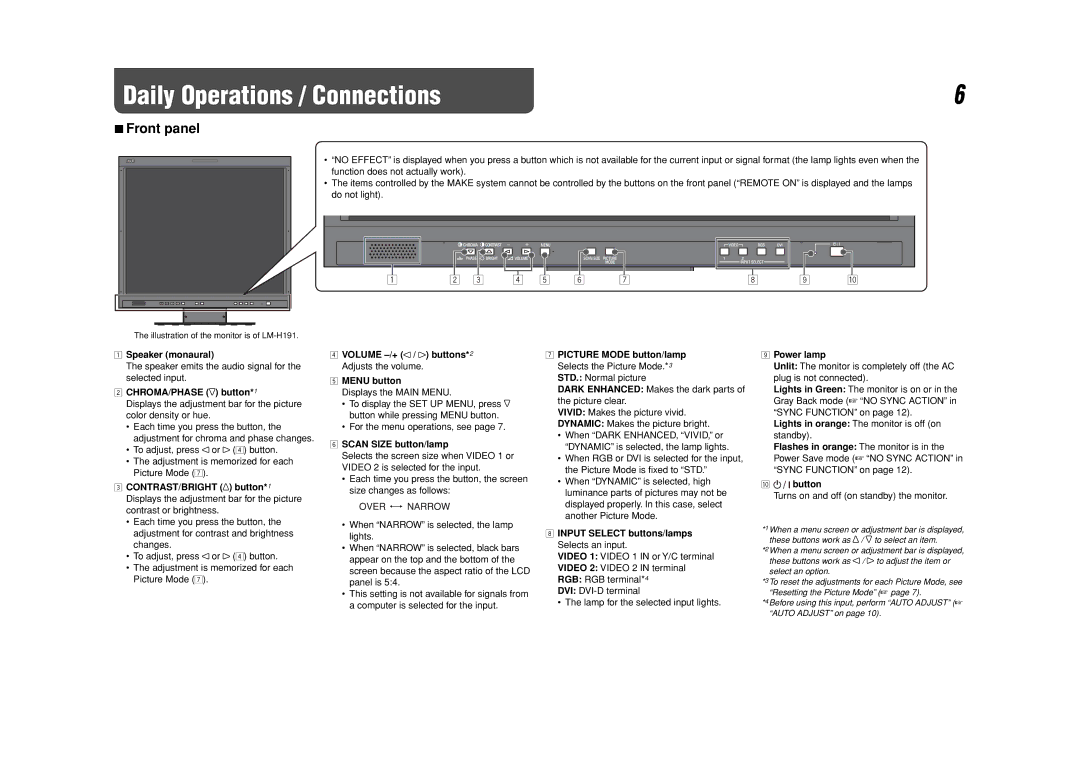
The illustration of the monitor is of
1Speaker (monaural)
The speaker emits the audio signal for the selected input.
2CHROMA/PHASE ( ) button*1
Displays the adjustment bar for the picture color density or hue.
•Each time you press the button, the adjustment for chroma and phase changes.
• To adjust, press or (4) button.
•The adjustment is memorized for each Picture Mode (7).
3CONTRAST/BRIGHT (![]() ) button*1 Displays the adjustment bar for the picture contrast or brightness.
) button*1 Displays the adjustment bar for the picture contrast or brightness.
•Each time you press the button, the adjustment for contrast and brightness changes.
• To adjust, press or (4) button.
•The adjustment is memorized for each Picture Mode (7).
4VOLUME –/+ ( / ) buttons*2 Adjusts the volume.
5MENU button
Displays the MAIN MENU.
•To display the SET UP MENU, press ![]() button while pressing MENU button.
button while pressing MENU button.
•For the menu operations, see page 7.
6SCAN SIZE button/lamp
Selects the screen size when VIDEO 1 or VIDEO 2 is selected for the input.
•Each time you press the button, the screen size changes as follows:
•When “NARROW” is selected, the lamp lights.
•When “NARROW” is selected, black bars appear on the top and the bottom of the screen because the aspect ratio of the LCD panel is 5:4.
•This setting is not available for signals from a computer is selected for the input.
7PICTURE MODE button/lamp Selects the Picture Mode.*3 STD.: Normal picture
DARK ENHANCED: Makes the dark parts of the picture clear.
VIVID: Makes the picture vivid.
DYNAMIC: Makes the picture bright.
•When “DARK ENHANCED, “VIVID,” or “DYNAMIC” is selected, the lamp lights.
•When RGB or DVI is selected for the input, the Picture Mode is fixed to “STD.”
•When “DYNAMIC” is selected, high luminance parts of pictures may not be displayed properly. In this case, select another Picture Mode.
8INPUT SELECT buttons/lamps Selects an input.
VIDEO 1: VIDEO 1 IN or Y/C terminal
VIDEO 2: VIDEO 2 IN terminal
RGB: RGB terminal*4
DVI:
• The lamp for the selected input lights.
9Power lamp
Unlit: The monitor is completely off (the AC plug is not connected).
Lights in Green: The monitor is on or in the Gray Back mode (☞ “NO SYNC ACTION” in “SYNC FUNCTION” on page 12).
Lights in orange: The monitor is off (on standby).
Flashes in orange: The monitor is in the Power Save mode (☞ “NO SYNC ACTION” in “SYNC FUNCTION” on page 12).
p 

 button
Turns on and off (on standby) the monitor.
*1 When a menu screen or adjustment bar is displayed, these buttons work as ![]() /
/ ![]() to select an item.
to select an item.
*2 When a menu screen or adjustment bar is displayed, these buttons work as / to adjust the item or select an option.
*3 To reset the adjustments for each Picture Mode, see “Resetting the Picture Mode” (☞ page 7).
*4 Before using this input, perform “AUTO ADJUST” (☞ “AUTO ADJUST” on page 10).