Video Cassette Recorder
Safety Precautions
Moisture Condensation
Front View
Rear View
Front Display Panel
ON-SCREEN Display for VHS deck
On the tape BeginningEnd
Remote Control
How To Use
Remote Control LCD
Check the contents
10 EN
Situate the recorder
Connect the recorder to TV
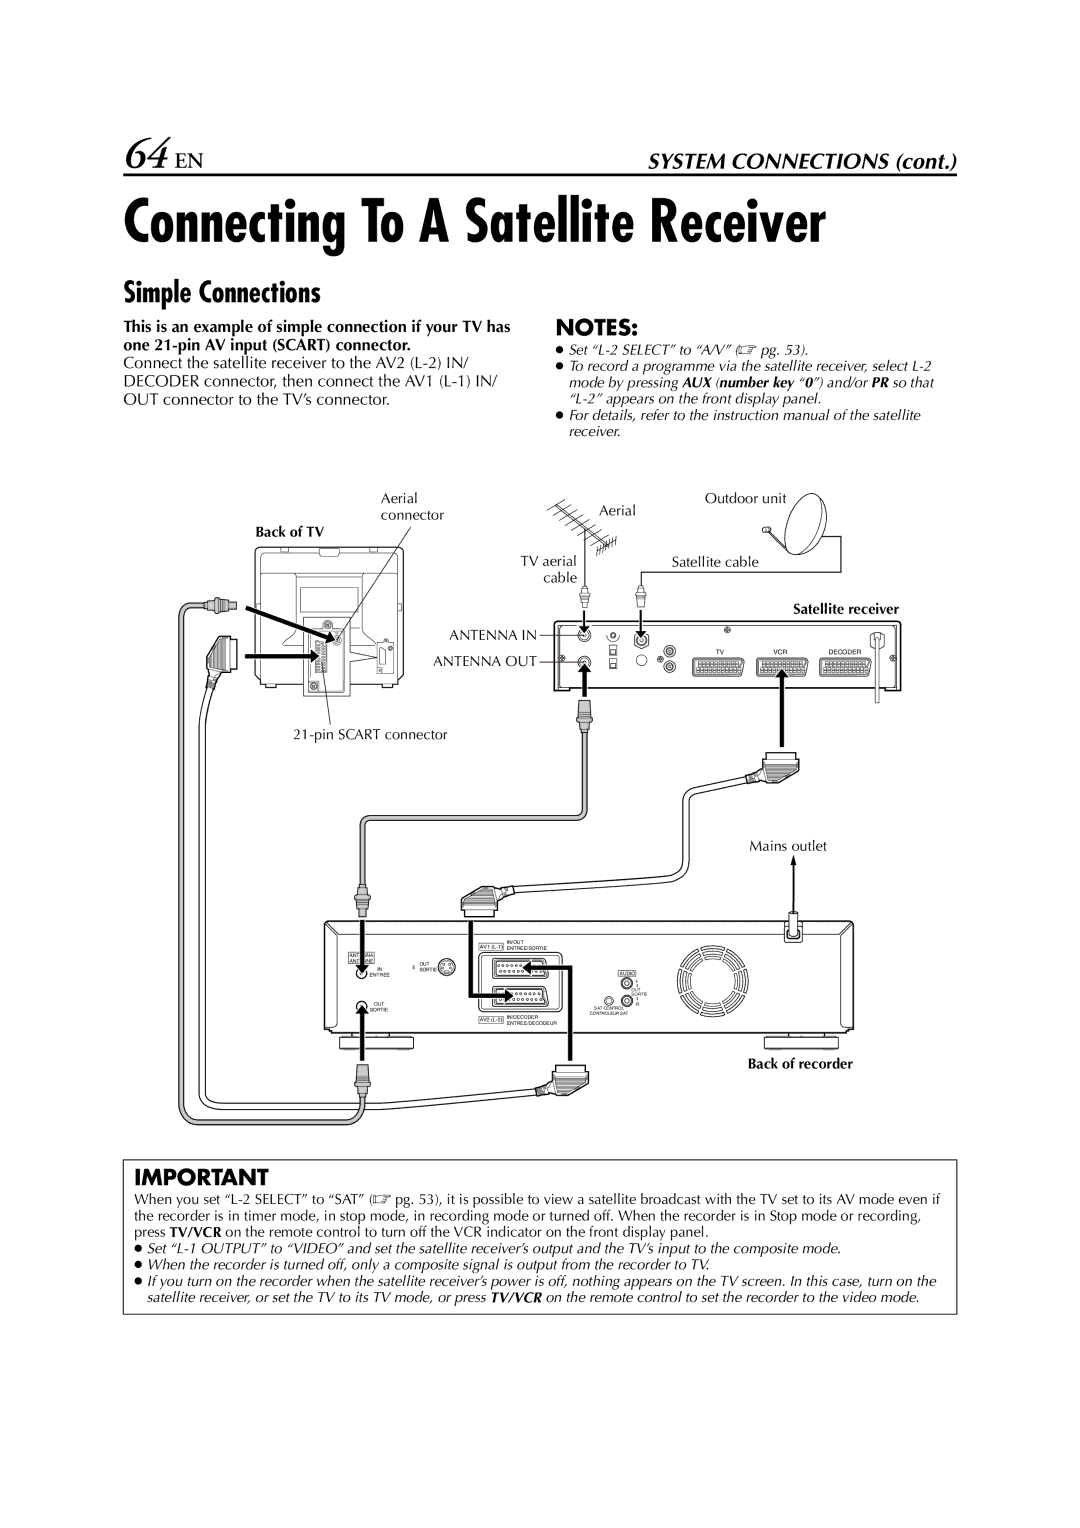
Aerial connector
To connect to a TV with S-VIDEO/AUDIO in connectors
Video Connection
Auto Set Up
12 EN
Turn on the recorder
Select your country
Perform Auto Set Up
Select the language
Press rtto select your language code
Press rtto select Auto and press OK or e
Perform Preset Download
14 EN
Press rtto select CH - and press OK or e
Progress, it will be interrupted
Just Clock
Language for the on-screen display
� pg , Just Clock
Access the Main Menu screen
Access the Country Set screen
Language
16 EN
Installing Satellite Controller
Situate the Satellite Controller
Attach the Satellite Controller
Make connections
Setting satellite receivers brand and channel
18 EN
NexTView Link
TV Auto Power On
VCR Auto Standby Direct Rec
20 EN
Basic Playback
VHS deck
Choose a programme
Set the tape speed
Start recording
Pause/Resume recording
22 EN
Slow Motion
Pause during playback
Activate frame-by-frame playback
High-Speed Turbo Search
Variable Speed Search
Index Search
Skip Search
24 EN
Next Function Memory
Repeat Playback
Activate Repeat Playback
Adjust the tracking manually
Manual Tracking
Soundtrack Selection
Override automatic tracking
Instant Timer Recording ITR
26 EN
Reset the counter
Tape Remaining Time
Set the counter display
Press 0000 before starting recording or playback
Retake
28 EN
Receiving Stereo and Bilingual Programmes
Playback
Recording
30 EN
DV deck
Select the DV deck
Press DV
DV recording indicator turns off
32 EN
For forward high-speed search
During playback, turn the JOG dial quickly to the right
Search, or 3 for reverse high-speed search
During playback or still, press 5 for forward high-speed
34 EN
Time Code
See Audio REC on
Programming
36 EN
Set the VPS/PDC mode
Engage the recorder’s timer mode
Check the programme data
Satellite Receiver Users
Express Timer Programming
38 EN
To Timer-Record Weekly Or Daily Serials
VPS/PDC Recording
Enter the programme date
Enter the channel position
Enter the programme mode
Before performing the 24 Hour Express Timer Programming
40 EN
Set the programme start/stop time and channel
Page
42 EN
Cancel or change programme setting
Confirm the overlapping programmes
Select the programme to modify
Overlapping programmes blink on the TV screen
44 EN
Tape Dubbing
From DV to VHS Dubbing An Entire Cassette
From VHS to DV Dubbing An Entire Cassette
Dubbing direction indicator VHS lights
Press DV, then press SP/LP p
46 EN
From DV to VHS
VHS playback indicator and DV recording indicator light
From VHS to DV
Locate the start point on the VHS deck
Prepare the DV deck for dubbing
48 EN
Recorder Video input
If the camcorder has no S-VIDEO output connector
Player
Another Video Recorder
50 EN
Another recorder
Recorder
Player Recorder
Output/Input Set
Press rt to move
Select Setting
VHS F-1 Input Setting
Decoder connector
Select the input mode for the Video Video connector
Audio Dubbing
54 EN
VHS Audio Dubbing
DV Audio Dubbing
End Audio Dubbing
Engage the Audio Dubbing mode
Press A.DUB
DV Insert Editing SP mode only
Insert Editing
56 EN
VHS Insert Editing
Engage the Insert Editing mode
AV Insert Editing VHS deck only
Prepare the recording cassette
Start Editing
Access the R.A.Edit screen
58 EN
Select the programme
Insert a VHS or S-VHS cassette and a Mini DV cassette
Locate the end point
Prepare the source tape
Start Random Assemble Editing
End Random Assemble Editing
Change the remote control code
Set the remote control code
60 EN
Display the code
TV Multi-Brand Remote Control
TV PR +/-, TV %+/- Volume, TV Muting, number keys
Set the TV brand code
Operate the TV
Satellite Receiver Multi-Brand Remote Control
62 EN
Set the satellite receiver brand code
Operate the satellite receiver
To DV in connector
About DV IN/OUT connector
Digital printer
Aerial ConnectorAerial
Pin Scart connector Mains outlet
Simple Connections
Outdoor unit Satellite cable
Aerial connector Outdoor unit Satellite cable
Perfect Connections
Pin Scart
Decoder
Select the input mode
66 EN
Connect the decoder
Set the tuner
Make connections
FM tuner CD player Stereo amplifier
AUX in or Tape Monitor
Speaker Television
Mode Set
Access the Mode Set screen
Select the mode
Select the mode setting
Powered back on
Default setting is bold in the table below
Screen. Messages appear in the selected language � pg
Control, or press 7 on the recorder
70 EN
VHS Mode SET
To record Secam signals, or play back a Mesecam tape
To record PAL signals, or play back a PAL or Ntsc tape
72 EN
Enables Audio Dubbing later
Original recorded sound
Audio-dubbed sound
Full SOUNDOriginal recorded sound and Audio-dubbed sound
Access the Auto Channel Set screen
Tuner Set
74 EN
Auto Channel Set
Perform Auto Channel Set
View the Confirmation screen
Press OK twice
TV screen moves from
76 EN
Manual Channel Set
When Receiving a Scrambled Broadcast
Delete a Channel
Set Stations a
78 EN
Set Stations B
TV Station And ID List
RTBF1 or
Clock Set
Access the Clock Set screen
80 EN
Set the date and time
Set Just Clock
Set the source channel position for clock data
Start the clock operation
Guide Program Number
Guide Program Number Set
Enter the Guide Program number
No power is supplied to the recorder
Connect the mains power cord
84 EN
VHS deck
DV deck
86 EN
Turn off the recorder once and connect
Not connected between TV
Turn off the recorder or the connected
Playback
88 EN
Scan system
Lines VHS Lines S-VHS Frequency range Hz to 10,000
Hz to 20,000 Hz Hi-Fi audio Maximum recording time
Auto Channel Set Auto Set Up
Connecting To a Printer
Express Timer Programming
CODE/SHOWVIEW System Setup
90 EN
Page
International telephone Language code
Example Francais 03 is selected for Belgium
Country code
For Customers in Asia, Oceania, Middle East and Africa