–Consistsof CA-UXG4and SP-UXG4
UX-G4 UX-G3
MICRO COMPONENT SYSTEM
INSTRUCTIONS
CAUTION—STANDBY/ON button
Warnings, Cautions and Others
Side view
IMPORTANT FOR LASER PRODUCTS
CAUTION Proper Ventilation
Front view
Installation
Introduction
Precautions
Power sources
English
Contents
Listening to FM and AM Broadcasts
Main Unit
Location of the Buttons and Controls
VOLUME
English
e r t y u
English
1 2 3 4 5 6
9 p q w
English
Remote Control
English
Getting Started
Connecting AM and FM Antennas
Connecting Speakers
To remove the speaker grilles
Adjusting the Voltage Selector
Connecting Other Equipment
English
English
Putting the Batteries into the Remote Control
NOW you are ready to plug in the unit
On the remote control ONLY
Common Operations
Setting the Clock
Turning On the Power
On the remote control ONLY
Adjusting the Volume
On the remote control ONLY
On the remote control ONLY
Playing Back the Entire Disc—NormalPlay
Playing Back Discs
When playing CD-Rsor CD-RWs
English
Programming the Track Playing Order —ProgramPlay
On the remote control ONLY 1 Place a disc
On the remote control ONLY
English
English
On the remote control ONLY
To check the program contents
To cancel Repeat Play, press REPEAT
Playing at Random—RandomPlay
On the remote control ONLY
On the remote control ONLY
English
English
Playing Back Tapes
On the remote control ONLY
To fast-windto the left or to the right, PRESET
Presetting Stations
Listening to FM and AM Broadcasts
Setting the Tuner Interval Spacing
Tuning in to a Station
PRESET GROUP to select a
Using an External Equipment
Tuning in to a Preset Station
Press PRESET GROUP or
English
Recording
On the remote control ONLY
On the remote control ONLY
On the unit ONLY
On the remote control ONLY
English
Recording Discs —DiscSynchronized Recording
How the Timer actually works
Using the Timers
Using Daily Timer and Recording Timer
On the remote control ONLY
To deactivate the timer, press and
Using Snooze Timer
3 For the Recording Timer ONLY
6 Press and hold DAILY TIMER/SNOOZE on the unit
English
Using Sleep Timer
On the remote control ONLY
How the Sleep Timer actually works
English
Maintenance
Cleaning the unit
To clean the disc
Supplied accessories
Troubleshooting
Specifications
Symptom
UX-G4/UX-G3MICRO COMPONENT SYSTEM
VOLTAGE SELECTOR
IMPORTANT for mains AC line
–Consistsof CA-UXG4and SP-UXG4
UX-G4 UX-G3
MICRO COMPONENT SYSTEM
INSTRUCTIONS
CAUTION—STANDBY/ON button
Warnings, Cautions and Others
Side view
IMPORTANT FOR LASER PRODUCTS
CAUTION: Proper Ventilation
Front view
Introduction
Precautions
Power sources
Installation
English
Contents
Listening to FM and AM Broadcasts
Main Unit
VOLUME
Location of the Buttons and Controls
English
e r t y u
English
1 2 3 4 5 6
9 p q w
English
Remote Control
OVER
English
Connecting AM and FM Antennas
Connecting Speakers
Getting Started
To remove the speaker grilles
Adjusting the Voltage Selector
Connecting Other Equipment
English
English
Putting the Batteries into the Remote Control
NOW you are ready to plug in the unit
1 Press CLOCK/TIMER repeatedly
Setting the Clock
Turning On the Power
On the remote control ONLY
On the remote control ONLY
Adjusting the Volume
On the remote control ONLY
On the remote control ONLY
Playing Back the Entire Disc—NormalPlay
When playing CD-Rsor CD-RWs
Playing Back Discs
English
Programming the Track Playing Order —ProgramPlay
On the remote control ONLY 1 Place a disc
On the remote control ONLY
English
English
On the remote control ONLY
To check the program contents
To cancel Repeat Play, press REPEAT
Playing at Random—RandomPlay
On the remote control ONLY
On the remote control ONLY
English
English
On the remote control ONLY
To fast-windto the left or to the right, PRESET
Playing Back Tapes
Turn the VOLUME + / –
Setting the Tuner Interval Spacing
Tuning in to a Station
Presetting Stations
PRESET GROUP to select a
Using an External Equipment
Tuning in to a Preset Station
3 Press PRESET GROUP or
English
On the remote control ONLY
On the remote control ONLY
Recording
On the unit ONLY
On the remote control ONLY
English
Recording Discs —DiscSynchronized Recording
How the Timer actually works
Using the Timers
Using Daily Timer and Recording Timer
On the remote control ONLY
To deactivate the timer, press and
Using Snooze Timer
3 For the Recording Timer ONLY
6 Press and hold DAILY TIMER/SNOOZE on the unit
English
Using Sleep Timer
On the remote control ONLY
How the Sleep Timer actually works
English
Maintenance
Cleaning the unit
To clean the disc
Supplied accessories
Troubleshooting
Specifications
Symptom
EN, CS 0605NYMMDWORI
VOLTAGE SELECTOR
UX-G4/UX-G3MICRO COMPONENT SYSTEM
IMPORTANT for mains AC line
UX-G3 –Consistsof CA-UXG3and SP-UXG3
MICRO COMPONENT SYSTEM
INSTRUCTIONS
UX-G4 –Consistsof CA-UXG4and SP-UXG4
CAUTION—STANDBY/ON button
Warnings, Cautions and Others
Avisos, precauciones y otras notas
Advertências, precauções e outras notas
PRECAUÇÃO
PRECAUCIÓN
PRECAUÇÃO
PRECAUCIÓN
Front view
CAUTION Proper Ventilation
PRECAUCIÓN: Ventilación correcta
PRECAUÇÃO: Ventilação adequada
IMPORTANTE PARA PRODUCTOS LÁSER
IMPORTANT FOR LASER PRODUCTS
PARA PRODUTOS LASER, IMPORTANTE
Introduction
Precautions
Power sources
Installation
English
Contents
Listening to FM and AM Broadcasts
Main Unit
VOLUME
Location of the Buttons and Controls
English
e r t y u
English
1 2 3 4 5 6
9 p q w
FM/AM
Remote Control
VOLUME
English
English
Connecting AM and FM Antennas
Connecting Speakers
Getting Started
To remove the speaker grilles
Adjusting the Voltage Selector
Connecting Other Equipment
English
English
Putting the Batteries into the Remote Control
NOW you are ready to plug in the unit
On the remote control ONLY 1 Press CLOCK/TIMER
Setting the Clock
Turning On the Power
On the remote control ONLY
On the remote control ONLY
Adjusting the Volume
On the remote control ONLY
On the remote control ONLY
Playing Back the Entire Disc—NormalPlay
When playing CD-Rsor CD-RWs
Playing Back Discs
English
Programming the Track Playing Order —ProgramPlay
On the remote control ONLY 1 Place a disc
On the remote control ONLY
English
English
On the remote control ONLY
To check the program contents
To cancel Repeat Play, press REPEAT
Playing at Random—RandomPlay
On the remote control ONLY
On the remote control ONLY
English
English
On the remote control ONLY
To fast-windto the left or to the right, PRESET
Playing Back Tapes
Turn the VOLUME + / –
Setting the Tuner Interval Spacing
Tuning in to a Station
Presetting Stations
PRESET GROUP to select a
Using an External Equipment
Tuning in to a Preset Station
Press PRESET GROUP or
English
On the remote control ONLY
On the remote control ONLY
Recording
On the unit ONLY
On the remote control ONLY
English
Recording Discs —DiscSynchronized Recording
How the Timer actually works
Using the Timers
Using Daily Timer and Recording Timer
On the remote control ONLY
To deactivate the timer, press and
Using Snooze Timer
3 For the Recording Timer ONLY
6 Press and hold DAILY TIMER/SNOOZE on the unit
English
Using Sleep Timer
On the remote control ONLY
How the Sleep Timer actually works
English
Maintenance
Cleaning the unit
To clean the disc
Supplied accessories
Troubleshooting
Specifications
Symptom
EN, SP, PR 0605NYMMDWORI
IMPORTANT for mains AC line
IMPORTANTE para la línea de la red CA
IMPORTANTE para a ligação à tensão da rede CA
LVT1364-011A
MICRO COMPONENT SYSTEM
INSTRUCTIONS
UX-G4 –Consistsof CA-UXG4and SP-UXG4
CAUTION—STANDBY/ON button
Warnings, Cautions and Others
Side view
IMPORTANT FOR LASER PRODUCTS
CAUTION: Proper Ventilation
Front view
Introduction
Precautions
Power sources
Installation
Listening to FM and AM Broadcasts
Contents
2 3 q w e r t
VOLUME
Location of the Buttons and Controls
Main Unit
Display window
1 2 3 4 5 6
9 p q w
e r t y u
See pages in parentheses for details
Remote Control
Unpacking
Connecting AM and FM Antennas
Connecting Speakers
Getting Started
To remove the speaker grilles
Connecting Other Equipment
Putting the Batteries into the Remote Control
NOW you are ready to plug in the unit
1 Press CLOCK/TIMER repeatedly
Setting the Clock
Turning On the Power
On the remote control ONLY
On the remote control ONLY
Adjusting the Volume
On the remote control ONLY
On the remote control ONLY
1 Press OPEN on top of the unit
When playing CD-Rsor CD-RWs
Playing Back Discs
Playing Back the Entire Disc—NormalPlay
Basic Disc Operations
On the remote control ONLY 1 Place a disc
On the remote control ONLY
Programming the Track Playing Order —ProgramPlay
Repeating Tracks—RepeatPlay
On the remote control ONLY
To check the program contents
To cancel Repeat Play, press REPEAT
Displaying the Remaining Time during Playback
On the remote control ONLY
On the remote control ONLY
Playing at Random—RandomPlay
Playing Back a Tape
On the remote control ONLY
To fast-windto the left or to the right, PRESET
Playing Back Tapes
1 Tune in to the station you want to preset
Tuning in to a Station
Presetting Stations
On the remote control ONLY
2 Press PRESET GROUP or
Using an External Equipment
Tuning in to a Preset Station
On the remote control ONLY
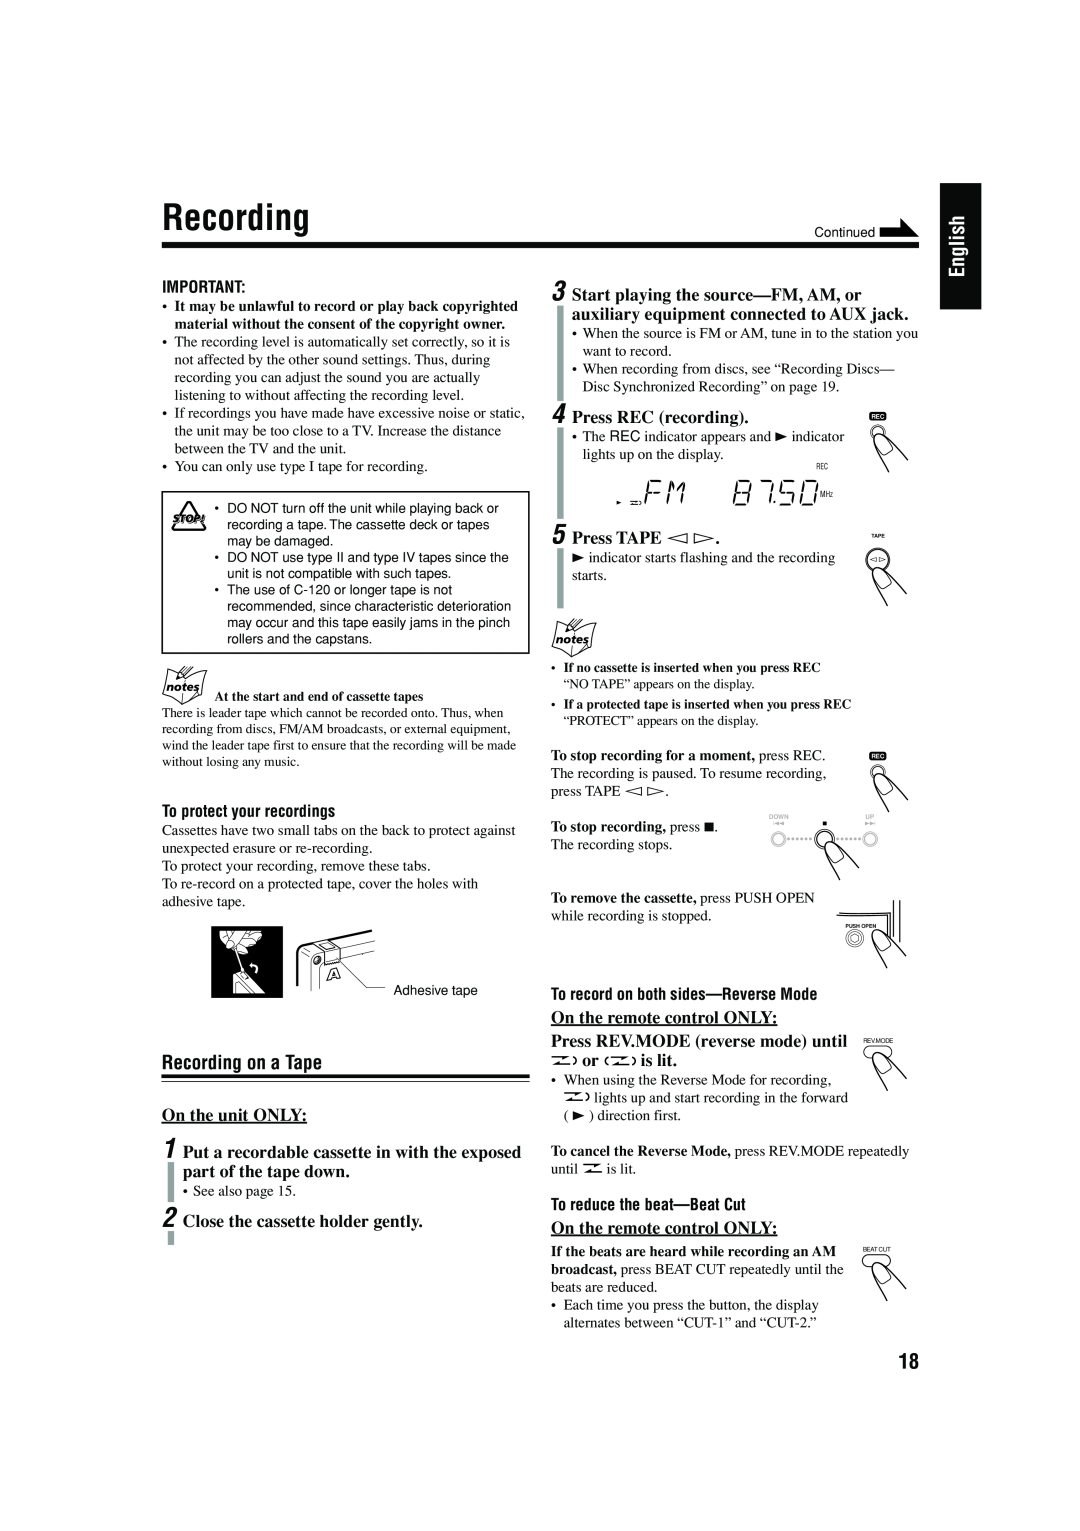
Recording on a Tape
On the remote control ONLY
On the remote control ONLY
Recording
2 Close the cassette holder gently
On the remote control ONLY
Recording Discs —DiscSynchronized Recording
On the unit ONLY
How the Timer actually works
Using the Timers
Using Daily Timer and Recording Timer
On the remote control ONLY
To deactivate the timer, press and
Using Snooze Timer
3 For the Recording Timer ONLY
6 Press and hold DAILY TIMER/SNOOZE on the unit
When you activate the Sleep Timer, Daily Timer and Auto Standby at the same time
Using Sleep Timer
On the remote control ONLY
How the Sleep Timer actually works
General Notes
Maintenance
Cleaning the unit
To clean the disc
Action
Troubleshooting
Symptom
Possible Cause
Tuner
Specifications
Supplied accessories
Amplifier Section
0605NYMMDWORI
UX-G4MICRO COMPONENT SYSTEM
2005 Victor Company Of Japan, Limited