GC-S1
Dear Customer
Important For Customers in U.K
It is recommended that you
This unit is produced to comply with Standard IEC Publ
Some DO’S and DON’TS on the Safe USE of Equipment
Shoot an image. pg
Turn the power on. pg
Load batteries. pg
Play an image. pg
10X Zooming for Magnifying Faraway Subjects
Major Features EN
Contents
Soft case
Alkaline battery x
LR6 AA-size
Video cable
Loading Batteries
Hand Strap Attachment
Unloading Batteries
Household Power Supply
Connect the Power Cord to the AC Power Adapter
Make sure connections are secure
Getting Started
Date/Time Setting
Rotate the Menu Jog Dial to select Exit and push it 3 times
EX I T Date / T I ME
Set the values for the date
Set the values for the time
12EN
Lens Adjustment Shutter Release Button
To brighten the image
Brightness Control
To darken the image
Rotate the Bright dial upward
Self-Timer mode
Shooting Mode Selection
Full Auto mode
Manual mode
Pictrue Mode Selection
Cture Mode System
STD Economy EX I T
Train the lens on the subject to be photo- graphed
Shutter Release Button Power Dial Lock Button
Camera turns on in the Full Auto mode
Simple Shooting Full Auto Shooting
Display Button Standard View with Information Display mode
Camera Setup Check
Zoom Shooting
Wide-angle zooming
Relatively wide area can be photographed
Self-Timer Shooting
Self-Timer Lamp
Blinks Lock Button
Flash Adjustment
Flash Shooting
To take another shot with a flash
To adjust a previously set exposure value
Exposure Control
Exposure EX I T
Auto
Adjusting the White Balance
M.W.B. Setup Screen appears
White Balance Control
Page
Selecting the Shutter Speed
Menu Jog Dial Power Dial Look Button
Shutter Speeds Selection
Shutter Speed
Shutter speed is not affected by subtle hand movements
Shutter Speeds and Effects
Shutter Speed Effect
Hard-to-shoot subjects in low light
Minimum subject distance
Manual Focusing
To focus on a farther subject
To focus on a nearer subject
Display Button
View Mode Selection
Standard View mode
Quick View mode
Power Save Mode
Power Save OFF EX I T
To deactivate the Power Save mode
Flash ADJ EX I T
Flash Adjustment
Camera Menu Cture Mode System
Flash ADJ Date / T I ME
Playback Through a TV Monitor or VCR
Playback
Auto Playback
Zoom Button Power Dial
When there is more than one image in memory
Normal Playback
Index Screen
Index Playback
Play Mode Ndex Effect Frame Mult EX I T
Playback
Protecting Images
Copy Format EX I T
Press Shutter After Select
Screen returns to the normal playback screen
To remove protection
Rotate the Menu Jog Dial to select Delete and push it
Deleting Images
File Screen
File Screen appears
To delete all images
Delete
Delete Execute EX I T
To select an image by browsing images stored in memory
SEP I a Zoom EX I T
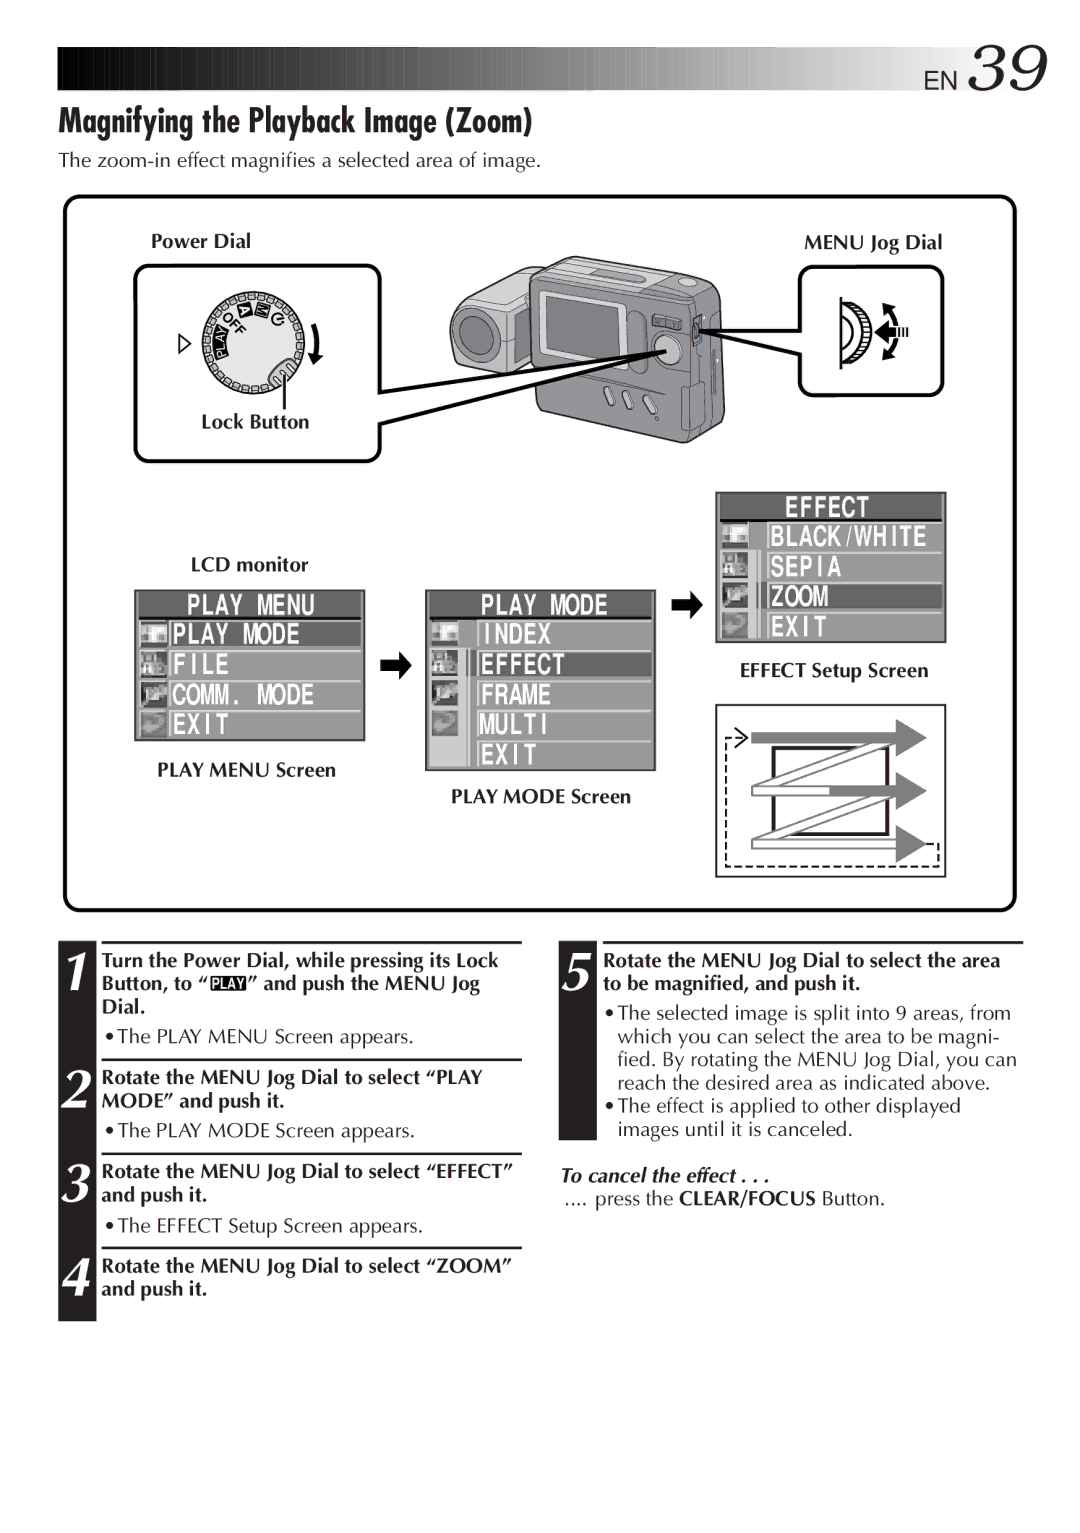
Menu Jog Dial Power Dial
To cancel the effect
Applying Sepia/Black-and-White Effects
Zoom-in effect magnifies a selected area of image
Effect Setup Screen
Magnifying the Playback Image Zoom
Effect Black /WH ITE SEP I a Zoom EX I T
Types of Frames
Preset frames 9 types
Rotate the Menu Jog Dial to select a frame and push it
Frame Setup Screen
Framing an Image
Rotate the Menu Jog Dial to select Frame and push it
Rotate the Menu Jog Dial to select Multi and push it
Multi-Image Screen
Mult Same
To Create a Multi-Image Screen Using the Same Image
To Create a Multi-Image Screen Using Selected Images
To cancel the selection of an image
Installing a Compact Flash Card
Compact Flash Card Operation
Removing a Compact Flash Card
Initializing the Storage Media
Protect Delete Copy Format EX I T
Preparation
Shoot images
Install the Compact Flash card in the camera
Applied Operations
Storing Images in a Compact Flash Card
To copy all images
Copy Screen
Rotate the Menu Jog Dial to select Copy and push it
To copy selected images only
Before doing the following, perform steps 1 through 5 on
EN Applied Operation
ALL Execute Selected EX I T
To Copy Selected Images Only
Copy Confirmation Screen
To Copy All Images
FLASH/TRANSFER Button Lock Button
Image Copy Using Infrared Communication IrTran-P
Comm . Mode PC Mode
Rotate the Menu Jog Dial to select COMM. Mode and push it
50 cm
Reception is complete when this message disappears
To abort image transfer in the middle
Make multi-image screens, when processing images
Printing on a Digital Printer IrDA Transfer
Press the FLASH/TRANSFER Button
Push the Menu Jog
COMM. Mode Setup Screen
PC Connection Operation
Picture Navigator Software Provided
@ # %
PC Jack
Shutter Release Button
Infrared Beam Sensor
Train on the subject
Tripod Mounting Socket
EN CONTROLS, Connectors and Indicators
CF F I NE
On-Screen Display During Shooting
These icons are displayed when manual focusing is selected
ENCONTROLS, Connectors and Indicators
Icons Displayed During Manual Focusing
Picture Quality Mode FINE/STD
Total Number of Images
Battery Power Remaining
When the Power Dial is set to playback screen
On-Screen Display During Playback
When the built-in memory is full and no more 47-53
No power is supplied
During flash shooting, power turns off
Is the battery dead?
AC power adapter and plug it in for over
Frames are erased. Consult your nearest JVC
Dealer
Appears when data was not received due to failure
Appears when image transmission is cancelled
Appears when image reception is cancelled
Appears when data was not sent due to failure
To prevent fire, electric shock or injury
To prevent fire, malfunction or electric shock
To avoid malfunction
To protect the unit, do not
For safety, do not
Avoid using the unit
Do not leave the unit
Be aware of the following phenomena for
To prolong service life
To prevent damage to the LCD monitor
Do not
Major Specifications
Exposure compensation
Camera setup check
Index
Pg , 57
GC-S1

