•The camcorder re-enters the Record-Standby mode.
Press the Start/Stop button.
•The tally lamp lights while recording is in progress, and “REC ” appears in the viewfinder.
STOP RECORDING
START SHOOTING
3
NOTE:

14RECORDING Basic Recording

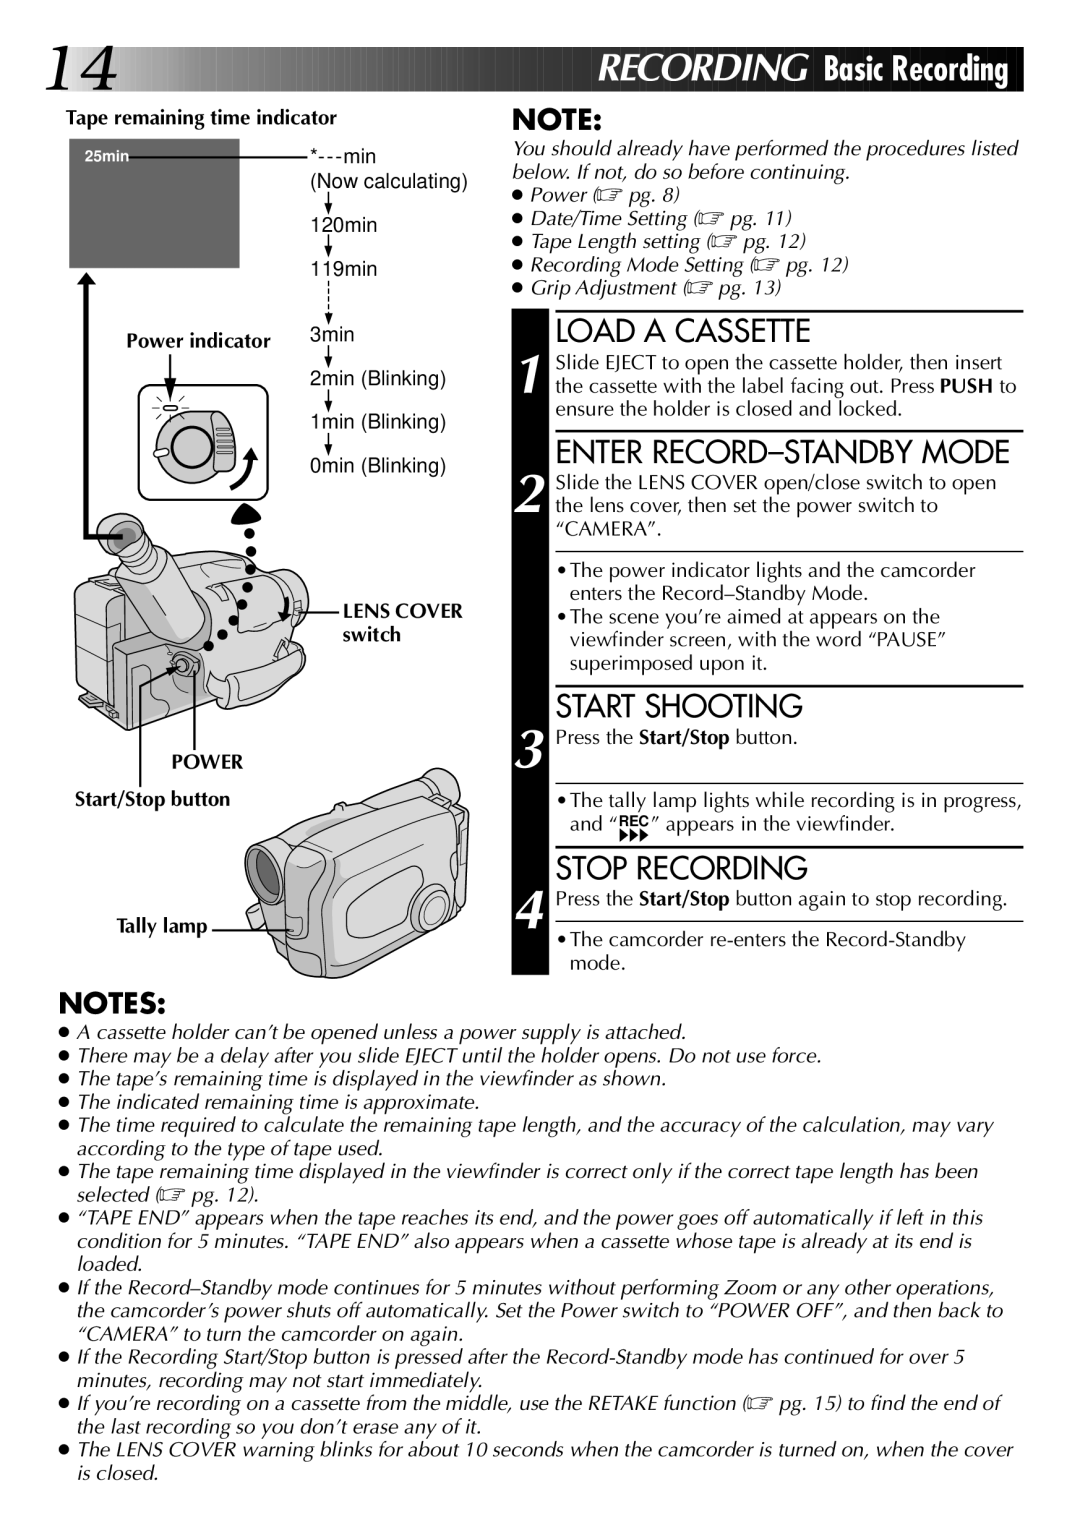
Tape remaining time indicator

25min

*---min

You should already have performed the procedures listed

below. If not, do so before continuing.


(Now calculating)


Power (pg. 8)


120min

Date/Time Setting (pg. 11)


Tape Length setting (pg. 12)


119min

Recording Mode Setting (pg. 12)


Grip Adjustment (pg. 13)

Power indicator

3min

LOAD A CASSETTE


2min (Blinking)

Slide EJECT to open the cassette holder, then insert


1 the cassette with the label facing out. Press PUSH to


1min (Blinking)

ensure the holder is closed and locked.


ENTER RECORD–STANDBY MODE


0min (Blinking)


Slide the LENS COVER open/close switch to open


2 the lens cover, then set the power switch to


“CAMERA”.


•The power indicator lights and the camcorder


LENS COVER

enters the Record–Standby Mode.


•The scene you’re aimed at appears on the


switch

viewfinder screen, with the word “PAUSE”


superimposed upon it.

POWER

Start/Stop button

4 Press the Start/Stop button again to stop recording.

Tally lamp

NOTES:

A cassette holder can’t be opened unless a power supply is attached.

There may be a delay after you slide EJECT until the holder opens. Do not use force.

The tape’s remaining time is displayed in the viewfinder as shown.

The indicated remaining time is approximate.

The time required to calculate the remaining tape length, and the accuracy of the calculation, may vary according to the type of tape used.

The tape remaining time displayed in the viewfinder is correct only if the correct tape length has been selected (pg. 12).

“TAPE END” appears when the tape reaches its end, and the power goes off automatically if left in this condition for 5 minutes. “TAPE END” also appears when a cassette whose tape is already at its end is loaded.

If the Record–Standby mode continues for 5 minutes without performing Zoom or any other operations, the camcorder’s power shuts off automatically. Set the Power switch to “POWER OFF”, and then back to “CAMERA” to turn the camcorder on again.

If the Recording Start/Stop button is pressed after the Record-Standby mode has continued for over 5 minutes, recording may not start immediately.

If you’re recording on a cassette from the middle, use the RETAKE function (pg. 15) to find the end of the last recording so you don’t erase any of it.

The LENS COVER warning blinks for about 10 seconds when the camcorder is turned on, when the cover is closed.

Page 14
Image 14
JVC Model GR-AX820 manual Tape remaining time indicator, Power, Start/Stop button, Tally lamp

Model GR-AX820 specifications

The JVC Model GR-AX820 is a notable camcorder that exemplifies the brand's commitment to delivering advanced technology and user-friendly features. Launched during the 1990s, this model has become a classic among enthusiasts of compact camcorders, appreciated for both its innovative features and its portability.

One of the standout characteristics of the GR-AX820 is its compact design, making it easy to carry for on-the-go recording. Weighing approximately 2.5 pounds and featuring an ergonomic design, it is comfortable to hold for extended periods, allowing for a seamless recording experience. The camcorder utilizes a 1/4-inch CCD sensor, which helps capture high-quality video, offering an excellent balance of sensitivity and resolution.

The GR-AX820 is equipped with a 20x optical zoom lens, providing users with the flexibility to capture close-up shots without sacrificing image quality. Additionally, a digital zoom feature allows for even greater magnification, though it is generally recommended to rely on optical zoom for maintaining clarity. The lens is complemented by an autofocus system that ensures subjects are in sharp focus, making it an ideal choice for both amateur and more experienced videographers.

One of the notable technologies implemented in the GR-AX820 is JVC's advanced image stabilization system. This feature significantly reduces the effects of shakiness during handheld shooting, resulting in smoother footage. The camcorder also comes with various manual and automatic settings that cater to different shooting environments, allowing users to adjust exposure, white balance, and more.

For audio, the GR-AX820 incorporates a built-in stereo microphone that captures clear sound, a key element in enhancing the overall quality of the recorded videos. Additionally, it supports the connection of an external microphone for those looking to improve their audio setup further.

The camcorder records in the VHS-C format, allowing for convenient playback on standard VCRs with the use of an adapter. This format, along with its intuitive controls and LCD screen for playback, makes sharing memories more accessible without the need for a complex editing setup.

In summary, the JVC Model GR-AX820 is a well-rounded camcorder that combines portability, advanced optical technology, and effective stabilization to deliver quality video recording. Its user-friendly features and reliable performance make it a solid choice for families, hobbyists, and professionals who appreciate vintage technology.