PRESS NUMBER KEY (0–9)
THEN (OK) TO TEST PRESS (MENU) TO END

NUMBER

1

T

W

2

3

2

4 5 6

7 8 9

0 4

EN17

ACCESS CABLE BOX

BRAND SET SCREEN

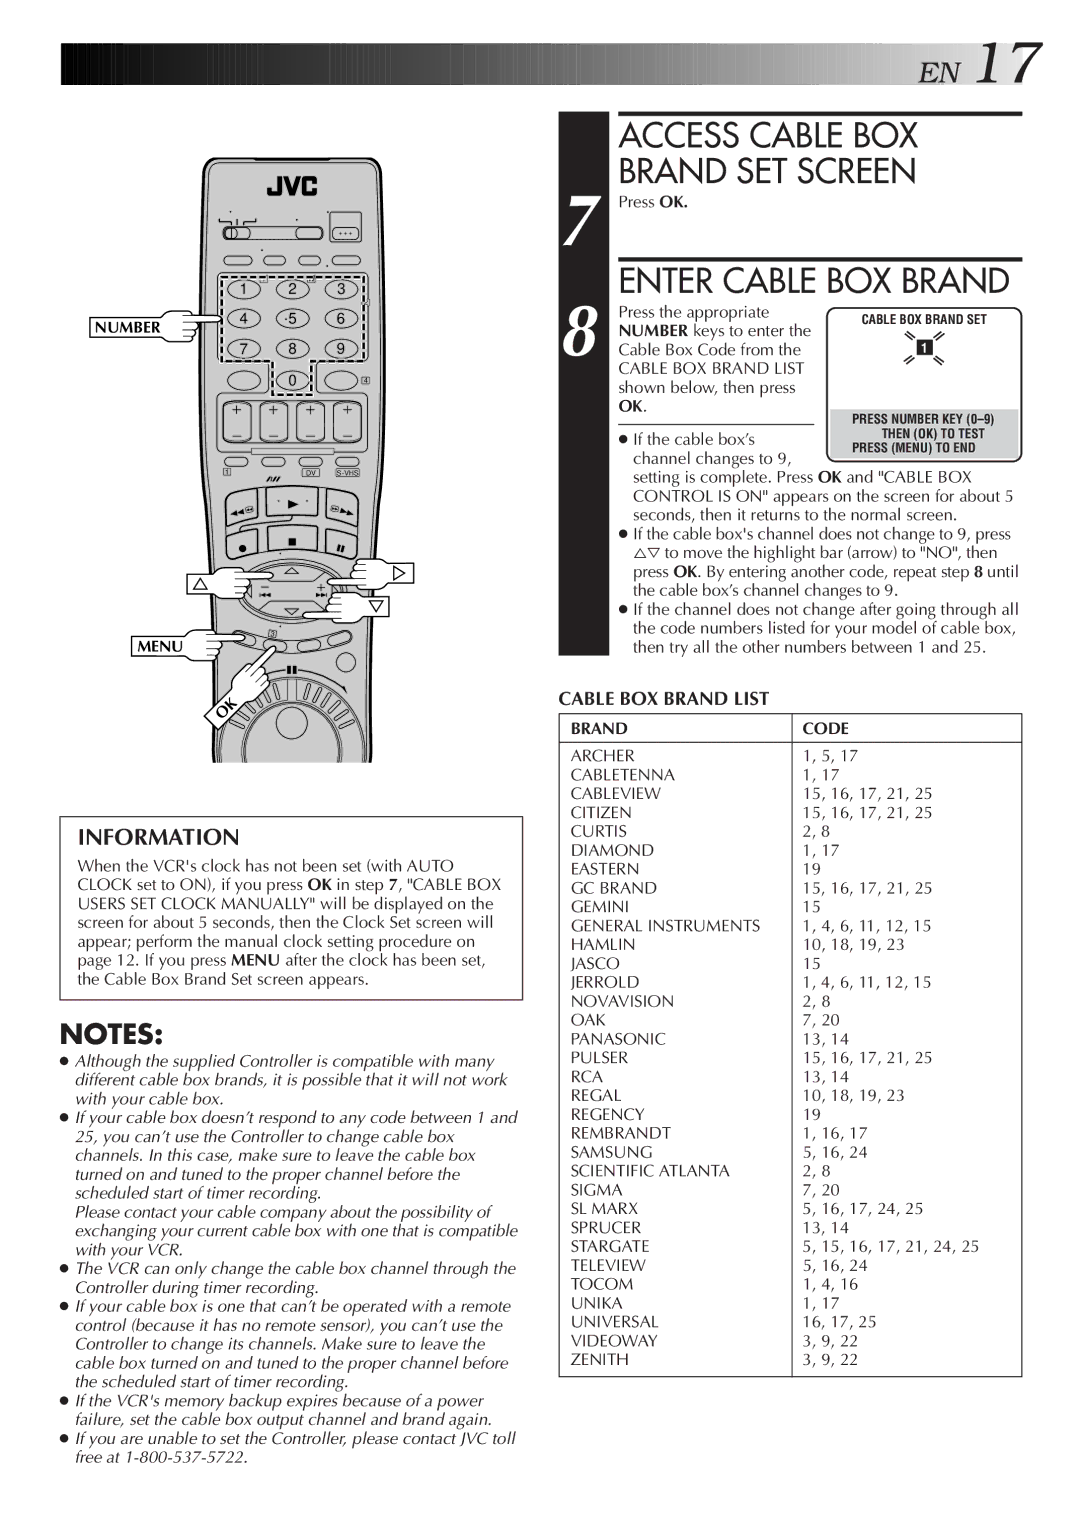
7 Press OK.

ENTER CABLE BOX BRAND

8

Press the appropriate

CABLE BOX BRAND SET

NUMBER keys to enter the


Cable Box Code from the


1


CABLE BOX BRAND LIST


shown below, then press


OK.


If the cable box’s channel changes to 9,

1

DV

S-VHS

3

MENU

OK

INFORMATION

When the VCR's clock has not been set (with AUTO CLOCK set to ON), if you press OK in step 7, "CABLE BOX USERS SET CLOCK MANUALLY" will be displayed on the screen for about 5 seconds, then the Clock Set screen will appear; perform the manual clock setting procedure on page 12. If you press MENU after the clock has been set, the Cable Box Brand Set screen appears.

NOTES:

Although the supplied Controller is compatible with many different cable box brands, it is possible that it will not work with your cable box.

If your cable box doesn’t respond to any code between 1 and 25, you can’t use the Controller to change cable box channels. In this case, make sure to leave the cable box turned on and tuned to the proper channel before the scheduled start of timer recording.

Please contact your cable company about the possibility of exchanging your current cable box with one that is compatible with your VCR.

The VCR can only change the cable box channel through the Controller during timer recording.

If your cable box is one that can’t be operated with a remote control (because it has no remote sensor), you can’t use the Controller to change its channels. Make sure to leave the cable box turned on and tuned to the proper channel before the scheduled start of timer recording.

If the VCR's memory backup expires because of a power failure, set the cable box output channel and brand again.

If you are unable to set the Controller, please contact JVC toll

free at 1-800-537-5722.

setting is complete. Press OK and "CABLE BOX CONTROL IS ON" appears on the screen for about 5 seconds, then it returns to the normal screen.

If the cable box's channel does not change to 9, press to move the highlight bar (arrow) to "NO", then press OK. By entering another code, repeat step 8 until the cable box’s channel changes to 9.

If the channel does not change after going through all the code numbers listed for your model of cable box, then try all the other numbers between 1 and 25.

CABLE BOX BRAND LIST

BRAND

CODE


ARCHER

1, 5, 17

CABLETENNA

1, 17

CABLEVIEW

15, 16, 17, 21, 25

CITIZEN

15, 16, 17, 21, 25

CURTIS

2, 8

DIAMOND

1, 17

EASTERN

19

GC BRAND

15, 16, 17, 21, 25

GEMINI

15

GENERAL INSTRUMENTS

1, 4, 6, 11, 12, 15

HAMLIN

10, 18, 19, 23

JASCO

15

JERROLD

1, 4, 6, 11, 12, 15

NOVAVISION

2, 8

OAK

7, 20

PANASONIC

13, 14

PULSER

15, 16, 17, 21, 25

RCA

13, 14

REGAL

10, 18, 19, 23

REGENCY

19

REMBRANDT

1, 16, 17

SAMSUNG

5, 16, 24

SCIENTIFIC ATLANTA

2, 8

SIGMA

7, 20

SL MARX

5, 16, 17, 24, 25

SPRUCER

13, 14

STARGATE

5, 15, 16, 17, 21, 24, 25

TELEVIEW

5, 16, 24

TOCOM

1, 4, 16

UNIKA

1, 17

UNIVERSAL

16, 17, 25

VIDEOWAY

3, 9, 22

ZENITH

3, 9, 22


Page 17
Image 17
JVC SR-VS20U manual Access Cable BOX Brand SET Screen, Enter Cable BOX Brand, Brand Code

SR-VS20U specifications

The JVC SR-VS20U is a versatile and reliable digital video recorder that combines the best features of both analog and digital technologies. It stands out in the market for its ability to handle various video formats, making it an ideal choice for both professionals and hobbyists who seek to preserve their cherished memories in a high-quality format.

One of the main features of the SR-VS20U is its dual-format capability. It enables users to record and playback both MiniDV and S-VHS formats, which is particularly beneficial for those who may have existing tapes in either format. This flexibility allows users to transition smoothly from analog to digital technology, facilitating easier editing and archiving of video content.

The SR-VS20U is equipped with JVC's renowned Digital Image Stabilization (DIS) technology. This feature enhances the smoothness and clarity of recordings by compensating for camera shake, resulting in less shaky footage and a more professional finish. This aspect is especially important for videographers who often work without a tripod, ensuring that their recordings maintain a high level of quality.

Another significant characteristic of the JVC SR-VS20U is its built-in 3D noise reduction processing, which effectively minimizes unwanted artifacts in captured videos. Users can benefit from cleaner and clearer images, especially in low-light conditions, where noise often becomes a problem. This technology adds to the overall production quality and is crucial for maintaining the integrity of the visual content.

The unit also features an array of editing and playback options, including a user-friendly interface that allows for simple navigation through various functions. The ability to connect to a PC or other devices via FireWire and USB ports enhances workflow, enabling users to quickly transfer files for editing and sharing.

In summary, the JVC SR-VS20U is a powerful digital video recorder characterized by its dual-format capabilities, advanced noise reduction technology, and user-friendly design. These features make it a valuable tool for anyone looking to capture, edit, and preserve their videos with enhanced quality and ease. Its effectiveness in bridging the gap between analog and digital formats ensures that it remains a relevant and sought-after solution in the world of video recording.