60ENEDITING(cont.)

Insert Editing

Recorder

Your VCR


Audio/Video cable (supplied)

Audio/Video signal

Another VCR

Player

NUMBER

T

W


1


2

3


2

4


5

6

"0"


8

9

7


0

4


CH


S-VHS

1DV


DV

S-VHS

PAUSE

3

JOG/SHUTTLE

JOG

SHUTTLE

NOTE:

VHS Insert Editing

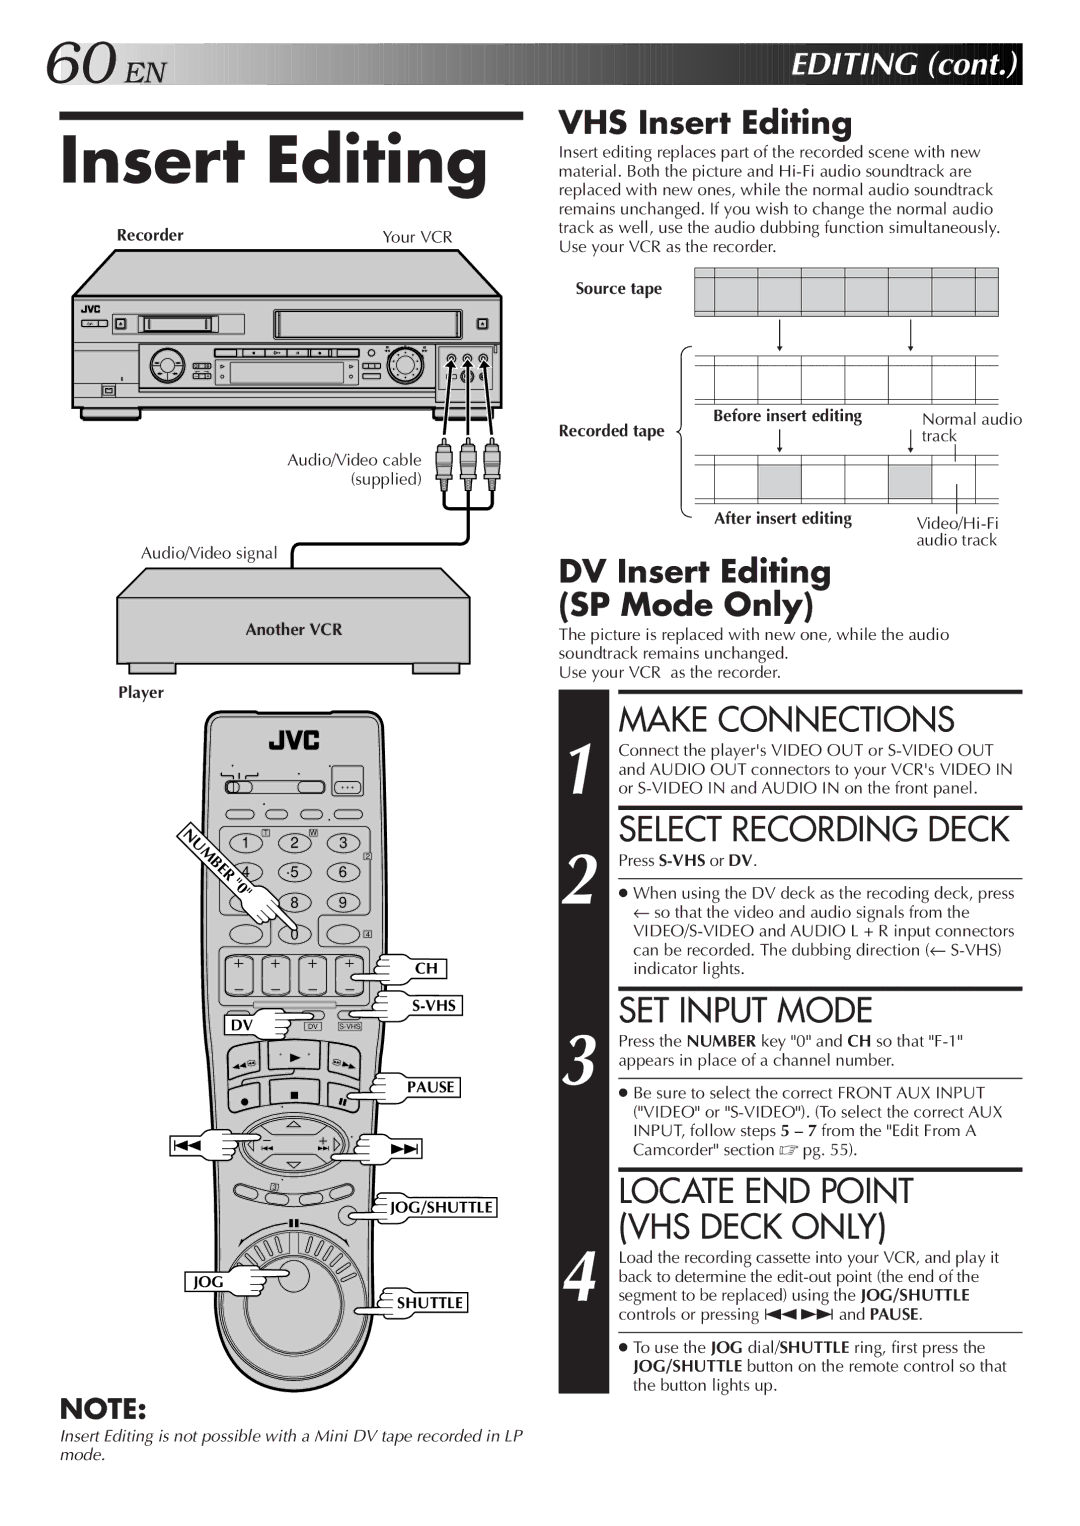
Insert editing replaces part of the recorded scene with new material. Both the picture and Hi-Fi audio soundtrack are replaced with new ones, while the normal audio soundtrack remains unchanged. If you wish to change the normal audio track as well, use the audio dubbing function simultaneously. Use your VCR as the recorder.

Source tape


Before insert editing


Normal audio

Recorded tape


track


After insert editing


Video/Hi-Fi


audio track

DV Insert Editing

(SP Mode Only)

The picture is replaced with new one, while the audio soundtrack remains unchanged.

Use your VCR as the recorder.

1


MAKE CONNECTIONS


Connect the player's VIDEO OUT or S-VIDEO OUT


and AUDIO OUT connectors to your VCR's VIDEO IN


or S-VIDEO IN and AUDIO IN on the front panel.

2


SELECT RECORDING DECK


Press S-VHSor DV.


When using the DV deck as the recoding deck, press


so that the video and audio signals from the


VIDEO/S-VIDEO and AUDIO L + R input connectors


can be recorded. The dubbing direction (Ê S-VHS)


indicator lights.


3


SET INPUT MODE


Press the NUMBER key "0" and CH so that "F-1"


appears in place of a channel number.


Be sure to select the correct FRONT AUX INPUT


("VIDEO" or "S-VIDEO"). (To select the correct AUX


INPUT, follow steps 5 – 7 from the "Edit From A


Camcorder" section pg. 55).


LOCATE END POINT

4


(VHS DECK ONLY)


Load the recording cassette into your VCR, and play it


back to determine the edit-out point (the end of the


segment to be replaced) using the JOG/SHUTTLE


controls or pressing ª£and PAUSE.


To use the JOG dial/SHUTTLE ring, first press the


JOG/SHUTTLE button on the remote control so that


the button lights up.


Insert Editing is not possible with a Mini DV tape recorded in LP mode.

Page 60
Image 60
JVC SR-VS20U manual Locate END Point, VHS Deck only, VHS Insert Editing, DV Insert Editing SP Mode Only

SR-VS20U specifications

The JVC SR-VS20U is a versatile and reliable digital video recorder that combines the best features of both analog and digital technologies. It stands out in the market for its ability to handle various video formats, making it an ideal choice for both professionals and hobbyists who seek to preserve their cherished memories in a high-quality format.

One of the main features of the SR-VS20U is its dual-format capability. It enables users to record and playback both MiniDV and S-VHS formats, which is particularly beneficial for those who may have existing tapes in either format. This flexibility allows users to transition smoothly from analog to digital technology, facilitating easier editing and archiving of video content.

The SR-VS20U is equipped with JVC's renowned Digital Image Stabilization (DIS) technology. This feature enhances the smoothness and clarity of recordings by compensating for camera shake, resulting in less shaky footage and a more professional finish. This aspect is especially important for videographers who often work without a tripod, ensuring that their recordings maintain a high level of quality.

Another significant characteristic of the JVC SR-VS20U is its built-in 3D noise reduction processing, which effectively minimizes unwanted artifacts in captured videos. Users can benefit from cleaner and clearer images, especially in low-light conditions, where noise often becomes a problem. This technology adds to the overall production quality and is crucial for maintaining the integrity of the visual content.

The unit also features an array of editing and playback options, including a user-friendly interface that allows for simple navigation through various functions. The ability to connect to a PC or other devices via FireWire and USB ports enhances workflow, enabling users to quickly transfer files for editing and sharing.

In summary, the JVC SR-VS20U is a powerful digital video recorder characterized by its dual-format capabilities, advanced noise reduction technology, and user-friendly design. These features make it a valuable tool for anyone looking to capture, edit, and preserve their videos with enhanced quality and ease. Its effectiveness in bridging the gap between analog and digital formats ensures that it remains a relevant and sought-after solution in the world of video recording.