UMBER

1

T

W

3


2


"8"


2


4


5

6


7


8

9

NUMBER "9"

NUMBER "7"


TIMER


0


4


PROG.

1


DV

S-VHS


SP/EP


3

OK

ATTENTION FOR DBS RECEIVER USERS

If you are using a DBS receiver


VHS PROGRAM 1

(unless "DBS RECEIVER SET" is


set to "OFF"  pg. 19), the


START


STOP

BAND indication (TV or CATV


8:00AM


=


9:00PM


DATE

CH

or DBS) appears under the


12/24/00


110


SP


channel number display. If the


THU


DBS


channel number that has been

PRESS (+/–, SP/EP, 8=DAILY,


entered requires that the band

9=WEEKLY, 7=DBS), THEN (0K)


PRESS (PROG.) TO END


be set, "7=DBS" is displayed


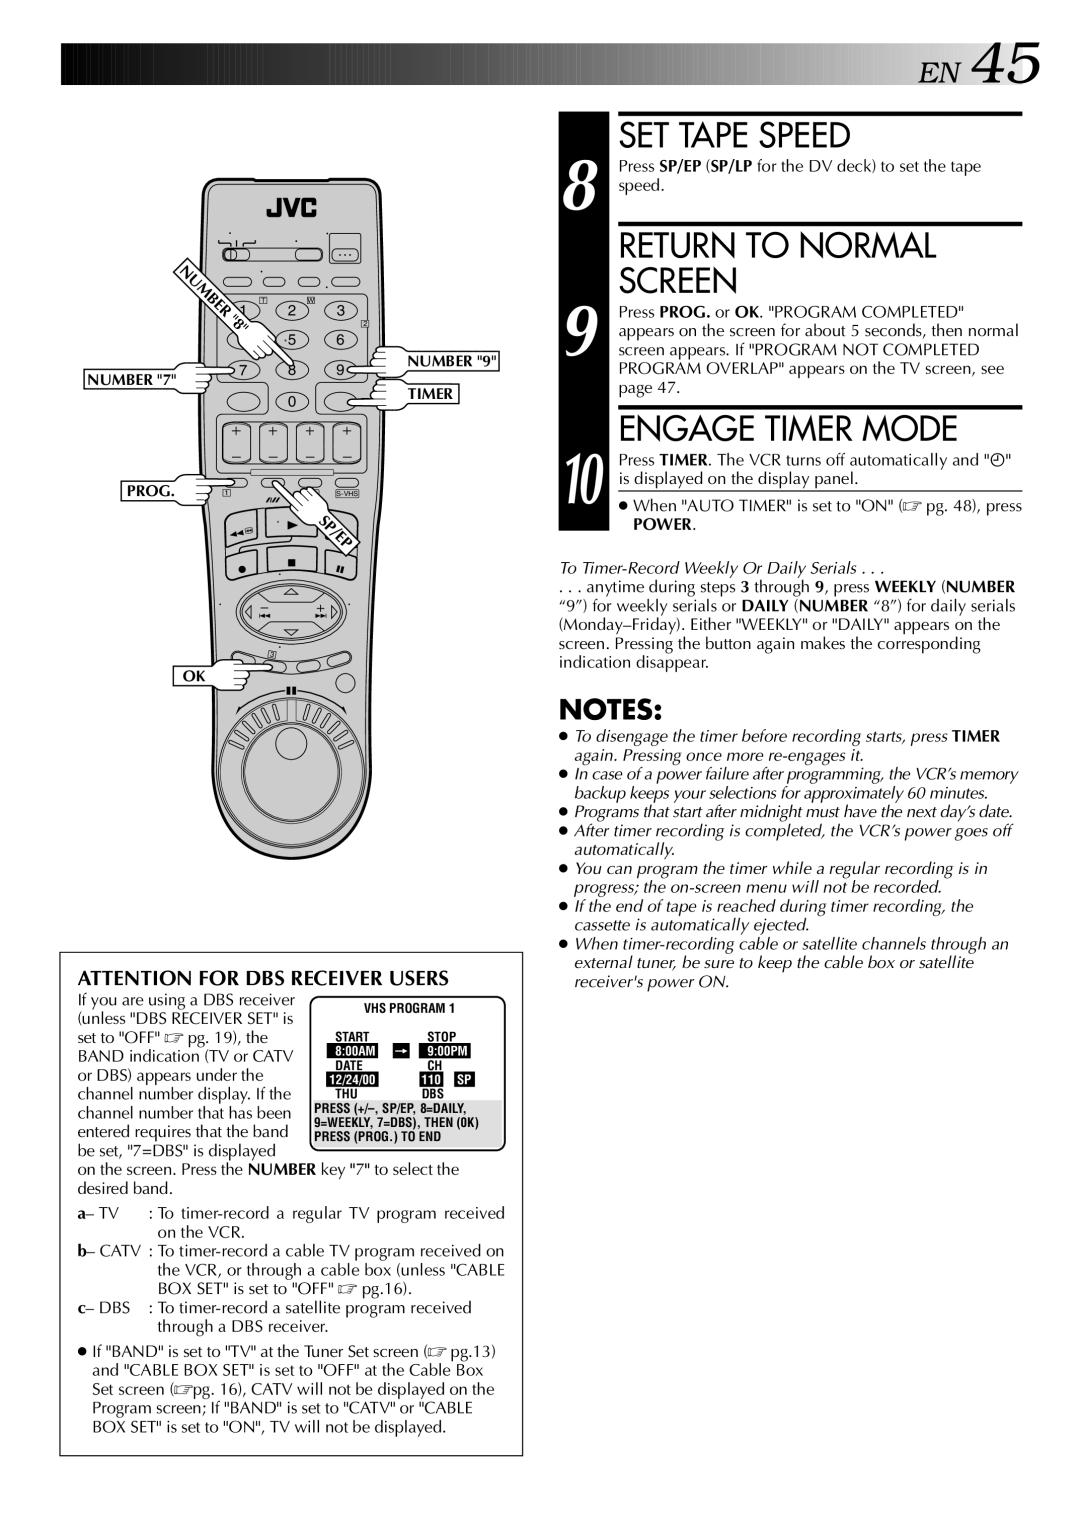
on the screen. Press the NUMBER key "7" to select the

desired band.


a– TV

: To timer-record a regular TV program received


on the VCR.


b– CATV : To timer-record a cable TV program received on the VCR, or through a cable box (unless "CABLE BOX SET" is set to "OFF"  pg.16).

c– DBS : To timer-record a satellite program received through a DBS receiver.

If "BAND" is set to "TV" at the Tuner Set screen ( pg.13) and "CABLE BOX SET" is set to "OFF" at the Cable Box Set screen (pg. 16), CATV will not be displayed on the Program screen; If "BAND" is set to "CATV" or "CABLE

BOX SET" is set to "ON", TV will not be displayed.

EN45


8


SET TAPE SPEED


Press SP/EP (SP/LP for the DV deck) to set the tape


speed.


RETURN TO NORMAL


9


SCREEN


Press PROG. or OK. "PROGRAM COMPLETED"


appears on the screen for about 5 seconds, then normal


screen appears. If "PROGRAM NOT COMPLETED


PROGRAM OVERLAP" appears on the TV screen, see


page 47.


10


ENGAGE TIMER MODE


Press TIMER. The VCR turns off automatically and "‰"


is displayed on the display panel.


When "AUTO TIMER" is set to "ON" ( pg. 48), press


POWER.

To Timer-Record Weekly Or Daily Serials . . .

.. . anytime during steps 3 through 9, press WEEKLY (NUMBER “9”) for weekly serials or DAILY (NUMBER “8”) for daily serials (Monday–Friday). Either "WEEKLY" or "DAILY" appears on the screen. Pressing the button again makes the corresponding indication disappear.

NOTES:

To disengage the timer before recording starts, press TIMER again. Pressing once more re-engages it.

In case of a power failure after programming, the VCR’s memory backup keeps your selections for approximately 60 minutes.

Programs that start after midnight must have the next day’s date.

After timer recording is completed, the VCR’s power goes off automatically.

You can program the timer while a regular recording is in progress; the on-screen menu will not be recorded.

If the end of tape is reached during timer recording, the cassette is automatically ejected.

When timer-recording cable or satellite channels through an external tuner, be sure to keep the cable box or satellite receiver's power ON.

Page 45
Image 45
JVC SR-VS20U manual Power

SR-VS20U specifications

The JVC SR-VS20U is a versatile and reliable digital video recorder that combines the best features of both analog and digital technologies. It stands out in the market for its ability to handle various video formats, making it an ideal choice for both professionals and hobbyists who seek to preserve their cherished memories in a high-quality format.

One of the main features of the SR-VS20U is its dual-format capability. It enables users to record and playback both MiniDV and S-VHS formats, which is particularly beneficial for those who may have existing tapes in either format. This flexibility allows users to transition smoothly from analog to digital technology, facilitating easier editing and archiving of video content.

The SR-VS20U is equipped with JVC's renowned Digital Image Stabilization (DIS) technology. This feature enhances the smoothness and clarity of recordings by compensating for camera shake, resulting in less shaky footage and a more professional finish. This aspect is especially important for videographers who often work without a tripod, ensuring that their recordings maintain a high level of quality.

Another significant characteristic of the JVC SR-VS20U is its built-in 3D noise reduction processing, which effectively minimizes unwanted artifacts in captured videos. Users can benefit from cleaner and clearer images, especially in low-light conditions, where noise often becomes a problem. This technology adds to the overall production quality and is crucial for maintaining the integrity of the visual content.

The unit also features an array of editing and playback options, including a user-friendly interface that allows for simple navigation through various functions. The ability to connect to a PC or other devices via FireWire and USB ports enhances workflow, enabling users to quickly transfer files for editing and sharing.

In summary, the JVC SR-VS20U is a powerful digital video recorder characterized by its dual-format capabilities, advanced noise reduction technology, and user-friendly design. These features make it a valuable tool for anyone looking to capture, edit, and preserve their videos with enhanced quality and ease. Its effectiveness in bridging the gap between analog and digital formats ensures that it remains a relevant and sought-after solution in the world of video recording.