HOW TO USE THE MENU FUNCTIONS

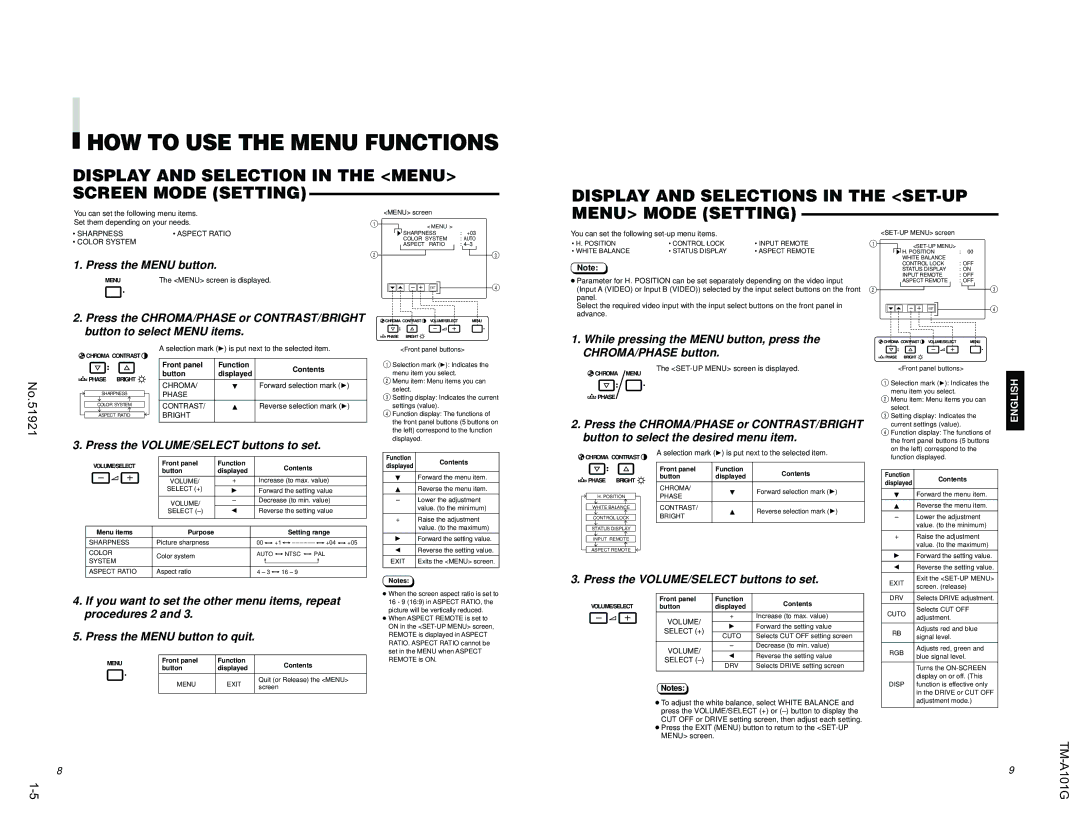
DISPLAY AND SELECTION IN THE <MENU> SCREEN MODE (SETTING)

You can set the following menu items.


<MENU> screen

Set them depending on your needs.

1


< MENU >

DISPLAY AND SELECTIONS IN THE <SET-UP MENU> MODE (SETTING)

• SHARPNESS

• ASPECT RATIO


SHARPNESS

: +03


• COLOR SYSTEM


COLOR SYSTEM

: AUTO


2


ASPECT RATIO


: 4–3

1. Press the MENU button.


3


You can set the following set-up menu items.

• H. POSITION

• CONTROL LOCK

• INPUT REMOTE

• WHITE BALANCE

• STATUS DISPLAY

• ASPECT REMOTE

Note:

<SET-UP MENU> screen

1<SET-UP MENU>


H. POSITION

: 00


WHITE BALANCE


CONTROL LOCK

: OFF


STATUS DISPLAY

: ON


INPUT REMOTE

: OFF

MENU

The <MENU> screen is displayed.

2.Press the CHROMA/PHASE or CONTRAST/BRIGHT button to select MENU items.

EXIT

4

CHROMA CONTRAST

VOLUME/SELECT

MENU

PHASE BRIGHT


Parameter for H. POSITION can be set separately depending on the video input (Input A (VIDEO) or Input B (VIDEO)) selected by the input select buttons on the front panel.

Select the required video input with the input select buttons on the front panel in advance.

1. While pressing the MENU button, press the

ASPECT REMOTE

: OFF

2

3

EXIT

4


CHROMA CONTRAST VOLUME/SELECT

MENU

No.51921

CHROMA CONTRAST

PHASE BRIGHT

SHARPNESS

COLOR SYSTEM

ASPECT RATIO

A selection mark (4) is put next to the selected item.

Front panel

Function

Contents

button

displayed


CHROMA/


Forward selection mark (4)

PHASE


CONTRAST/


Reverse selection mark (4)

BRIGHT


<Front panel buttons>

1Selection mark (4): Indicates the

menu item you select.

2Menu item: Menu items you can

select.

3Setting display: Indicates the current settings (value).

4Function display: The functions of the front panel buttons (5 buttons on the left) correspond to the function displayed.

CHROMA/PHASE button.

The <SET-UP MENU> screen is displayed.

CHROMA MENU

PHASE

2. Press the CHROMA/PHASE or CONTRAST/BRIGHT

button to select the desired menu item.

PHASE BRIGHT


<Front panel buttons>


1 Selection mark (4): Indicates the

ENGLISH

menu item you select.

2 Menu item: Menu items you can

select.

3 Setting display: Indicates the

current settings (value).


4 Function display: The functions of

the front panel buttons (5 buttons

3. Press the VOLUME/SELECT buttons to set.

VOLUME/SELECT

Front panel

Function

Contents

button

displayed


VOLUME/

+

Increase (to max. value)


SELECT (+)

4

Forward the setting value


VOLUME/

Decrease (to min. value)


SELECT (–)

1

Reverse the setting value


Menu items

Purpose


Setting range


Function

Contents

displayed


Forward the menu item.


Reverse the menu item.

Lower the adjustment


value. (to the minimum)

+

Raise the adjustment


value. (to the maximum)


8

1-5

SHARPNESS

Picture sharpness

00 +1

+04 +05

COLOR

Color system

AUTO

NTSC PAL

SYSTEM


ASPECT RATIO

Aspect ratio

4 – 3

16 – 9

4.If you want to set the other menu items, repeat procedures 2 and 3.

5.Press the MENU button to quit.

MENU

Front panel

Function

Contents

button

displayed


MENU

EXIT

Quit (or Release) the <MENU>


screen


4

Forward the setting value.

1

Reverse the setting value.

EXIT

Exits the <MENU> screen.

Notes:


When the screen aspect ratio is set to 16 - 9 (16:9) in ASPECT RATIO, the picture will be vertically reduced.

When ASPECT REMOTE is set to ON in the <SET-UP MENU> screen, REMOTE is displayed in ASPECT RATIO. ASPECT RATIO cannot be set in the MENU when ASPECT REMOTE is ON.

CHROMA CONTRAST

PHASE BRIGHT

H.POSITION WHITE BALANCE CONTROL LOCK STATUS DISPLAY

A selection mark (4) is put next to the selected item.

Front panel

Function

Contents

button

displayed


CHROMA/


Forward selection mark (4)

PHASE


CONTRAST/


Reverse selection mark (4)

BRIGHT


function displayed.

Function

Contents

displayed


Forward the menu item.


Reverse the menu item.


Lower the adjustment


value. (to the minimum)


+

Raise the adjustment

INPUT REMOTE

ASPECT REMOTE

3. Press the VOLUME/SELECT buttons to set.


Front panel

Function

Contents

VOLUME/SELECT

button

displayed


VOLUME/

+

Increase (to max. value)


4

Forward the setting value


SELECT (+)


CUTO

Selects CUT OFF setting screen


VOLUME/

Decrease (to min. value)


1

Reverse the setting value


SELECT (–)


DRV

Selects DRIVE setting screen


Notes:

To adjust the white balance, select WHITE BALANCE and press the VOLUME/SELECT (+) or (–) button to display the CUT OFF or DRIVE setting screen, then adjust each setting.

Press the EXIT (MENU) button to return to the <SET-UP MENU> screen.


value. (to the maximum)

4

Forward the setting value.


1

Reverse the setting value.


EXIT

Exit the <SET-UP MENU>

screen. (release)


DRV

Selects DRIVE adjustment.

CUTO

Selects CUT OFF

adjustment.


RB

Adjusts red and blue

signal level.


RGB

Adjusts red, green and

blue signal level.


Turns the ON-SCREEN


display on or off. (This

DISP

function is effective only


in the DRIVE or CUT OFF


adjustment mode.)

9

TM-A101G

Page 5
Image 5
JVC TM-A101G Display and Selection in the Menu Screen Mode Setting, Display and Selections in the SET-UP Menu Mode Setting

TM-A101G specifications

The JVC TM-A101G is a compact and versatile color monitor designed for various professional applications, particularly in the fields of broadcasting, video production, and educational environments. With a screen size of 10 inches, it offers a balance between portability and screen real estate, making it ideal for on-the-go setups and tight studio spaces.

One of the standout features of the TM-A101G is its high-resolution display capability. The monitor supports a maximum resolution of 1024 x 768 pixels, ensuring that users can achieve a crisp and clear output. This clarity is essential for professionals who need accurate color representation and detail in their work, whether they are editing video, monitoring live feeds, or conducting presentations.

The TM-A101G is equipped with advanced signal processing technologies that ensure high-quality image reproduction. Its wide viewing angles allow users to have a consistent image quality from multiple positions, making it practical for collaborative environments where group viewing is necessary. This feature enhances usability in settings such as control rooms or classrooms.

Connectivity is crucial in modern applications, and JVC has designed the TM-A101G with a range of inputs, including composite, S-Video, and component video, ensuring compatibility with various video sources. This versatility allows professionals to easily integrate the monitor into different setups, whether they are working with older equipment or the latest technology.

Another key characteristic of the TM-A101G is its lightweight design. Weighing only a fraction of larger monitors, it is easy to transport and install. This makes it a popular choice for fieldwork and mobile production teams who require reliable monitoring solutions without the burden of heavy equipment.

The monitor is built with durability in mind, featuring a sturdy chassis that can withstand the rigors of professional use. Additionally, the TM-A101G includes professional features such as underscan and overscan capabilities, providing users with control over the display output according to their specific needs.

In summary, the JVC TM-A101G is a well-rounded monitor that excels in image quality, connectivity, and portability, making it a valuable asset for video professionals and educators alike. Its mix of features and thoughtful design ensures that it meets the demands of today’s fast-paced media landscape, providing reliability and performance where it counts most.