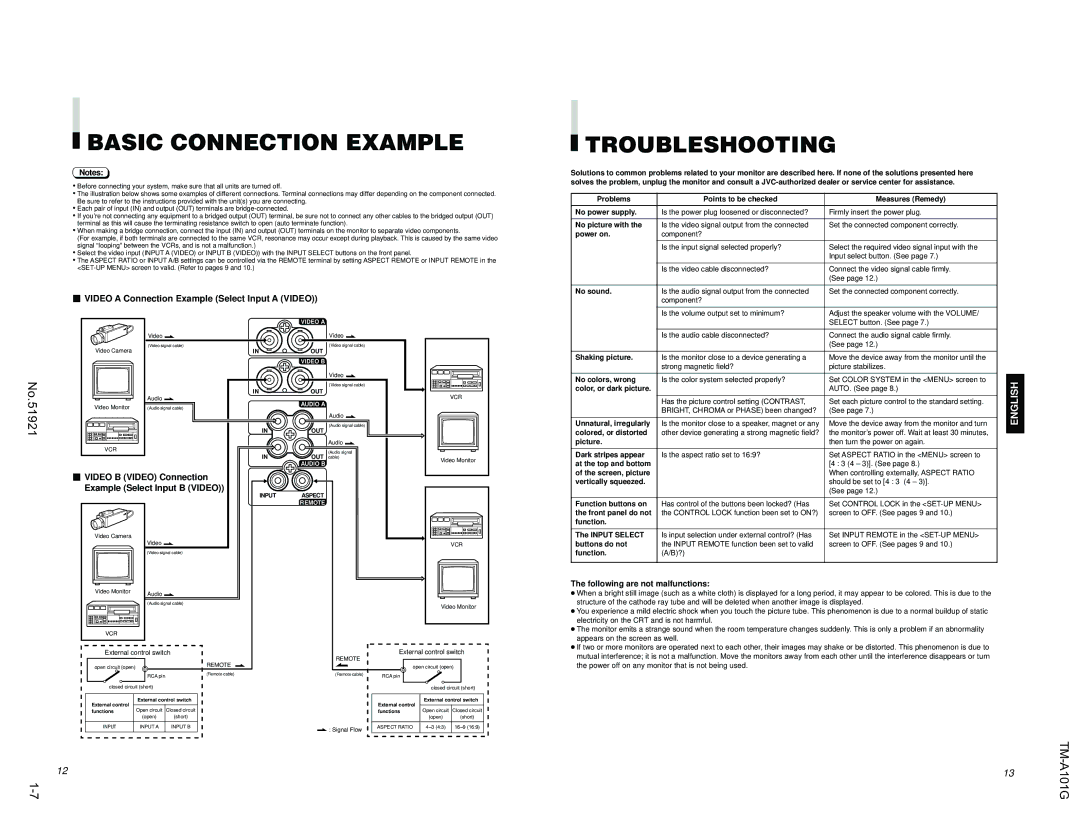
BASIC CONNECTION EXAMPLE

Notes:

Before connecting your system, make sure that all units are turned off.

The illustration below shows some examples of different connections. Terminal connections may differ depending on the component connected. Be sure to refer to the instructions provided with the unit(s) you are connecting.

Each pair of input (IN) and output (OUT) terminals are bridge-connected.

If you’re not connecting any equipment to a bridged output (OUT) terminal, be sure not to connect any other cables to the bridged output (OUT) terminal as this will cause the terminating resistance switch to open (auto terminate function).

When making a bridge connection, connect the input (IN) and output (OUT) terminals on the monitor to separate video components.

(For example, if both terminals are connected to the same VCR, resonance may occur except during playback. This is caused by the same video signal “looping” between the VCRs, and is not a malfunction.)

Select the video input (INPUT A (VIDEO) or INPUT B (VIDEO)) with the INPUT SELECT buttons on the front panel.

The ASPECT RATIO or INPUT A/B settings can be controlled via the REMOTE terminal by setting ASPECT REMOTE or INPUT REMOTE in the <SET-UP MENU> screen to valid. (Refer to pages 9 and 10.)

VIDEO A Connection Example (Select Input A (VIDEO))

VIDEO A

TROUBLESHOOTING

Solutions to common problems related to your monitor are described here. If none of the solutions presented here solves the problem, unplug the monitor and consult a JVC-authorized dealer or service center for assistance.

Problems

Points to be checked

Measures (Remedy)

No power supply.

Is the power plug loosened or disconnected?

Firmly insert the power plug.


No picture with the

Is the video signal output from the connected

Set the connected component correctly.

power on.

component?


Is the input signal selected properly?

Select the required video signal input with the


Input select button. (See page 7.)


Is the video cable disconnected?

Connect the video signal cable firmly.


(See page 12.)


No sound.

Is the audio signal output from the connected

Set the connected component correctly.


component?


Is the volume output set to minimum?

Adjust the speaker volume with the VOLUME/


SELECT button. (See page 7.)

No.51921

Video Camera

Video Monitor

VCR

Video

(Video signal cable)

Audio

(Audio signal cable)

Video


(Video signal cable)

IN

OUT


VIDEO B


Video


(Video signal cable)

IN

OUT


AUDIO A


Audio


(Audio signal cable)

IN

OUT


Audio

IN

(Audio signal

OUT cable)


AUDIO B

VCR

Video Monitor


Is the audio cable disconnected?

Connect the audio signal cable firmly.


(See page 12.)


Shaking picture.

Is the monitor close to a device generating a

Move the device away from the monitor until the


strong magnetic field?

picture stabilizes.


No colors, wrong

Is the color system selected properly?

Set COLOR SYSTEM in the <MENU> screen to

ENGLISH

color, or dark picture.


AUTO. (See page 8.)


Has the picture control setting (CONTRAST,

Set each picture control to the standard setting.


BRIGHT, CHROMA or PHASE) been changed?

(See page 7.)


Unnatural, irregularly

Is the monitor close to a speaker, magnet or any

Move the device away from the monitor and turn

colored, or distorted

other device generating a strong magnetic field?

the monitor’s power off. Wait at least 30 minutes,


picture.


then turn the power on again.


Dark stripes appear

Is the aspect ratio set to 16:9?

Set ASPECT RATIO in the <MENU> screen to


at the top and bottom


[4 : 3 (4 – 3)]. (See page 8.)


of the screen, picture


When controlling externally, ASPECT RATIO


VIDEO B (VIDEO) Connection Example (Select Input B (VIDEO))

INPUT ASPECT

REMOTE

vertically squeezed.


should be set to [4 : 3 (4 – 3)].


(See page 12.)


Function buttons on

Has control of the buttons been locked? (Has

Set CONTROL LOCK in the <SET-UP MENU>

the front panel do not

the CONTROL LOCK function been set to ON?)

screen to OFF. (See pages 9 and 10.)

function.


Video Camera

Video Monitor

VCR

Video

(Video signal cable)

Audio

(Audio signal cable)

VCR

Video Monitor

The INPUT SELECT

Is input selection under external control? (Has

Set INPUT REMOTE in the <SET-UP MENU>

buttons do not

the INPUT REMOTE function been set to valid

screen to OFF. (See pages 9 and 10.)

function.

(A/B)?)


The following are not malfunctions:

When a bright still image (such as a white cloth) is displayed for a long period, it may appear to be colored. This is due to the

structure of the cathode ray tube and will be deleted when another image is displayed.

You experience a mild electric shock when you touch the picture tube. This phenomenon is due to a normal buildup of static

electricity on the CRT and is not harmful.

The monitor emits a strange sound when the room temperature changes suddenly. This is only a problem if an abnormality

appears on the screen as well.

If two or more monitors are operated next to each other, their images may shake or be distorted. This phenomenon is due to

External control switch

open circuit (open)


REMOTE


RCA pin


(Remote cable)


closed circuit (short)


External control


External control switch


functions


Open circuit

Closed circuit


(open)

(short)


INPUT


INPUT A

INPUT B


External control switch


REMOTE


open circuit (open)


(Remote cable)


RCA pin


closed circuit (short)


External control

External control switch


functions


Open circuit

Closed circuit


(open)

(short)


: Signal Flow

ASPECT RATIO


4–3 (4:3)

16–9 (16:9)


mutual interference; it is not a malfunction. Move the monitors away from each other until the interference disappears or turn

the power off on any monitor that is not being used.

12

1-7

13

TM-A101G

Page 7
Image 7
JVC TM-A101G manual Basic Connection Example, Troubleshooting,  Video a Connection Example Select Input a Video

TM-A101G specifications

The JVC TM-A101G is a compact and versatile color monitor designed for various professional applications, particularly in the fields of broadcasting, video production, and educational environments. With a screen size of 10 inches, it offers a balance between portability and screen real estate, making it ideal for on-the-go setups and tight studio spaces.

One of the standout features of the TM-A101G is its high-resolution display capability. The monitor supports a maximum resolution of 1024 x 768 pixels, ensuring that users can achieve a crisp and clear output. This clarity is essential for professionals who need accurate color representation and detail in their work, whether they are editing video, monitoring live feeds, or conducting presentations.

The TM-A101G is equipped with advanced signal processing technologies that ensure high-quality image reproduction. Its wide viewing angles allow users to have a consistent image quality from multiple positions, making it practical for collaborative environments where group viewing is necessary. This feature enhances usability in settings such as control rooms or classrooms.

Connectivity is crucial in modern applications, and JVC has designed the TM-A101G with a range of inputs, including composite, S-Video, and component video, ensuring compatibility with various video sources. This versatility allows professionals to easily integrate the monitor into different setups, whether they are working with older equipment or the latest technology.

Another key characteristic of the TM-A101G is its lightweight design. Weighing only a fraction of larger monitors, it is easy to transport and install. This makes it a popular choice for fieldwork and mobile production teams who require reliable monitoring solutions without the burden of heavy equipment.

The monitor is built with durability in mind, featuring a sturdy chassis that can withstand the rigors of professional use. Additionally, the TM-A101G includes professional features such as underscan and overscan capabilities, providing users with control over the display output according to their specific needs.

In summary, the JVC TM-A101G is a well-rounded monitor that excels in image quality, connectivity, and portability, making it a valuable asset for video professionals and educators alike. Its mix of features and thoughtful design ensures that it meets the demands of today’s fast-paced media landscape, providing reliability and performance where it counts most.