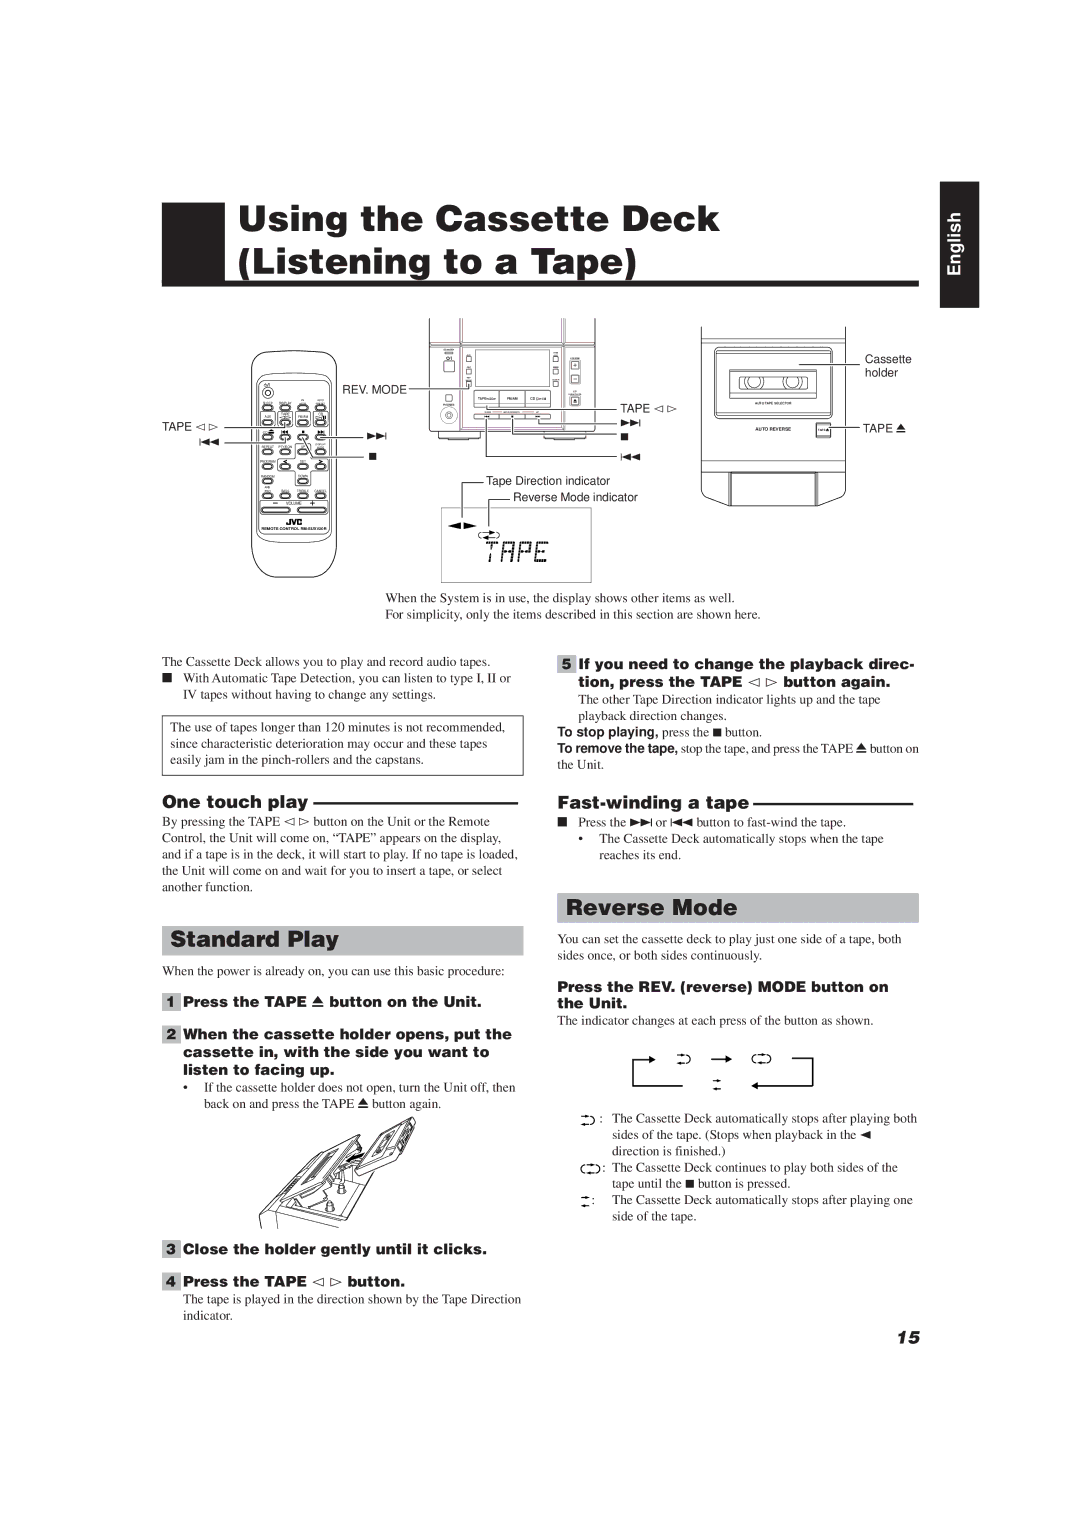
Using the Cassette Deck (Listening to a Tape)

English

TAPE @ #

4

FMAUTO

SLEEP DISPLAY MODE PRESET

AUX

TAPE

FM/AM

CD


CD


REPEAT

PTY/EON

UP

DISPLAY

MODE

PROGRAM


SET


RANDOM


DOWN


AHB


PRO

BASS

TREBLE

CANCEL

VOLUME

REMOTE CONTROL RM-SUXV20R

REV. MODE

¢

7

STANDBY


AHB

AUX


PRO


VOLUME

REC


TIMER

REV


CLOCK

MODE


CD


OPEN/CLOSE

TAPE

FM/AM

CD

TAPE @ #

PHONES


DOWN

MULTI CONTROL

UP

¢

7

4

Tape Direction indicator

Reverse Mode indicator

AUTO TAPE SELECTOR

AUTO REVERSE

TAPE


Cassette holder

TAPE 0

When the System is in use, the display shows other items as well.

For simplicity, only the items described in this section are shown here.

The Cassette Deck allows you to play and record audio tapes.

With Automatic Tape Detection, you can listen to type I, II or IV tapes without having to change any settings.

The use of tapes longer than 120 minutes is not recommended, since characteristic deterioration may occur and these tapes easily jam in the pinch-rollers and the capstans.

5If you need to change the playback direc- tion, press the TAPE @ # button again.

The other Tape Direction indicator lights up and the tape playback direction changes.

To stop playing, press the 7button.

To remove the tape, stop the tape, and press the TAPE 0button on the Unit.

One touch play –––––––––––––––––––––––

By pressing the TAPE @#button on the Unit or the Remote Control, the Unit will come on, “TAPE” appears on the display, and if a tape is in the deck, it will start to play. If no tape is loaded, the Unit will come on and wait for you to insert a tape, or select another function.

Standard Play

When the power is already on, you can use this basic procedure:

1Press the TAPE 0 button on the Unit.

2When the cassette holder opens, put the cassette in, with the side you want to listen to facing up.

If the cassette holder does not open, turn the Unit off, then back on and press the TAPE 0button again.

3Close the holder gently until it clicks.

4Press the TAPE @ # button.

The tape is played in the direction shown by the Tape Direction indicator.

Fast-winding a tape ––––––––––––––––––

Press the ¢or 4 button to fast-wind the tape.

The Cassette Deck automatically stops when the tape reaches its end.

Reverse Mode

You can set the cassette deck to play just one side of a tape, both sides once, or both sides continuously.

Press the REV. (reverse) MODE button on the Unit.

The indicator changes at each press of the button as shown.

:The Cassette Deck automatically stops after playing both sides of the tape. (Stops when playback in the 2 direction is finished.)

:The Cassette Deck continues to play both sides of the tape until the 7 button is pressed.

:The Cassette Deck automatically stops after playing one side of the tape.

15

Page 19
Image 19
JVC UX-V10 Using the Cassette Deck Listening to a Tape, Standard Play, Reverse Mode, One touch play, Fast-winding a tape

UX-V10, UX-V20R specifications

The JVC UX-V20R and UX-V10 are impressive micro hi-fi systems that combine advanced audio technology with sleek design, making them a great choice for music enthusiasts. Both models stand out due to their compact size, making them suitable for small spaces without compromising on sound quality.

The JVC UX-V20R features a powerful 100 watts RMS output, which ensures robust sound performance across various genres. This model is equipped with a dual cassette deck that allows for convenient playback and recording, catering to users who still appreciate the nostalgic charm of cassette tapes. Furthermore, the UX-V20R supports CD playback, complete with a digital sound processor that enhances audio quality, resulting in a rich listening experience.

One of the key technologies in this system is the incorporation of JVC's Advanced Surround feature, providing an immersive audio listening experience. This technology simulates a multi-speaker environment, allowing users to feel as if they are at a live performance, even when using a standard stereo configuration. Additionally, the UX-V20R is compatible with various audio sources, including AM/FM radio and auxiliary inputs, allowing users to connect their smartphones or other devices effortlessly.

On the other hand, the JVC UX-V10, while boasting a slightly lower power output at around 80 watts RMS, maintains impressive audio fidelity. This model also includes a built-in CD player and FM radio, providing versatility for different listening preferences. The UX-V10 focuses on delivering crisp highs and deep lows, thanks to its custom speaker design that optimizes sound dispersion.

Another noteworthy feature of the UX-V10 is its user-friendly interface, complete with an easy-to-read LCD display and intuitive controls, allowing for seamless navigation through tracks or radio stations. Both models come with remote controls, adding to convenience and flexibility in managing playback without needing to be in close proximity to the system.

The design of the JVC UX-V20R and UX-V10 is elegant and contemporary, making them an appealing addition to any décor. The systems are compatible with various formats and sources, making them versatile solutions for music lovers. Whether it's for casual listening, hosting gatherings, or simply enjoying high-quality audio at home, the JVC UX-V20R and UX-V10 fulfill a blend of performance, functionality, and aesthetic appeal.