HOME DVD PLAYER | V10M10_IM_EN_12312007 |
GETTING STARTED
Connecting the DVD Player to a TV Set using S-Video
Use an
Connecting the DVD Player to a TV using the Y / Pb / Pr Jacks
Use a COMPONENT cable (not included) to connect the DVD player to your TV. Set the VIDEO OUT to COMPONENT. For Progressive Scan, set to
Connecting to an Amplifier with Digital Audio Input
1.Select the Coaxial digital output.
2.Set the DVD player’s Audio Out to “Raw or “PCM.”
3.Set the digital amplifier to the AV input connected to the DVD player.
Notes on the Connection Diagram
1.You don’t need to connect all the video outputs even though your TV set supports all the connections. Choose and make the most appropriate video connection available on your TV. The
2.The component VIDEO output is labeled as Y, Pr (or Cr), and Pb (or Cb), and these three component video output jacks must be all and properly connected to properly display the picture in the component video mode of your TV set.
3.After making the video connection of your choice, please ensure that your TV is in the proper mode as well. If you choose the component VIDEO connection, your TV must be in the component mode. If you choose the
4.Some TV sets use the different audio input for each video mode. Please refer to the user’s manual of your TV for the detailed setting information.
HOME DVD PLAYER | V10M10_IM_EN_12312007 |
GETTING STARTED
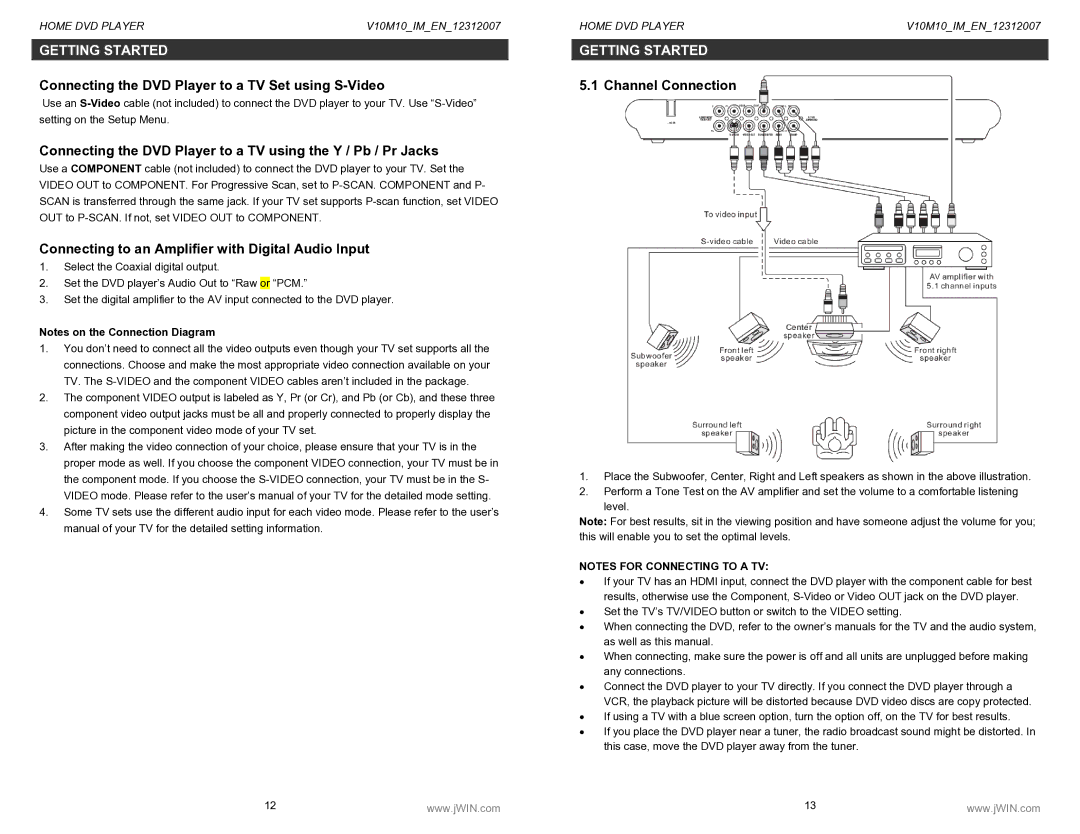
5.1 Channel Connection
1.Place the Subwoofer, Center, Right and Left speakers as shown in the above illustration.
2.Perform a Tone Test on the AV amplifier and set the volume to a comfortable listening
level.
Note: For best results, sit in the viewing position and have someone adjust the volume for you; this will enable you to set the optimal levels.
NOTES FOR CONNECTING TO A TV:
•If your TV has an HDMI input, connect the DVD player with the component cable for best results, otherwise use the Component,
•Set the TV’s TV/VIDEO button or switch to the VIDEO setting.
•When connecting the DVD, refer to the owner’s manuals for the TV and the audio system, as well as this manual.
•When connecting, make sure the power is off and all units are unplugged before making any connections.
•Connect the DVD player to your TV directly. If you connect the DVD player through a VCR, the playback picture will be distorted because DVD video discs are copy protected.
•If using a TV with a blue screen option, turn the option off, on the TV for best results.
•If you place the DVD player near a tuner, the radio broadcast sound might be distorted. In this case, move the DVD player away from the tuner.
12 | www.jWIN.com | 13 | www.jWIN.com |