Installing Battery

1.Unscrew the ignition battery cap.(Found at far-left of control panel)

2.Insert battery into ignition box with positive terminal facing outward.

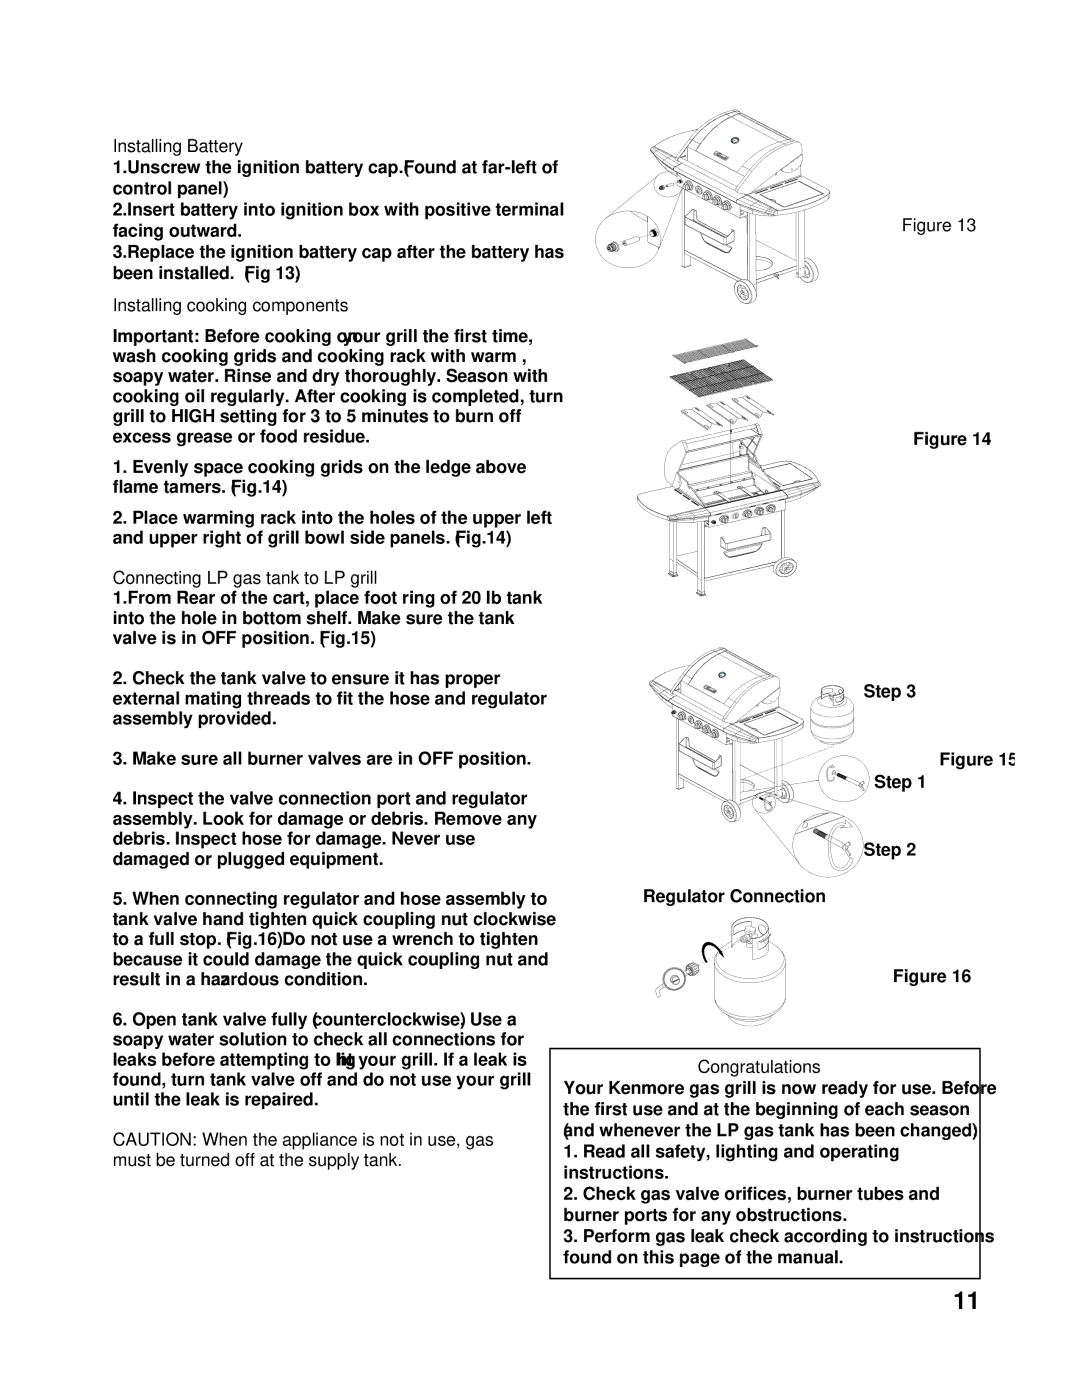
3.Replace the ignition battery cap after the battery has been installed. (Fig 13).

Installing cooking components

Important: Before cooking on your grill the first time, wash cooking grids and cooking rack with warm , soapy water. Rinse and dry thoroughly. Season with cooking oil regularly. After cooking is completed, turn grill to HIGH setting for 3 to 5 minutes to burn off excess grease or food residue.

1.Evenly space cooking grids on the ledge above flame tamers. (Fig.14)

2.Place warming rack into the holes of the upper left and upper right of grill bowl side panels. (Fig.14)

Connecting LP gas tank to LP grill

1.From Rear of the cart, place foot ring of 20 lb tank into the hole in bottom shelf. Make sure the tank valve is in OFF position. (Fig.15)

2.Check the tank valve to ensure it has proper external mating threads to fit the hose and regulator assembly provided.

3.Make sure all burner valves are in OFF position.

4.Inspect the valve connection port and regulator assembly. Look for damage or debris. Remove any debris. Inspect hose for damage. Never use damaged or plugged equipment.

5.When connecting regulator and hose assembly to tank valve hand tighten quick coupling nut clockwise to a full stop. (Fig.16) Do not use a wrench to tighten because it could damage the quick coupling nut and result in a hazardous condition.

6.Open tank valve fully (counterclockwise). Use a soapy water solution to check all connections for leaks before attempting to light your grill. If a leak is found, turn tank valve off and do not use your grill until the leak is repaired.

CAUTION: When the appliance is not in use, gas must be turned off at the supply tank.

Figure 13

Figure 14

Step 3

Figure 15

Step 1

Step 2

Regulator Connection

Figure 16

Congratulations

Your Kenmore gas grill is now ready for use. Before the first use and at the beginning of each season (and whenever the LP gas tank has been changed):

1.Read all safety, lighting and operating instructions.

2.Check gas valve orifices, burner tubes and burner ports for any obstructions.

3.Perform gas leak check according to instructions found on this page of the manual.

11

Page 11
Image 11
Kenmore 122.16118 Installing Battery, Installing cooking components, Connecting LP gas tank to LP grill, Congratulations

122.16118 specifications

The Kenmore 122.16118 is an exemplary appliance in the realm of home heating solutions, particularly noted for its efficiency and design. This model is specifically designed for individuals who prioritize both functionality and aesthetics in their home environment. The 122.16118 is primarily an electric wall heater that promises to deliver consistent warmth in various settings, whether used in a residential or commercial context.

One of the standout features of the Kenmore 122.16118 is its compact design, which allows it to fit seamlessly into any room without taking up excessive space. This makes it a fitting choice for smaller apartments, studios, or even larger living areas where significant heat output is needed without a bulky heater detracting from the overall decor. The sleek appearance is complemented by a neutral color palette, ensuring it blends well with most interiors.

In terms of technology, the Kenmore 122.16118 utilizes advanced heating elements that provide efficient thermal output. The built-in thermostat ensures precise temperature control, allowing users to set their desired level of warmth with ease. This not only contributes to comfort but also enhances energy efficiency, as the system can maintain a consistent temperature without excessive energy consumption. Furthermore, some models feature programmable settings, allowing users to schedule heating times, adding another layer of convenience.

Safety is also a key consideration with the Kenmore 122.16118. It comes equipped with automatic shut-off features that prevent overheating, providing peace of mind for users, particularly in households with children or pets. Additionally, the surface materials are designed to minimize burn risk, an essential characteristic for any home heating appliance.

The installation process for the Kenmore 122.16118 is straightforward, with guidelines provided to ensure seamless setup on any wall. It can be hardwired into the existing electrical system, providing a clean look without visible cords or connections.

Overall, the Kenmore 122.16118 combines stylish design, advanced heating technology, and essential safety features, making it a reliable choice for anyone in need of effective heating solutions in their home or workspace. Whether it’s enhancing warmth during cold seasons or creating a comfortable atmosphere in any room, this model has proven to be a valuable addition to modern heating systems.