TROUBLESHOOTING GUIDELINES
These guidelines should be used by a qualified service agent. Call Sears Service at
for assistance. Inform the associate that this is a “Flammable Vapor Ignition Resistant” Product.
#
7
8
9
10
11
12
13
14
15
16
LED STATUS | PROBLEM |
| SOLUTION | |
|
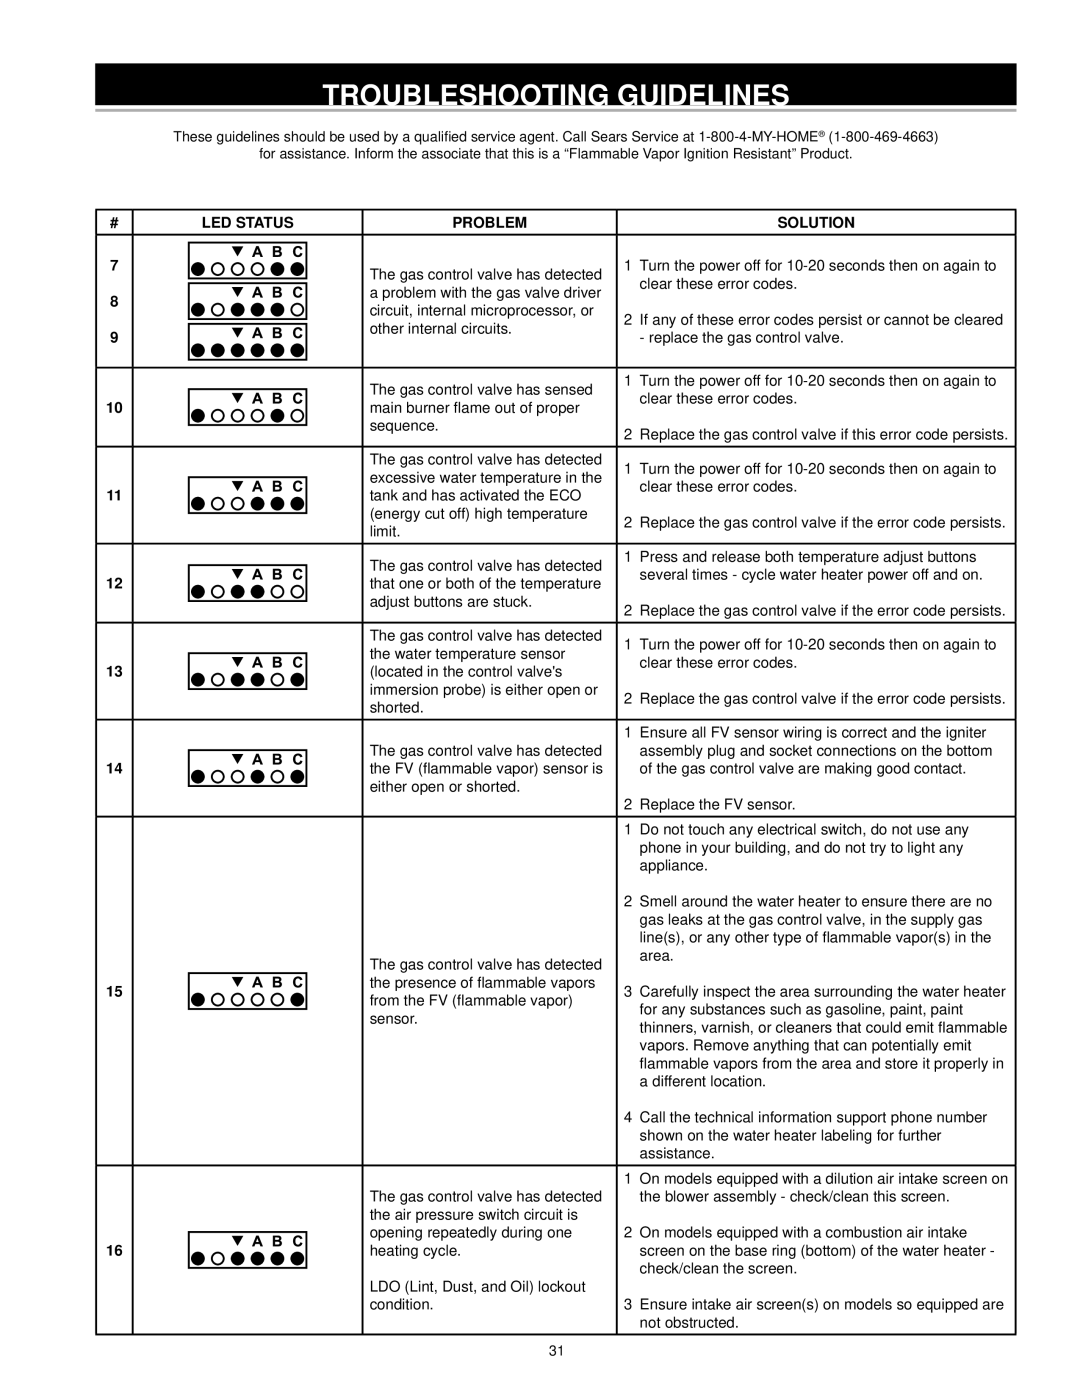
| The gas control valve has detected | 1 | Turn the power off for |
|
| |||
|
|
| clear these error codes. | |
|
|
| ||
|
| a problem with the gas valve driver |
| |
|
|
|
| |
|
| circuit, internal microprocessor, or | 2 | If any of these error codes persist or cannot be cleared |
|
| other internal circuits. | ||
|
|
| - replace the gas control valve. | |
|
|
|
| |
|
| The gas control valve has sensed | 1 | Turn the power off for |
|
| |||
|
|
| clear these error codes. | |
|
| main burner flame out of proper |
| |
|
|
|
| |
|
| sequence. | 2 | Replace the gas control valve if this error code persists. |
|
| |||
|
|
| ||
|
| The gas control valve has detected | 1 | Turn the power off for |
|
| excessive water temperature in the | ||
|
|
| clear these error codes. | |
|
| tank and has activated the ECO |
| |
|
|
|
| |
|
| (energy cut off) high temperature | 2 | Replace the gas control valve if the error code persists. |
|
| |||
|
| limit. | ||
|
|
|
| |
|
| The gas control valve has detected | 1 | Press and release both temperature adjust buttons |
|
|
| several times - cycle water heater power off and on. | |
|
| that one or both of the temperature |
| |
|
|
|
| |
|
| adjust buttons are stuck. | 2 | Replace the gas control valve if the error code persists. |
|
| |||
|
|
| ||
|
| The gas control valve has detected | 1 | Turn the power off for |
|
| the water temperature sensor | ||
|
|
| clear these error codes. | |
|
| (located in the control valve's |
| |
|
|
|
| |
|
| immersion probe) is either open or | 2 | Replace the gas control valve if the error code persists. |
|
| |||
|
| shorted. | ||
|
|
|
| |
|
|
| 1 | Ensure all FV sensor wiring is correct and the igniter |
|
| The gas control valve has detected |
| assembly plug and socket connections on the bottom |
|
|
| ||
|
| the FV (flammable vapor) sensor is |
| of the gas control valve are making good contact. |
|
| either open or shorted. | 2 | Replace the FV sensor. |
|
| |||
|
|
| ||
|
|
| 1 | Do not touch any electrical switch, do not use any |
|
|
|
| phone in your building, and do not try to light any |
|
|
|
| appliance. |
|
|
| 2 | Smell around the water heater to ensure there are no |
|
|
|
| gas leaks at the gas control valve, in the supply gas |
|
|
|
| line(s), or any other type of flammable vapor(s) in the |
|
| The gas control valve has detected |
| area. |
|
|
|
| |
|
| the presence of flammable vapors | 3 | Carefully inspect the area surrounding the water heater |
|
| from the FV (flammable vapor) | ||
|
|
| for any substances such as gasoline, paint, paint | |
|
| sensor. |
| |
|
|
| thinners, varnish, or cleaners that could emit flammable | |
|
|
|
| |
|
|
|
| vapors. Remove anything that can potentially emit |
|
|
|
| flammable vapors from the area and store it properly in |
|
|
|
| a different location. |
|
|
| 4 | Call the technical information support phone number |
|
|
|
| shown on the water heater labeling for further |
|
|
|
| assistance. |
|
|
| 1 | On models equipped with a dilution air intake screen on |
|
| The gas control valve has detected |
| the blower assembly - check/clean this screen. |
|
| the air pressure switch circuit is |
|
|
|
| opening repeatedly during one | 2 | On models equipped with a combustion air intake |
|
| |||
|
| heating cycle. |
| screen on the base ring (bottom) of the water heater - |
|
| LDO (Lint, Dust, and Oil) lockout |
| check/clean the screen. |
|
|
| ||
|
|
|
| |
|
| condition. | 3 | Ensure intake air screen(s) on models so equipped are |
|
|
|
| not obstructed. |
31