Before Setting Surface Controls

Locations of the Gas Surface Burners

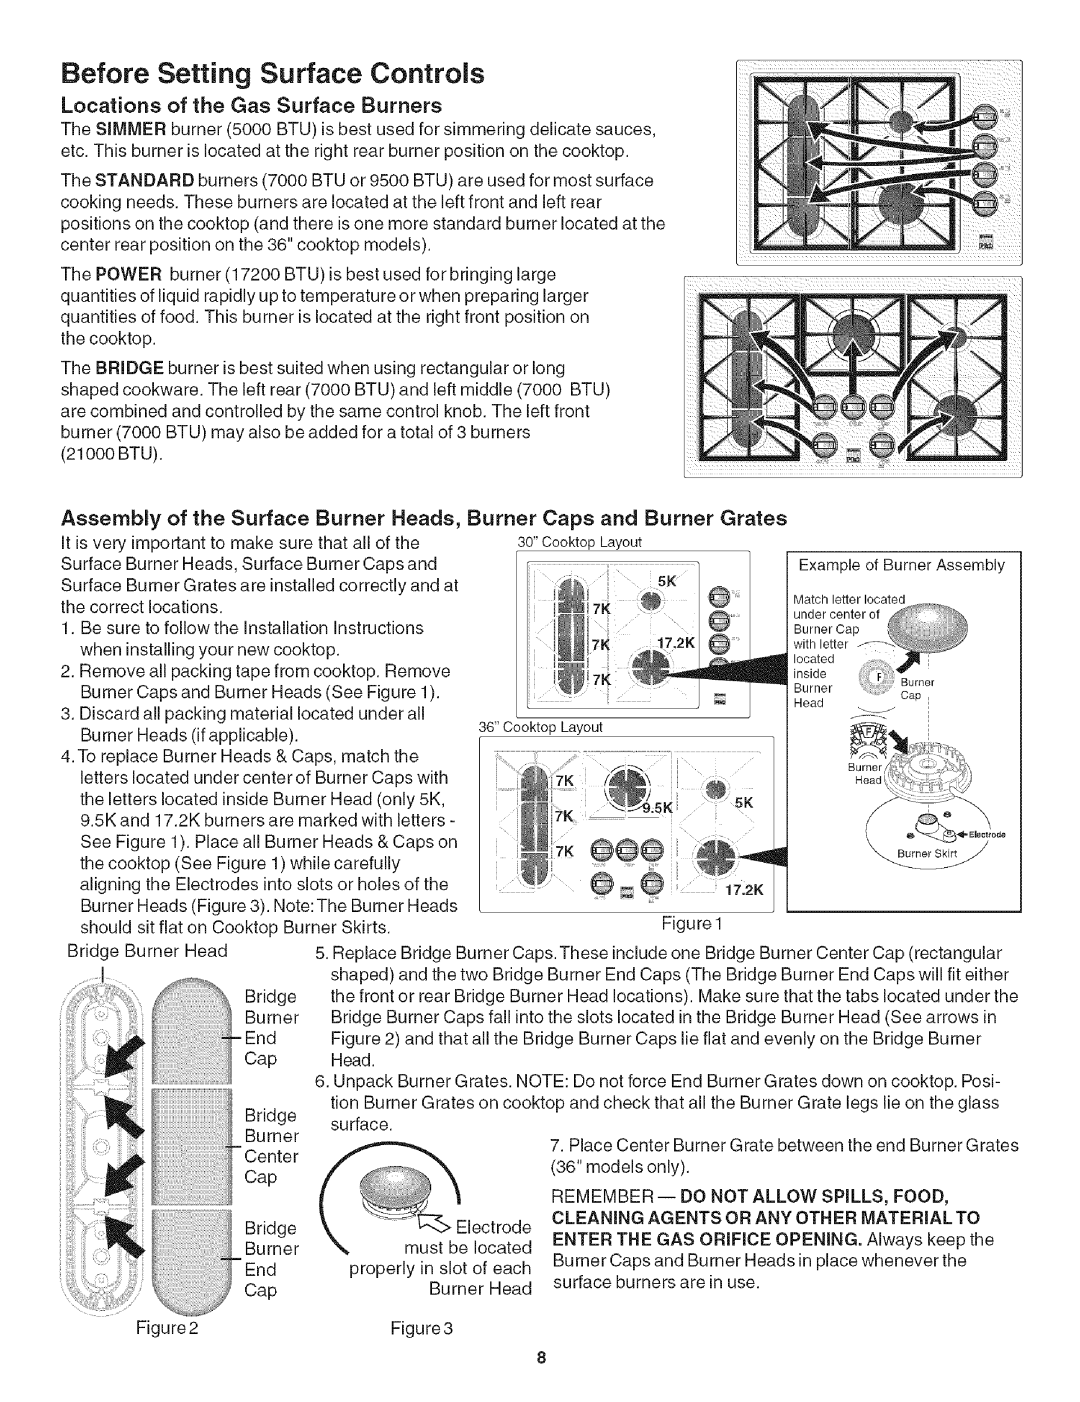
The SIMMER burner (5000 BTU) is best used for simmering delicate sauces, etc. This burner is located at the right rear burner position on the cooktop.

The STANDARD burners (7000 BTU or 9500 BTU) are used for most surface cooking needs. These burners are located at the left front and left rear positions on the cooktop (and there is one more standard burner located at the center rear position on the 36" cooktop models).

The POWER burner (17200 BTU)is best used for bringing large quantities of liquid rapidly up to temperature or when preparing larger quantities of food. This burner is located at the right front position on the cooktop.

The BRIDGE burner is best suited when using rectangular or long shaped cookware. The left rear (7000 BTU) and left middle (7000 BTU) are combined and controlled by the same control knob. The left front burner (7000 BTU) may also be added for a total of 3 burners

(21000 BTU).

Assembly of the Surface Burner Heads, Burner Caps and Burner Grates

It is very

important to make sure that all of the

30"CooktopLayout


Surface

Burner Heads, Surface Burner Caps and


Example of Burner Assembly

Surface Burner Grates are installed correctly and at


the correct locations.


Match letter located

1. Be sure to follow the installation instructions


@ ....


when installing your new cooktop.


2. Remove all packing tape from cooktop. Remove


Burner Caps and Burner Heads (See Figure 1).


_

Head

3. Discard all packing material

located under all


_-_

BuHer Heads (if applicable).


36"CooktopLayout


4.To replace Burner Heads & Caps, match the


letters located under center of Burner Caps with


the letters located inside Burner Head (only 5K,


9.5K and 17.2K burners are marked with letters -


See Figure 1). Place all Burner Heads & Caps on


the cooktop (See Figure 1) while carefully


aligning the Electrodes into slots or holes of the


Burner Heads (Figure 3). Note: The Burner Heads


should sit flat on Cooktop Burner Skirts.


Figure 1


Bridge

Burner Head

5. Replace Bridge Burner Caps. These includeone Bridge Burner Center Cap (rectangular


shaped) and the two Bridge Burner End Caps (The Bridge Burner End Caps will fit either


Bridge

the front or rear Bridge Burner Head locations). Make sure that the tabs located under the


Burner

Bridge Burner

Caps fall into the slots located in the Bridge

Burner Head (See arrows in


Figure 2) and that all the Bridge Burner Caps lie flat and evenly on the Bridge Burner


Cap

Head.


6. Unpack Burner Grates. NOTE: Do not force End Burner Grates down on cooktop. Posi-


tion Burner Grates on cooktop and check that all the Burner Grate legs lie on the glass


Bridge

surface.


Burner


7. Place Center Burner Grate between the end Burner Grates


=Center


(36" models only).


Cap


REMEMBER-- DO NOT ALLOW SPILLS, FOOD,


Bridge


Electrode

CLEANING AGENTS OR ANY OTHER MATERIAL TO


ENTER THE GAS ORiFiCE OPENING. Always keep the


Burner

must

be located


Burner Caps and Burner Heads in place whenever the


=End

properly in slot of each


surface burners are in use.


Cap

Burner Head


Figure2

Figure3


Page 8
Image 8
Kenmore 790.3101 manual Before Setting Surface Controls, Locations of the Gas Surface Burners

790.31, 790.3101 specifications

The Kenmore 790.3101 and 790.31 series are part of Kenmore’s commitment to producing high-quality kitchen appliances that combine functionality with modern design. These models, particularly admired for their reliability, offer a blend of innovative technology and user-friendly features, making them a great choice for home cooks and culinary enthusiasts alike.

One of the main features of the Kenmore 790.3101 and 790.31 is their advanced cooking capabilities. Both models are equipped with precise temperature controls, enabling users to ensure that their dishes are cooked evenly and to perfection. The ovens offer multiple cooking modes, including bake, broil, and convection options, which enhance versatility in the kitchen. The convection cooking feature circulates hot air around food, resulting in faster cooking times and improved browning.

Another standout characteristic is the sleek and modern design that fits seamlessly into any kitchen décor. The stainless steel finish not only adds a touch of elegance but is also built to resist fingerprints and smudges, making maintenance easier. The intuitive control panel allows users to set timers, adjust temperatures, and select cooking modes with ease.

Safety is a significant consideration in kitchen appliances, and the Kenmore 790.3101 and 790.31 do not disappoint. Both models include safety features such as an automatic shut-off, ensuring peace of mind when cooking. Additionally, the cool-touch oven doors are designed to minimize the risk of burns, providing a safer cooking environment for families.

Durability is another hallmark of the Kenmore brand, and these models are no exception. Constructed with high-quality materials, they are built to withstand the rigors of everyday cooking while maintaining their performance over time. The removable oven racks and easy-clean interior make it convenient to keep the oven in pristine condition, adding to the overall user experience.

In conclusion, the Kenmore 790.3101 and 790.31 series offer a reliable and efficient cooking solution for any kitchen. With their advanced features, modern design, and safety considerations, these models are well-suited for both novice cooks and seasoned chefs. Whether baking a cake or roasting a chicken, these ovens provide the quality and versatility required to handle a variety of culinary tasks. Investing in a Kenmore 790.3101 or 790.31 is a step toward enhancing your cooking experience with confidence and style.