General Care & Cleaning

Care and Cleaning of Stainless Steel (some models)

Some models are equipped with stainless steel exterior parts. Special care and cleaning are required for maintaining the appearance of stainless parts. Please refer to the Cleaning Table provided at the beginning of the General Care & Cleaning section in this Use & Care Guide.

Changing the Oven Light (some models)

On some models, the oven light automatically turns on when the door is opened. Some models have a switch located on the control panel to turn on the light. The oven light bulb is located at the rear of the oven.

To replace the oven light:

1. Turn electrical power off at the main source or unplug the range.

2. Replace bulb with a new 40 watt appliance bulb.

3. Turn power back on again at the main source (or plug the range back in).

4. The clock will then need to be reset. To reset, see Setting the Clock and Minute Timer in this Use & Care Guide.

Be sure the range is unplugged and all parts are COOL before replacing oven light. Wear a leather-faced glove for protection against possible broken glass.

Removing and Replacing the Oven Door

The door is heavy. For safe, temporary storage, lay the door flat with the inside of the door facing down.

To Remove Oven Door:

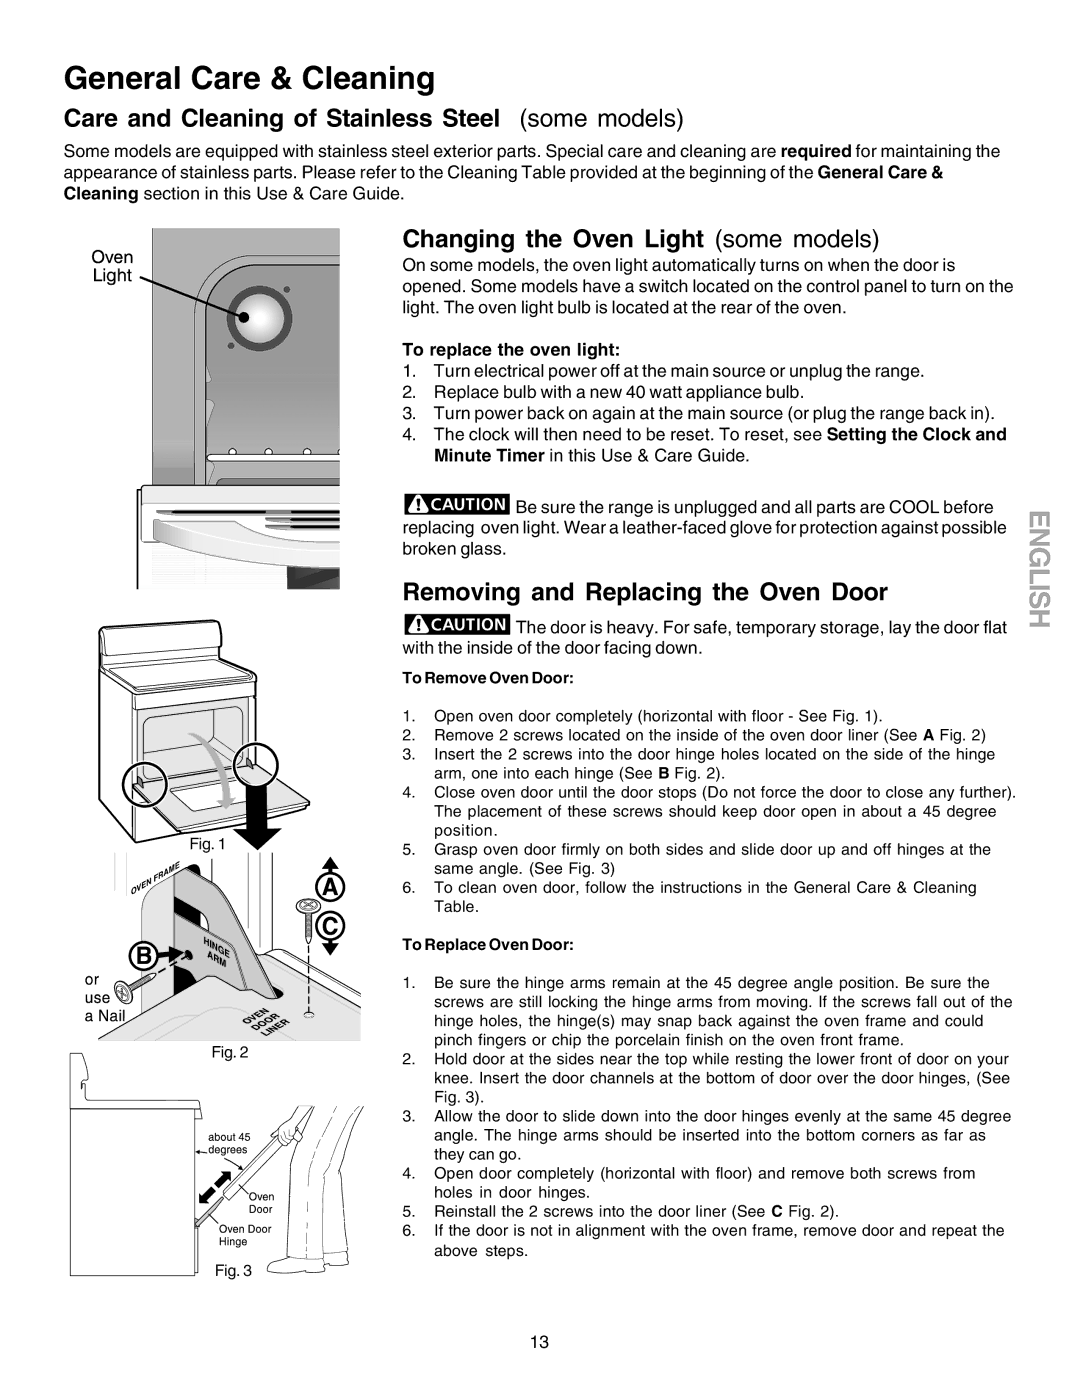
1.Open oven door completely (horizontal with floor - See Fig. 1).

2.Remove 2 screws located on the inside of the oven door liner (See A Fig. 2)

3.Insert the 2 screws into the door hinge holes located on the side of the hinge arm, one into each hinge (See B Fig. 2).

4.Close oven door until the door stops (Do not force the door to close any further). The placement of these screws should keep door open in about a 45 degree

Fig. 1


position.

5.

Grasp oven door firmly on both sides and slide door up and off hinges at the


same angle. (See Fig. 3)


6.

To clean oven door, follow the instructions in the General Care & Cleaning


Table.


To Replace Oven Door:


1.

Be sure the hinge arms remain at the 45 degree angle position. Be sure the


screws are still locking the hinge arms from moving. If the screws fall out of the


hinge holes, the hinge(s) may snap back against the oven frame and could

Fig. 2


pinch fingers or chip the porcelain finish on the oven front frame.

2.

Hold door at the sides near the top while resting the lower front of door on your


knee. Insert the door channels at the bottom of door over the door hinges, (See


Fig. 3).


3.

Allow the door to slide down into the door hinges evenly at the same 45 degree


angle. The hinge arms should be inserted into the bottom corners as far as


they can go.


4.

Open door completely (horizontal with floor) and remove both screws from


holes in door hinges.


5.

Reinstall the 2 screws into the door liner (See C Fig. 2).


6.

If the door is not in alignment with the oven frame, remove door and repeat the


above steps.

Fig. 3


ENGLISH

13

Page 13
Image 13
Kenmore 790.9083, 790.9006, 790.9003, 790.9104 Care and Cleaning of Stainless Steel some models, To replace the oven light

790.9081, 790.9004, 790.9007, 790.9005, 790.9083 specifications

The Kenmore 790 series, which includes models 790.9006, 790.9003, 790.9104, 790.9103, and 790.9083, is renowned for its blend of performance, functionality, and advanced cooking technologies. These ranges provide a reliable cooking experience that appeals to both casual cooks and culinary enthusiasts alike.

One of the standout features across the Kenmore 790 series is the powerful gas burner system. The ranges boast multiple burners, offering various BTU outputs that cater to a wide range of cooking styles. The high-heat burners are perfect for searing meats or boiling water quickly, while low-heat options are ideal for simmering sauces or melting chocolate. The precision and versatility of the burner system ensure that users can achieve optimal results for any dish.

Another significant characteristic of the Kenmore 790 models is the spacious oven capacity, allowing for cooking multiple dishes simultaneously. The convection cooking option found in select models enhances heat distribution, ensuring that foods cook evenly and come out perfectly every time. This technology is especially beneficial for baking, where consistent temperature is critical for achieving desired results.

The design of the Kenmore 790 series features a sleek stainless steel exterior with modern aesthetics, making it an attractive addition to any kitchen. The intuitive control panel is user-friendly, incorporating digital displays and easy-to-navigate settings. This ensures that adjusting cooking temperatures and times is straightforward and hassle-free.

Safety features are also a priority in these models. With an automatic shut-off function and a reliable flame failure safety system, users can have peace of mind while cooking. Additionally, the models are designed with easy-to-clean surfaces, including removable grates and a smooth oven interior, simplifying maintenance.

Overall, the Kenmore 790.9006, 790.9003, 790.9104, 790.9103, and 790.9083 ranges combine innovative technology with a user-friendly design. Whether grilling, baking, or simmering, these ranges offer an efficient and enjoyable cooking experience. The thoughtful arrangement of features, robust construction, and stylish design make the Kenmore 790 series a standout choice for anyone looking to enhance their kitchen with a reliable and high-performing range.