Exhaust systems longer than specified will:

Shorten the life of the dryer.

Reduce performance, resulting in longer drying times and increased energy usage.

3.Determine the number of elbows you will need.

IMPORTANT: Do not use vent runs longer than specified in the Vent Length Chart.

The chart below helps you determine your maximum vent length based on the number of 90 ° turns or elbows you will need and the type of vent (rigid or flexible metal) and hood that you will use.

Vent Length Chart

Number of

Type of


Box or


Angled

90 ° turns

vent


Louvered

hoods

or elbows


hoods


O

Rigid metal

64

ft (20

m)

58

ft (17.7 m)


Flexible

metal

36

ft (11

m)

28

ft (8.5 m)

1

Rigid metal

54

ft (16.5 m)

48

ft (14.6 m)


Flexible

metal

31

ft (9.4 m)

23

ft (7 m)

2

Rigid metal

44

ft (13.4 m)

38

ft (11.6 m)


Flexible

metal

27

ft (8.2 m)

19

ft (5.8 m)

3Rigid metal 35 ft (10.7 m) 29 ft (8.8 m)


Flexible

metal

25

ft (7.6

m)

17

ft (5.2

m)

4

Rigid metal

27

ft

(8.2

m)

21

ft

(6.4

m)


Flexible

metal

23

ft

(7 m)

15

ft

(4.6

m)

_.............. _H,_,.,_¢_4'>

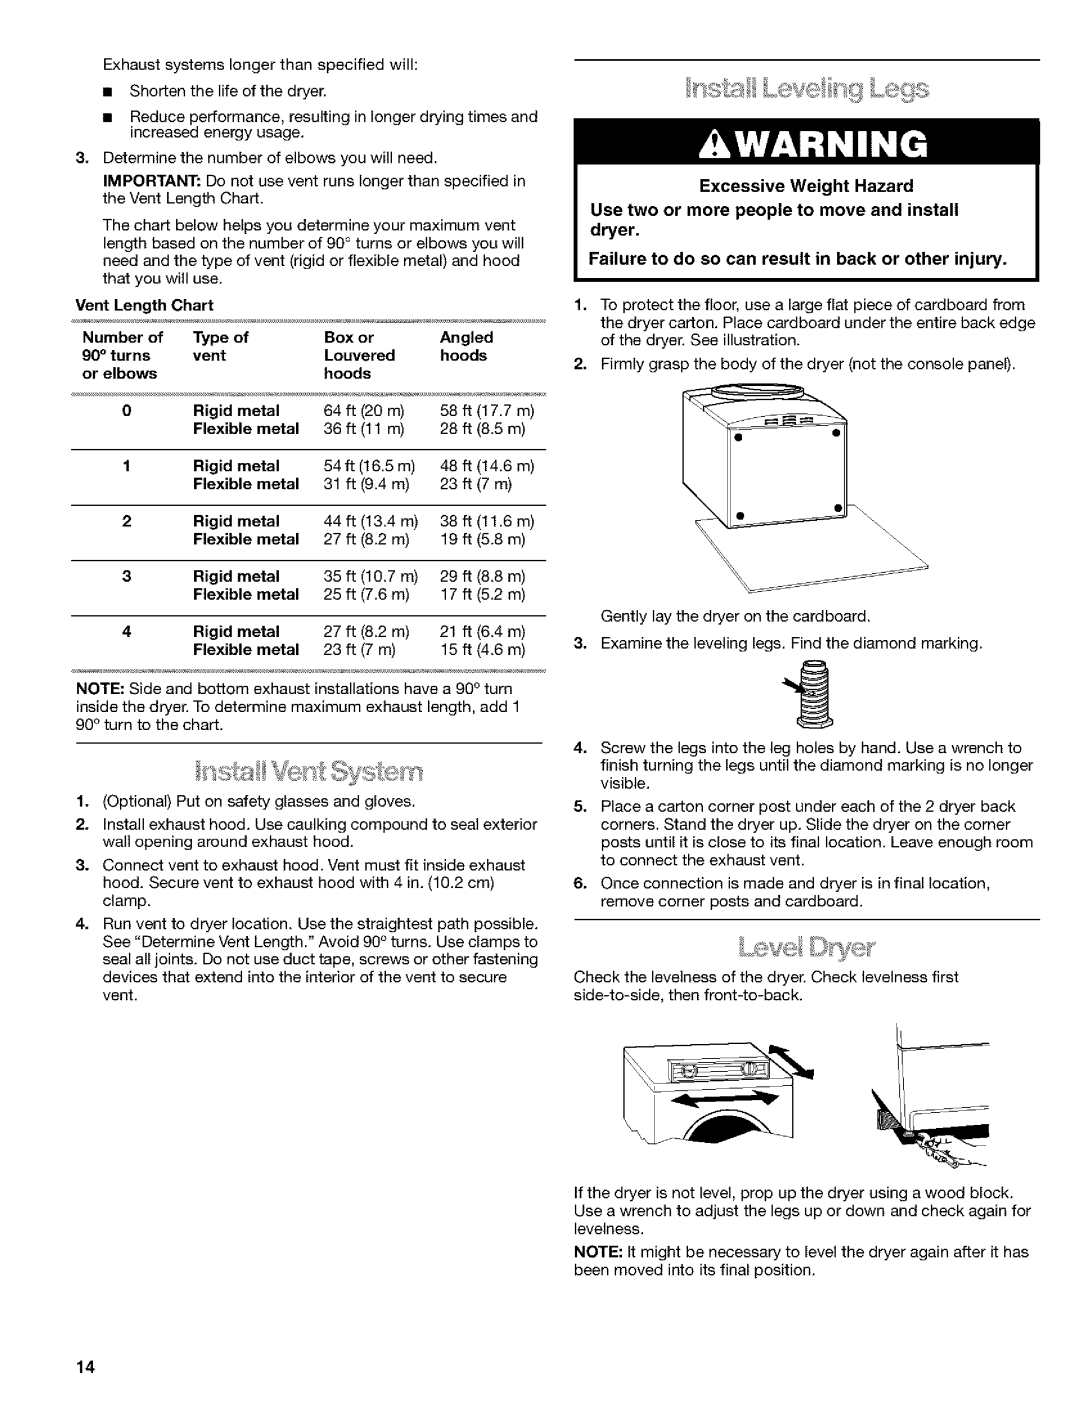
1.To protect the floor, use a large flat piece of cardboard from the dryer carton. Place cardboard under the entire back edge of the dryer. See illustration.

2, Firmly grasp the body of the dryer (not the console panel).

Gently lay the dryer on the cardboard.

3.Examine the leveling legs. Find the diamond marking.

NOTE: Side and bottom exhaust installations have a 90 ° turn

inside the dryer. To determine maximum exhaust length, add 1 90 ° turn to the chart.

1.(Optional) Put on safety glasses and gloves.

2, Install exhaust hood. Use caulking compound to eeal exterior wall opening around exhaust hood.

3.Connect vent to exhaust hood. Vent must fit inside exhaust hood. Secure vent to exhaust hood with 4 in. (10.2 cm) clamp.

4, Run vent to dryer lecation. Use the straightest path peesible. See "Determine Vent Length." Avoid 90 ° turns. Use clamps to

seal all joints. Do not use duct tape, screws or other fastening devices that extend into the interior of the vent to secure

vent.

4, Screw the legs into the leg holes by hand. Use a wrench to finish turning the legs until the diamond marking is no longer visible.

5_ Place a carton corner post under each of the 2 dryer back corners. Stand the dryer up. Slide the dryer on the corner posts until it is close to its final location. Leave enough room to connect the exhaust vent.

6, Once connection is made and dryer is in final location, remove corner posts and cardboard.

Check the levelness of the dryer. Check levelness first side-to-side, then front-to-back.

If the dryer is not level, prop up the dryer using a wood block.

Use a wrench to adjust the legs up or down and check again for levelness.

NOTE: It might be necessary to level the dryer again after it has been moved into its final position.

14

Page 14
Image 14
Kenmore 8519319A manual Metal, Rigid metal

8519319A specifications

The Kenmore 8519319A is a top-of-the-line home appliance designed to elevate your kitchen experience. This refrigerator is widely appreciated for its blend of innovative technology, spacious design, and energy efficiency, ensuring both form and function.

One of the standout features of the Kenmore 8519319A is its spacious interior, which comes with advanced storage solutions. With adjustable shelves and numerous bins, it allows for maximum flexibility in organizing food items. The refrigerator is designed to accommodate varying sizes of groceries, making it ideal for families and those who love to entertain. Additionally, the shelving is crafted from durable materials that are easy to clean, providing both longevity and convenience.

Energy efficiency is another hallmark of the Kenmore 8519319A. It is Energy Star certified, meaning it meets strict energy efficiency guidelines set by the U.S. Environmental Protection Agency. This not only helps lower your utility bills but also contributes to sustainable living by reducing your carbon footprint. The efficiency is bolstered by features like LED lighting, which illuminates the interior while consuming less power than traditional bulbs.

The cooling technology employed in the Kenmore 8519319A ensures even temperature distribution throughout the refrigerator. This feature is particularly beneficial for food preservation, as it helps maintain the freshness of vegetables and fruits longer than standard models. The appliance also includes a frost-free freezer option, eliminating the need for manual defrosting and making maintenance hassle-free.

Another impressive aspect is the advanced temperature control mechanism. This allows for precise adjustments to meet your specific cooling needs, whether you are storing leftovers, fresh produce, or beverages. The intuitive interface is user-friendly, making it easy to monitor and adjust settings.

Moreover, the design of the Kenmore 8519319A does not compromise aesthetics. With a sleek stainless-steel finish and modern lines, it can seamlessly integrate into various kitchen designs while maintaining a polished look.

In summary, the Kenmore 8519319A refrigerator stands out in terms of its spacious design, energy efficiency, advanced cooling technology, and user-friendly features. It not only meets the demands of modern kitchens but also enhances everyday living with its practical solutions and stylish appearance. For those in search of reliability and performance, the Kenmore 8519319A is a compelling choice that supports both busy lifestyles and eco-friendly practices.