Installation
■ Installation | *…North & South America sales area only. |
Firewall or metal support
(North & South America sales
■ Screwing the Faceplate on the Unit area only.)
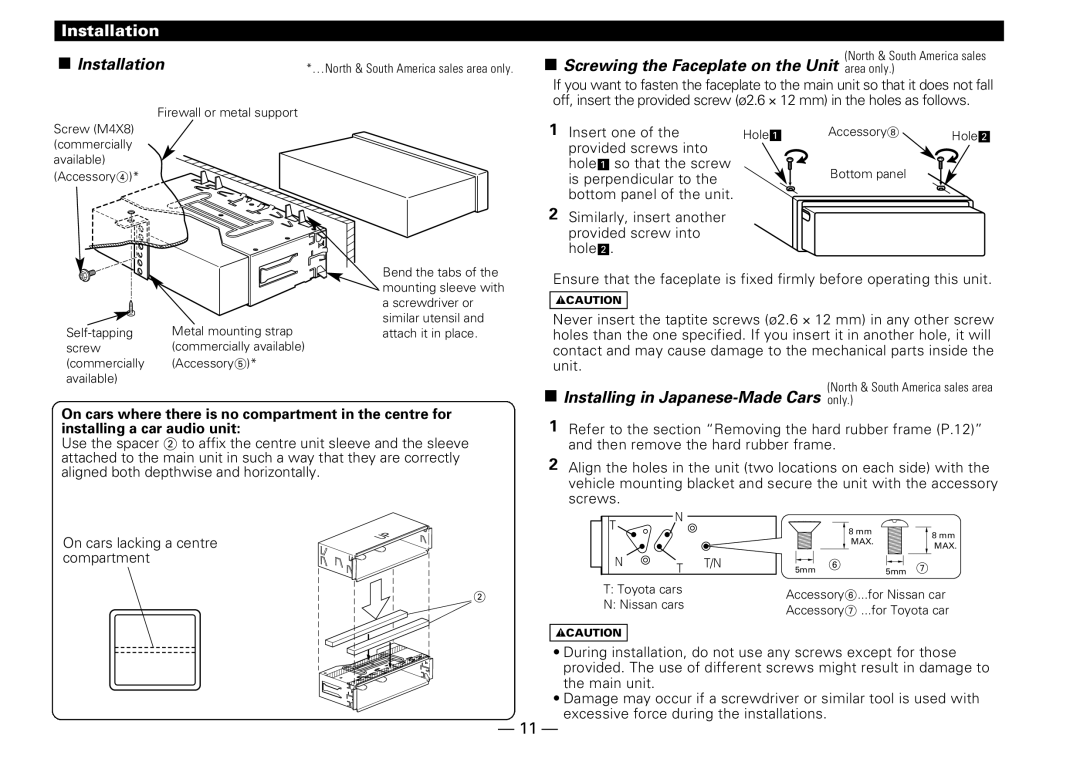
If you want to fasten the faceplate to the main unit so that it does not fall off, insert the provided screw (ø2.6 × 12 mm) in the holes as follows.
Screw (M4X8) (commercially available)
(Accessory4)*
1 | Insert one of the | HoleÁ |
| provided screws into |
|
| holeÁ so that the screw |
|
| is perpendicular to the |
|
| bottom panel of the unit. |
|
2 | Similarly, insert another |
|
| provided screw into |
|
| holeª. |
|
Accessory8 Holeª
Bottom panel
Metal mounting strap | |
screw | (commercially available) |
(commercially | (Accessory5)* |
available) |
|
Bend the tabs of the ![]() mounting sleeve with a screwdriver or similar utensil and attach it in place.
mounting sleeve with a screwdriver or similar utensil and attach it in place.
Ensure that the faceplate is fixed firmly before operating this unit.
2CAUTION
Never insert the taptite screws (ø2.6 × 12 mm) in any other screw holes than the one specified. If you insert it in another hole, it will contact and may cause damage to the mechanical parts inside the unit.
■ Installing in |
On cars where there is no compartment in the centre for installing a car audio unit:
Use the spacer 2 to affix the centre unit sleeve and the sleeve attached to the main unit in such a way that they are correctly aligned both depthwise and horizontally.
On cars lacking a centre | P |
U | |
| |
compartment |
|
2
1 | Refer to the section “Removing the hard rubber frame (P.12)” |
| and then remove the hard rubber frame. |
2 | Align the holes in the unit (two locations on each side) with the |
| vehicle mounting blacket and secure the unit with the accessory |
| screws. |
T | N |
|
|
|
|
|
|
|
|
| 8 mm | 8 mm | |
|
|
|
|
| ||
|
|
|
|
| MAX. | |
|
|
|
|
| MAX. | |
|
|
|
|
|
| |
N | T | T/N | 5mm | 6 | 5mm | 7 |
T: Toyota cars | Accessory6...for Nissan car | ||
N: Nissan cars | |||
Accessory7 | ...for Toyota car | ||
| |||
2CAUTION
•During installation, do not use any screws except for those provided. The use of different screws might result in damage to the main unit.
•Damage may occur if a screwdriver or similar tool is used with excessive force during the installations.
— 11 —
