Unpacking
Assembly
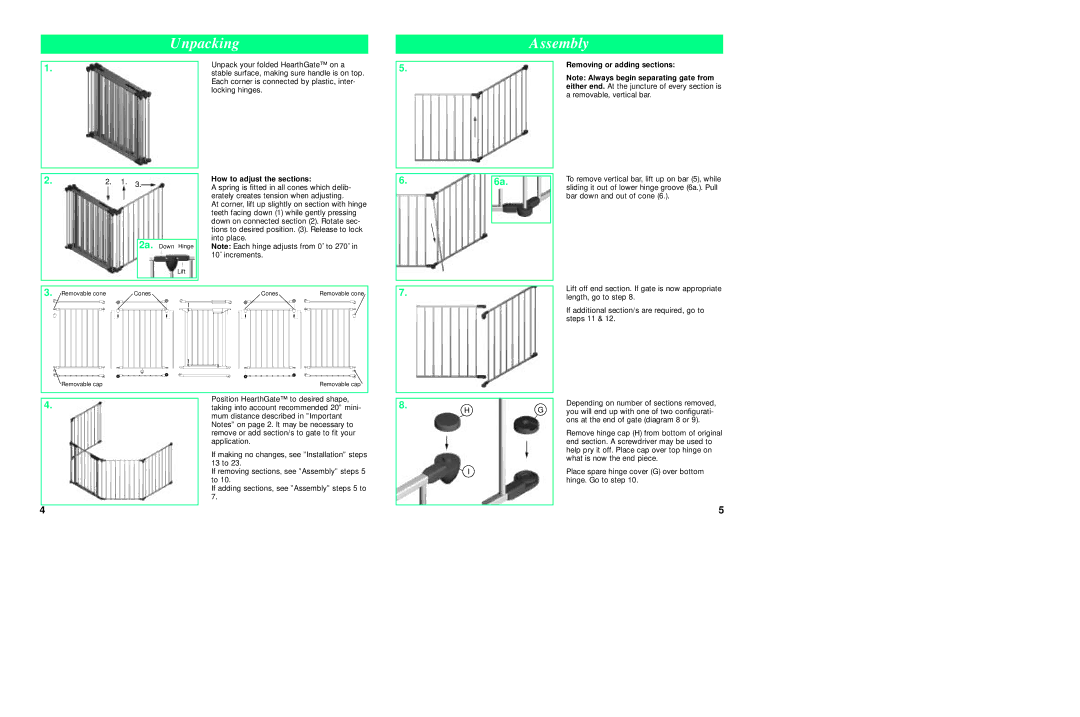
1. | Unpack your folded HearthGate™ on a | |
stable surface, making sure handle is on top. | ||
| ||
| Each corner is connected by plastic, inter- | |
| locking hinges. | |
|
|
2. | 2. 1. | 3. | How to adjust the sections: | |
|
| A spring is fitted in all cones which delib- | ||
|
|
|
| |
|
|
|
| erately creates tension when adjusting. |
|
|
|
| At corner, lift up slightly on section with hinge |
|
|
|
| teeth facing down (1) while gently pressing |
|
|
|
| down on connected section (2). Rotate sec- |
|
|
|
| tions to desired position. (3). Release to lock |
|
|
|
| into place. |
|
|
| 2a. Down Hinge | |
|
|
| Note: Each hinge adjusts from 0˚ to 270˚ in | |
|
|
|
| 10˚ increments. |
|
|
| Lift |
|
3. | Removable cone | Cones | Cones | Removable cone |
| Removable cap |
|
| Removable cap |
Position HearthGate™ to desired shape,
4.taking into account recommended 20” mini- mum distance described in ”Important Notes” on page 2. It may be necessary to remove or add section/s to gate to fit your application.
If making no changes, see ”Installation” steps 13 to 23.
If removing sections, see ”Assembly” steps 5 to 10.
If adding sections, see ”Assembly” steps 5 to 7.
5.
6.
7.
8.
6a.
HG
I
Removing or adding sections:
Note: Always begin separating gate from either end. At the juncture of every section is a removable, vertical bar.
To remove vertical bar, lift up on bar (5), while sliding it out of lower hinge groove (6a.). Pull bar down and out of cone (6.).
Lift off end section. If gate is now appropriate length, go to step 8.
If additional section/s are required, go to steps 11 & 12.
Depending on number of sections removed, you will end up with one of two configurati- ons at the end of gate (diagram 8 or 9).
Remove hinge cap (H) from bottom of original end section. A screwdriver may be used to help pry it off. Place cap over top hinge on what is now the end piece.
Place spare hinge cover (G) over bottom hinge. Go to step 10.
4 | 5 |