If you need to adjust the temperature, wait at least 24 hours between adjustments and then recheck the temperature.

To make the wine cellar colder, adjust the control to the next higher setting. To make the wine cellar less cold, adjust the control to the next lower setting.

Wine Racks

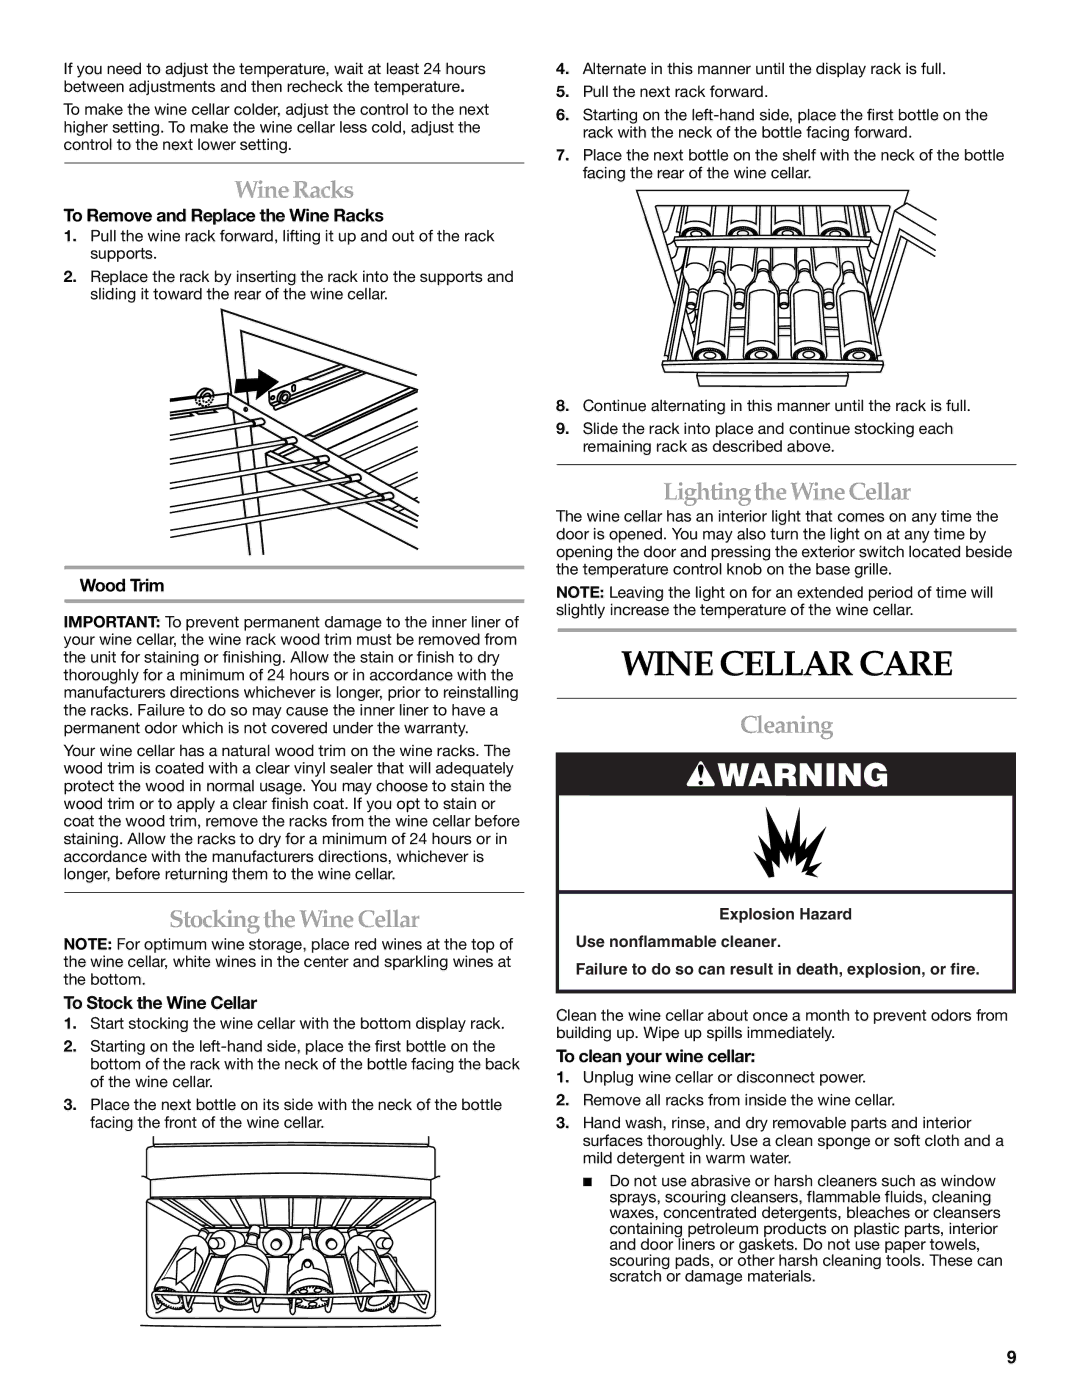
To Remove and Replace the Wine Racks

1.Pull the wine rack forward, lifting it up and out of the rack supports.

2.Replace the rack by inserting the rack into the supports and sliding it toward the rear of the wine cellar.

Wood Trim

IMPORTANT: To prevent permanent damage to the inner liner of your wine cellar, the wine rack wood trim must be removed from the unit for staining or finishing. Allow the stain or finish to dry thoroughly for a minimum of 24 hours or in accordance with the manufacturers directions whichever is longer, prior to reinstalling the racks. Failure to do so may cause the inner liner to have a permanent odor which is not covered under the warranty.

Your wine cellar has a natural wood trim on the wine racks. The wood trim is coated with a clear vinyl sealer that will adequately protect the wood in normal usage. You may choose to stain the wood trim or to apply a clear finish coat. If you opt to stain or coat the wood trim, remove the racks from the wine cellar before staining. Allow the racks to dry for a minimum of 24 hours or in accordance with the manufacturers directions, whichever is longer, before returning them to the wine cellar.

Stocking the Wine Cellar

NOTE: For optimum wine storage, place red wines at the top of the wine cellar, white wines in the center and sparkling wines at the bottom.

To Stock the Wine Cellar

1.Start stocking the wine cellar with the bottom display rack.

2.Starting on the left-hand side, place the first bottle on the bottom of the rack with the neck of the bottle facing the back of the wine cellar.

3.Place the next bottle on its side with the neck of the bottle facing the front of the wine cellar.

4.Alternate in this manner until the display rack is full.

5.Pull the next rack forward.

6.Starting on the left-hand side, place the first bottle on the rack with the neck of the bottle facing forward.

7.Place the next bottle on the shelf with the neck of the bottle facing the rear of the wine cellar.

8.Continue alternating in this manner until the rack is full.

9.Slide the rack into place and continue stocking each remaining rack as described above.

Lightingthe Wine Cellar

The wine cellar has an interior light that comes on any time the door is opened. You may also turn the light on at any time by opening the door and pressing the exterior switch located beside the temperature control knob on the base grille.

NOTE: Leaving the light on for an extended period of time will slightly increase the temperature of the wine cellar.

WINE CELLAR CARE

Cleaning

WARNING

Explosion Hazard

Use nonflammable cleaner.

Failure to do so can result in death, explosion, or fire.

Clean the wine cellar about once a month to prevent odors from building up. Wipe up spills immediately.

To clean your wine cellar:

1.Unplug wine cellar or disconnect power.

2.Remove all racks from inside the wine cellar.

3.Hand wash, rinse, and dry removable parts and interior surfaces thoroughly. Use a clean sponge or soft cloth and a mild detergent in warm water.

Do not use abrasive or harsh cleaners such as window sprays, scouring cleansers, flammable fluids, cleaning waxes, concentrated detergents, bleaches or cleansers containing petroleum products on plastic parts, interior and door liners or gaskets. Do not use paper towels, scouring pads, or other harsh cleaning tools. These can scratch or damage materials.

9

Page 9
Image 9
KitchenAid 2300269 manual Wine Cellar Care, Wine Racks, Stocking the Wine Cellar, Lightingthe Wine Cellar, Cleaning

2300269 specifications

The KitchenAid 2300269 is a versatile and innovative kitchen appliance designed to elevate your culinary experience. This all-purpose stand mixer is a staple for home cooks and professional chefs alike, thanks to its impressive features, powerful performance, and sleek design.

One of the standout characteristics of the KitchenAid 2300269 is its robust motor. With a powerful 300-watt motor, it effortlessly tackles a wide range of mixing tasks, from whipping cream to kneading dough. The motor's direct drive design ensures efficient power transfer and consistent results, making it an indispensable tool for baking enthusiasts.

The stand mixer boasts a generous capacity bowl, typically featuring a 4.5-quart stainless steel design that is both durable and easy to clean. This bowl size is perfect for mixing large batches of dough or batter, accommodating everything from cookies to bread recipes. The stainless steel construction also helps maintain the temperature of your ingredients, ensuring optimal mixing conditions.

One of the most innovative technologies integrated into the KitchenAid 2300269 is its Planetary Mixing Action. This system allows the mixing attachment to rotate in one direction while the bowl itself rotates in the opposite direction, ensuring thorough blending of ingredients with every use. This feature enhances the mixer’s performance, ensuring that even tough mixtures are combined efficiently without leaving pockets of unmixed ingredients.

Additionally, the KitchenAid 2300269 offers multiple speed settings, allowing you to select the right speed for your specific task. From slow stirring to high-speed whipping, the variety of speeds provides precise control over your mixing processes, resulting in perfectly textured mixtures every time.

The mixer also comes with a variety of useful attachments, including a flat beater, dough hook, and wire whip. These attachments make it easy to tackle different recipes — from making pizza dough to aerating egg whites for soufflés. For added versatility, the stand mixer features a power hub that allows you to attach various accessories, such as food grinders and pasta makers, expanding its functionality in the kitchen.

With its classic aesthetic and reliable performance, the KitchenAid 2300269 stands out as an essential kitchen companion. Whether you're a seasoned chef or someone just starting their cooking journey, this mixer is designed to make your culinary tasks easier and more enjoyable. Its combination of style, power, and versatility truly makes it a cornerstone for any modern kitchen.