3.Use a hex-head socket wrench to adjust the leveling screws. Turn the leveling screw to the right to raise that side of the refrigerator or turn the leveling screw to the left to lower that side. It may take several turns of the leveling screws to adjust the tilt of the refrigerator. See Graphic 7.

NOTE: Having someone push against the top of the refrigerator takes some weight off the leveling screws and rollers. This makes it easier to adjust the screws.

4.Open both doors again and check to make sure that they close as easily as you like. If not, tilt the refrigerator slightly more to the rear by turning both leveling screws to the right. It may take several more turns, and you should turn both leveling screws the same amount.

5.Replace the base grille.

NOTE: Be sure to refasten the Tech Sheet behind the base grille.

Connectthe Water Supply

Read all directions before you begin.

IMPORTANT: If you turn the refrigerator on before the water line is connected, turn the ice maker OFF.

Connect to Water Line

1.Unplug refrigerator or disconnect power.

2.Turn OFF main water supply. Turn ON nearest faucet long enough to clear line of water.

3.Locate a ¹⁄₂" (12.70 mm) to 1¹⁄₄" (3.18 cm) vertical cold water pipe near the refrigerator.

IMPORTANT:

Make sure it is a cold water pipe.

Horizontal pipe will work, but drill on the top side of the pipe, not the bottom. This will help keep water away from the drill and normal sediment from collecting in the valve.

4.Determine the length of copper tubing you need. Measure from the connection on the lower rear corner of the refrigerator to the water pipe. Add 7 ft (2.1 m) to allow for cleaning. Use ¹⁄₄" (6.35 mm) O.D. (outside diameter) copper tubing. Be sure both ends of copper tubing are cut square.

5.Using a grounded drill, drill a ¹⁄₄" (6.35 mm) hole in the cold water pipe you have selected.


A

G

B


C

F E

D

A. Cold water pipe

E. Compression sleeve

B. Pipe clamp

F. Shutoff valve

C. Copper tubing

G. Packing nut

D. Compression nut


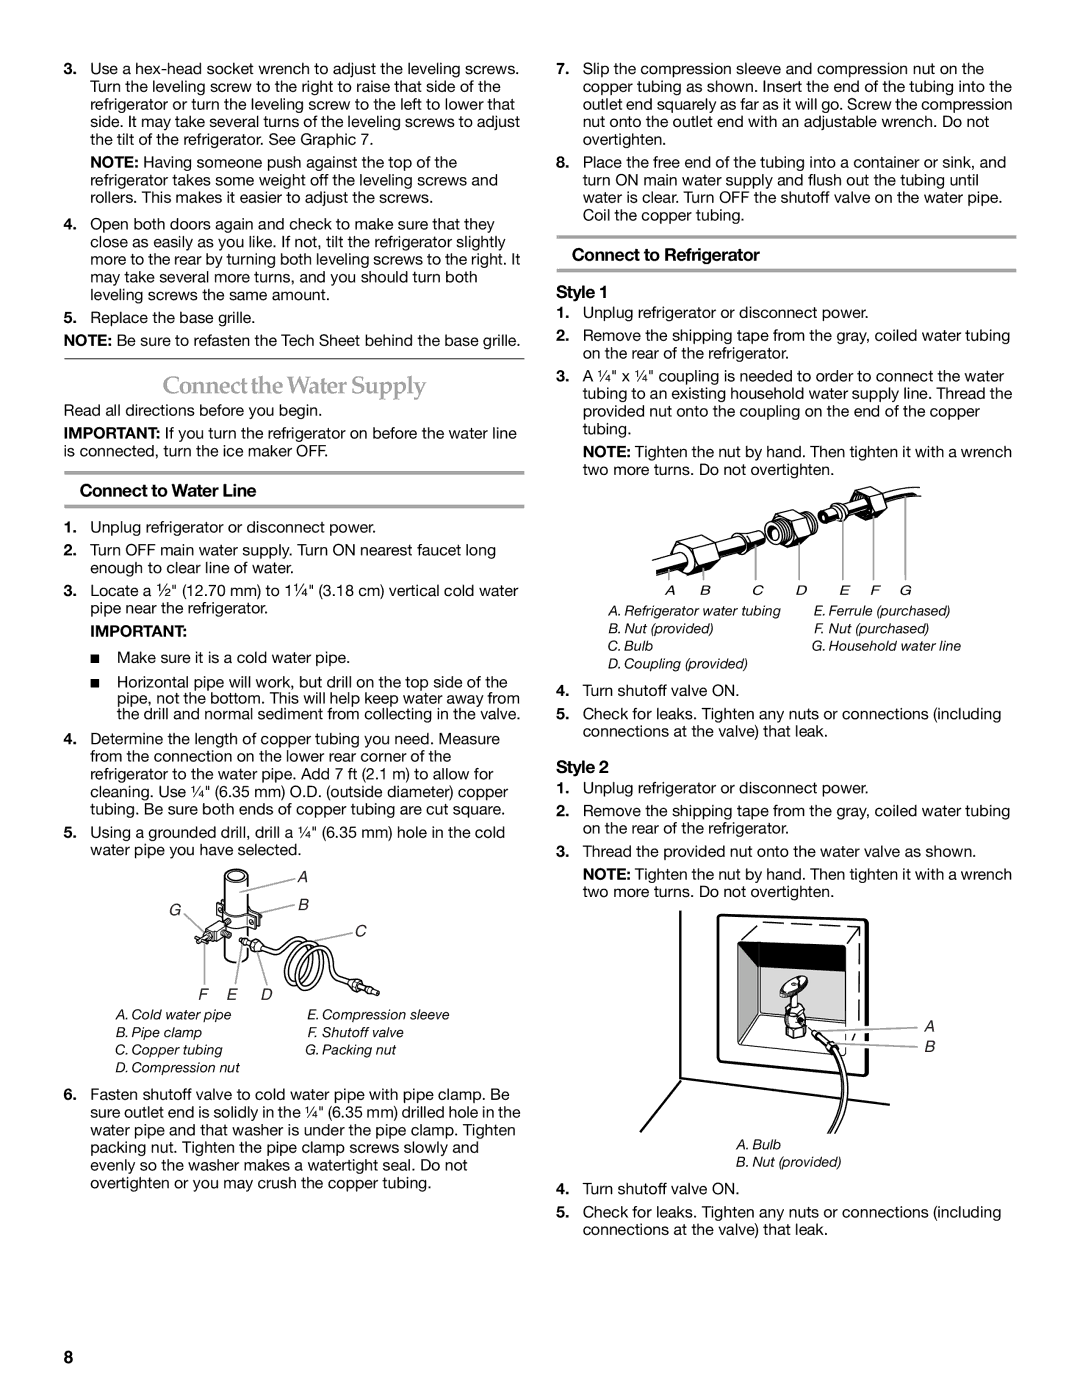
6.Fasten shutoff valve to cold water pipe with pipe clamp. Be sure outlet end is solidly in the ¹⁄₄" (6.35 mm) drilled hole in the water pipe and that washer is under the pipe clamp. Tighten packing nut. Tighten the pipe clamp screws slowly and evenly so the washer makes a watertight seal. Do not overtighten or you may crush the copper tubing.

7.Slip the compression sleeve and compression nut on the copper tubing as shown. Insert the end of the tubing into the outlet end squarely as far as it will go. Screw the compression nut onto the outlet end with an adjustable wrench. Do not overtighten.

8.Place the free end of the tubing into a container or sink, and turn ON main water supply and flush out the tubing until water is clear. Turn OFF the shutoff valve on the water pipe. Coil the copper tubing.

Connect to Refrigerator

Style 1

1.Unplug refrigerator or disconnect power.

2.Remove the shipping tape from the gray, coiled water tubing on the rear of the refrigerator.

3.A ¹⁄₄" x ¹⁄₄" coupling is needed to order to connect the water tubing to an existing household water supply line. Thread the provided nut onto the coupling on the end of the copper tubing.

NOTE: Tighten the nut by hand. Then tighten it with a wrench two more turns. Do not overtighten.

A

B

C

D

E F G

A. Refrigerator water tubing


E. Ferrule (purchased)

B. Nut (provided)


F. Nut (purchased)

C. Bulb


G. Household water line

D. Coupling (provided)


4.Turn shutoff valve ON.

5.Check for leaks. Tighten any nuts or connections (including connections at the valve) that leak.

Style 2

1.Unplug refrigerator or disconnect power.

2.Remove the shipping tape from the gray, coiled water tubing on the rear of the refrigerator.

3.Thread the provided nut onto the water valve as shown.

NOTE: Tighten the nut by hand. Then tighten it with a wrench two more turns. Do not overtighten.

A

B

A.Bulb

B.Nut (provided)

4.Turn shutoff valve ON.

5.Check for leaks. Tighten any nuts or connections (including connections at the valve) that leak.

8

Page 8
Image 8
KitchenAid 2308307 manual Connectthe Water Supply, Connect to Water Line, Connect to Refrigerator Style

2308307 specifications

The KitchenAid 2308307 is an innovative and versatile stand mixer that has captured the hearts of home bakers and culinary enthusiasts around the world. Known for its durability and performance, this model stands out with an impressive blend of features and technologies designed to enhance the home cooking experience.

One of the standout characteristics of the KitchenAid 2308307 is its powerful 300-watt motor. This robust motor allows the mixer to handle a wide variety of tasks, from mixing light batters to kneading heavy dough, making it an ideal companion for all baking endeavors. The motor is also designed to operate quietly, providing a more pleasant kitchen experience.

The mixer boasts a unique tilt-head design, which offers easy access to the mixing bowl. This feature allows users to easily add ingredients and scrape the sides of the bowl without any hassle, leading to more efficient baking. The included 4.5-quart stainless steel mixing bowl is both durable and resistant to rust, ensuring long-lasting performance.

This model comes with three essential attachments: a flat beater, a dough hook, and a wire whip. Each attachment is designed to tackle specific tasks, whether it’s mixing ingredients, kneading dough, or whipping cream. The versatility of these attachments expands the mixer's functionality, allowing users to create a wide range of recipes with ease.

In terms of technology, the KitchenAid 2308307 features a 10-speed slide control, enabling precision mixing. Users can select the perfect speed for their specific task, whether it’s folding in delicate ingredients or achieving a robust mix. This range of speeds allows for complete control over the mixing process, catering to both novice cooks and seasoned bakers.

Another important characteristic is the dishwasher-safe bowl and attachments, which makes cleanup quick and effortless. The sleek design and variety of color options also ensure that the KitchenAid mixer fits beautifully into any kitchen decor.

In conclusion, the KitchenAid 2308307 combines functionality, durability, and user-friendly features to create a stand mixer that is not only effective but also aesthetically pleasing. Ideal for a diverse range of culinary tasks, this stand mixer is a worthwhile investment for anyone looking to elevate their baking game. Whether preparing simple dessert mixtures or complex bread recipes, this mixer is equipped to handle it all with style and efficiency.