Floor Damage

Before moving range across Iloor, check that range is on shipping base or slide range onlo cardboard or hardboard.

Failure lo iollow lhese inslruclions may resull In damage lo floor covering.

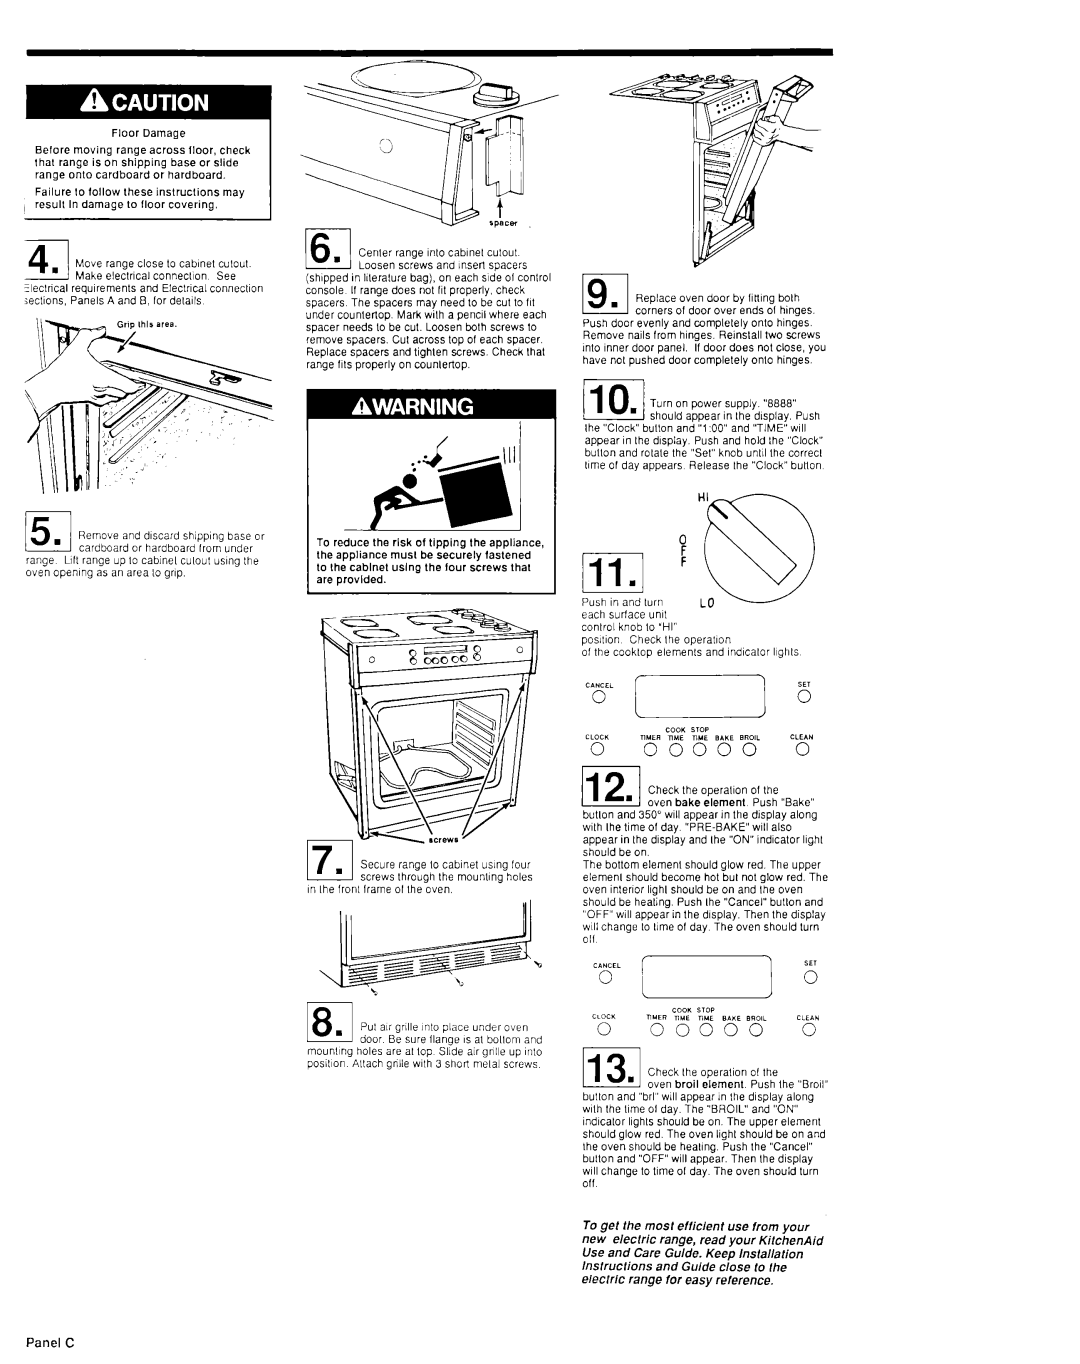
41Move range close lo cablnel culout.

.

Make eleclncal connectIon See Sclncal requlremenls and Eleclr~cal connectIon zclions, Panels A and 8, for delalls

(6 Cenler range lnlo cablnel culoul

.

Loosen screws and lnserl soacers ishlooed in l&ralure baa). on each side 01 conlrol consble II range does &l 111properly, check spacers The spacers may need 10 be cul lo 111 under counlerlo~. Mark wilh a oencll where each spacer needs Id be cut. Loosen bolh screws lo remove spacers. Cul across top of each spacer. Replace spacers and tighlen screws. Check lhal range flls properly on counlertop.

Replace oven door by llnlng bolh comers of door over ends 01 hinges

Push door evenly and complelely onlo hinges. Remove nails from hinges. Reins’lall Iwo wews lnlo inner door panel. If door does nol close, you have nol pushed door complelely onlo hinges.

110, Turn on power supply. “8888” should appear in Ihe display. Push

Ihe “Clock” bullon and “l-00” and “TIME” will appear tn Ihe display. Push and hold lhe “Clock” bullon and rolale Ihe “Se?’knob unlll the correcl lhme of day appears Release Ihe “Clock”bullon

Remove and discard shIppIng base or cardboard or hardboard from under

range Llfl range up lo cablnel culoul wng Ihe oven opening as an area lo grip.

To reduce the risk of tipping the appliance, the appliance musl be securely iaslened lo Ihe cablnel using the four screws thal are provided.

m

.

I/ . Secure range lo cabinet using four screws through the mounllng holes

tn Ihe fronl lrame 01 Ihe oven.

18. Pul air grille Into place under oven door Be sure Ilange IS al bollom and

mounllng holes are al lop Slide ar grille up IIIO poWon Allach grille wllh 3 short melal screws

Push in and lurn each suriace unll conlrol knob lo ‘HI”

poslhon Check Ihe operalIon

of the cooklop elemenls and lndlcalor llghls

112Check the operalion of Ihe

. oven bake elemenl Push “Bake” butlon and 350” will appear in Ihe display along wllh Ihe lime of dav “PRE-BAKE” WIII also appear in Ihe display and Ihe “ON”indicator llghl should be on.

The boltom elemenl should glow red. The upper elemenl should become hot but not alow red. The oven interior llghl should be on and ihe oven should be healing. Push Ihe “Cancel” bullon and “OFF”will appear in the display. Then Ihe display will change lo lhme of day The oven should turn 011

113. Check Ihe operalion of the

oven broil element Push Ihe “Broil” bullon and “brl”will aooear in Ihe dlsolav alona wlh the lime 01 day. ihe “BROIL’ aid “6N” - mdlcalor llghls should be on. The upper element should glow red. The oven llghl should be on and Ihe oven should be healing. Push the “Cancel” bullon and “OFF”will appear. Then Ihe display WIII change lo lime of day. The oven should lurn off

To get the most efficlent use from your new eleclric range, read your KitchenAid Use and Care Guide. Keep lnslaflalion lnslrucfions and Guide close lo /he eleclrlc range for easy reference.

Panel C

Page 4
Image 4
KitchenAid 3147388 installation instructions Panel C, Cenler range lnlo cablnel culoul, Tn Ihe fronl lrame 01 Ihe oven

3147388 specifications

The KitchenAid 3147388 is a versatile and powerful stand mixer that has become a staple in kitchens around the world. Known for its exceptional performance and sleek design, this model is an ideal choice for both amateur and professional bakers looking to elevate their culinary creations.

One of the standout features of the KitchenAid 3147388 is its robust 325-watt motor, which provides ample power to handle a variety of mixing tasks with ease. Whether you’re kneading dough for bread or whipping cream for desserts, this mixer can tackle the job without straining. The mixer is equipped with a 5-quart stainless steel mixing bowl, offering enough capacity for large batches, making it perfect for family gatherings or entertaining guests.

The KitchenAid 3147388 also boasts a unique planetary mixing action that ensures thorough mixing. This means that the mixing tool rotates in one direction while the bowl rotates in the opposite direction, allowing for an even and consistent mix every time. Baking enthusiasts will appreciate the mixer’s 10-speed settings, which provide flexibility to achieve the desired consistency for various recipes, from slow mixing to high-speed whipping.

Another notable characteristic is its tilt-head design, which allows for easy access to the bowl and easy attachment of the mixing tools. The mixer comes with several essential attachments, including a flat beater, dough hook, and wire whip, which can handle a variety of tasks ranging from mixing batter to kneading dough. Additionally, the KitchenAid 3147388 is compatible with a range of optional attachments that expand its functionality, allowing for even greater versatility in the kitchen.

Aesthetically pleasing, the KitchenAid 3147388 is available in a variety of colors, allowing users to choose one that fits their kitchen decor. Its durable construction ensures longevity, making it a reliable investment for years of culinary endeavors.

Safety features, such as a locking mechanism for the head and a non-slip base, provide peace of mind while in use. Overall, the KitchenAid 3147388 is an essential appliance for anyone passionate about cooking and baking, combining performance, design, and convenience in a single package. Whether you’re preparing a quick meal or experimenting with new recipes, this stand mixer is sure to become an essential part of your kitchen arsenal.