Electrical ground is required. See Electrical requirements.
DO NOT install dishwasher over carpeted flooring.
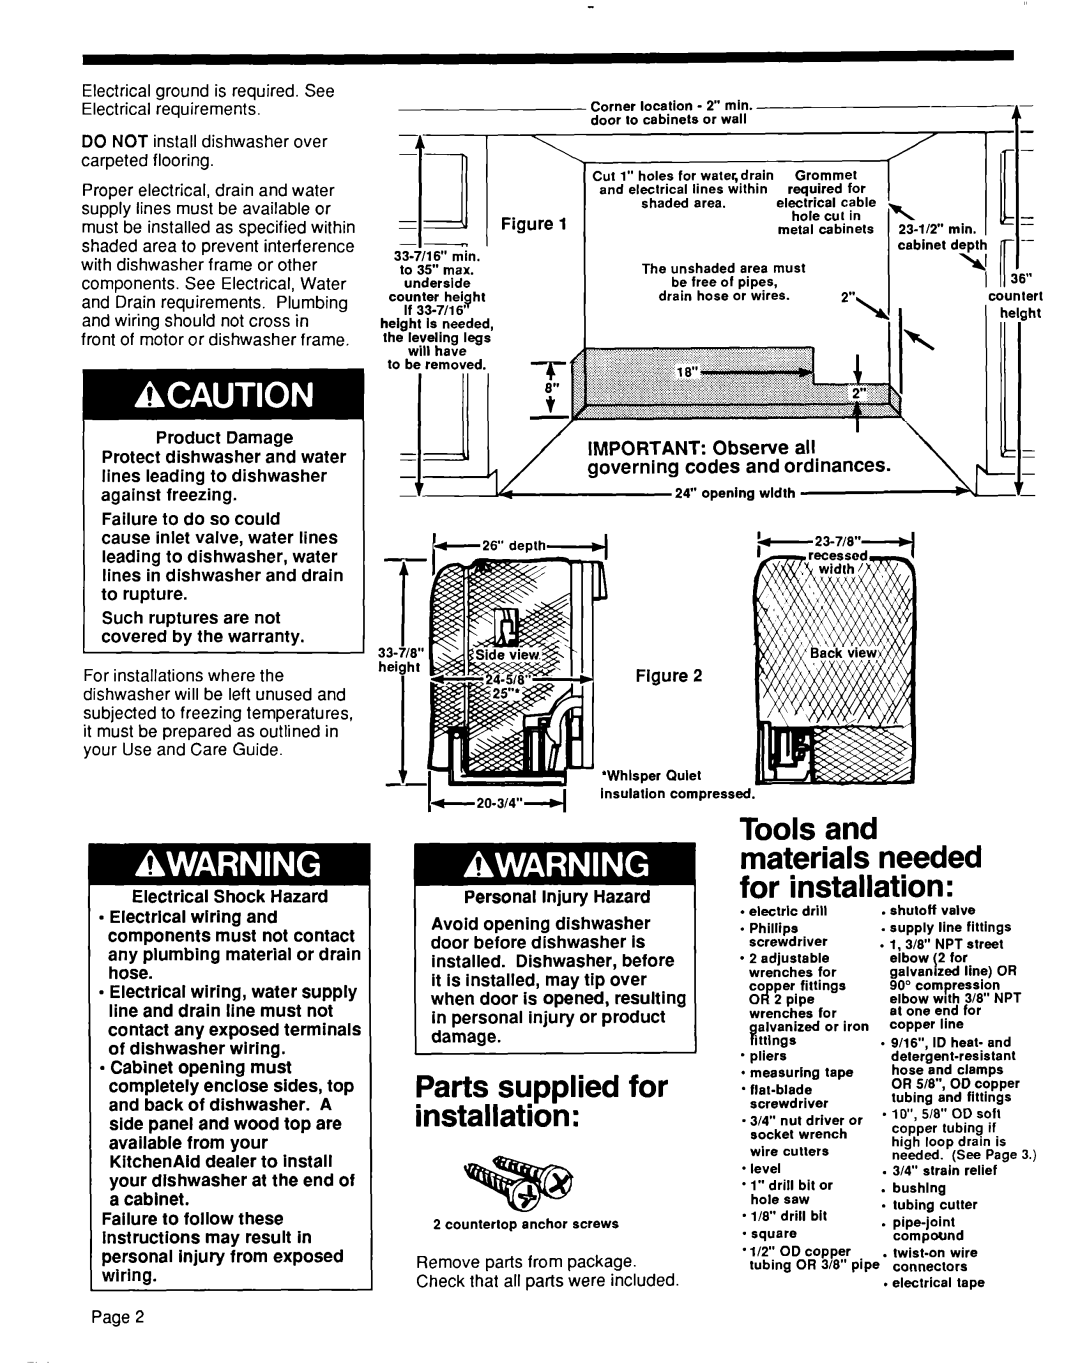
Proper electrical, drain and water supply lines must be available or must be installed as specified within shaded area to prevent interference with dishwasher frame or other components. See Electrical, Water and Drain requirements. Plumbing and wiring should not cross in front of motor or dishwasher frame.
Product Damage
Protect dishwasher and water lines leading to dishwasher against freezing.
Failure to do so could
cause inlet valve, water lines leading to dishwasher, water lines in dishwasher and drain to rupture.
Such ruptures are not covered by the warranty.
For installations where the dishwasher will be left unused and subjected to freezing temperatures, it must be prepared as outlined in your Use and Care Guide.
Corner location - 2” min. |
|
|
|
|
| ||||||||||
door | to | cabinets | or | wall |
|
|
|
|
| ||||||
- |
| Cut | 1” | holes | for | water,,drain | Grommet | 7)\ |
| ||||||
| and | electrical | lines |
| within | required | for |
| |||||||
|
|
| shaded | area. |
|
| electrical | cable |
| ||||||
Figure | 1 |
|
|
| hole | cut | in |
| |||||||
|
|
|
|
|
| metal | cabinets | min. | |||||||
|
|
|
|
|
|
|
|
|
|
|
|
| cabinet | 7depth | |
|
| The | unshaded | area | must |
|
|
|
| ||||||
| to 35” | max. |
|
|
|
|
| Xi | |||||||
| underside |
|
|
| be | free | of oioes. |
|
|
|
| ||||
counter | height |
|
| drain | hose | or ‘wires. |
|
|
| ountert | |||||
| If |
|
|
|
|
|
|
|
|
|
|
|
| ||
height | Is | needed, |
|
|
|
|
|
|
|
|
|
|
|
| |
the | leveling legs |
|
|
|
|
|
|
|
|
|
|
|
| ||
| will | have |
|
|
|
|
|
|
|
|
|
|
|
| |
to | be | removed |
|
|
|
|
|
|
|
|
|
|
|
| |
| 11 / | IMPORTANT: | Observe | all |
|
| |
| governing codes | and | ordinances. | \ | I | ||
|
| 24” | opening | width |
|
| |
depth |
|
| I |
|
| ||
|
|
|
|
| |||
|
|
|
|
|
| ||
Flgure 2
J
‘Whisper Quiet insulation compressed.
l Electrlcal wlring and components must not contact any plumbing material or drain hose.
l Electrical wiring, water supply line and drain line must not contact any exposed terminals of dishwasher wiring.
l Cabinet opening must completely enclose sides, top and back of dishwasher. A side panel and wood top are available from your KitchenAid dealer to install your dlshwasher at the end of a cabinet.
Failure to follow these instructions may result in personal injury from exposed wiring.
Page 2
Personal Injury Hazard
Avoid opening dishwasher door before dishwasher Is installed. Dishwasher, before it Is installed, may tip over when door is opened, resulting in personal injury or product damage.
Parts supplied for installation:
2 countertop anchor screws
Remove parts from package. Check that all parts were included.
Tools and materials needed for installation:
l | electric | drill | . shutoff |
| valve |
|
|
| ||||||
- | Phillips |
|
| . supply | line |
| fittings | |||||||
| screwdriver |
| . 1, 3/E” | NPT | street | |||||||||
l | 2 adjustable |
|
| elbow | (2 | for |
|
|
| |||||
| wrenches |
| for |
| galvanized |
| line) |
| OR | |||||
| co | per | fittings |
| 90” | compression |
|
| ||||||
| 0 I! | 2 pipe |
|
| elbow | wtth | 316” | NPT | ||||||
| wrenches |
| for |
| at one | end | for |
|
| |||||
| jl;,pp |
| Or iron | . ;;J,e;;;aIm |
|
|
|
| and | |||||
- | pliers |
|
|
|
| |||||||||
l | measuring | tape |
| hoseand |
|
| clam1 |
| ||||||
* |
|
|
| OR | 5/r, |
|
| c30- | carper | |||||
|
|
| tubing | ana | rnur |
| ||||||||
| screwdriver |
| . liy, |
|
|
| d ““‘XIS | |||||||
|
| 5/a** r- |
|
|
| |||||||||
- 3/4” nut driver or |
|
|
|
|
| UIJ soft | ||||||||
| copper |
| tulbing | if |
| |||||||||
| socket | wrench |
|
|
| |||||||||
|
|
|
| drain |
| is | ||||||||
| wire | cutters |
|
| HKJ~ loop |
|
| |||||||
|
|
| needed. |
| (See | Page 3.) | ||||||||
* level |
|
|
|
|
| |||||||||
|
|
| . | 3/4” | strain | relief | - | |||||||
* 1” drill | bit | or | . | bushlna |
|
|
|
|
|
| ||||
| hole | saw |
| - | tubing | iutter |
|
|
| |||||
* l/8” | drill | bit | . |
|
|
|
|
|
| |||||
- square |
|
|
| ~&mpotmd |
|
|
|
| ||||||
‘112” | OD | copper | . |
|
| wire |
|
| ||||||
| tubing OR | 316” pipe |
| connectors |
|
|
|
|
| |||||
|
|
|
|
| . electrical |
|
| tape |
|
| ||||