25” (63.5 cm)

countertop over

0START

anti-tip bracket template

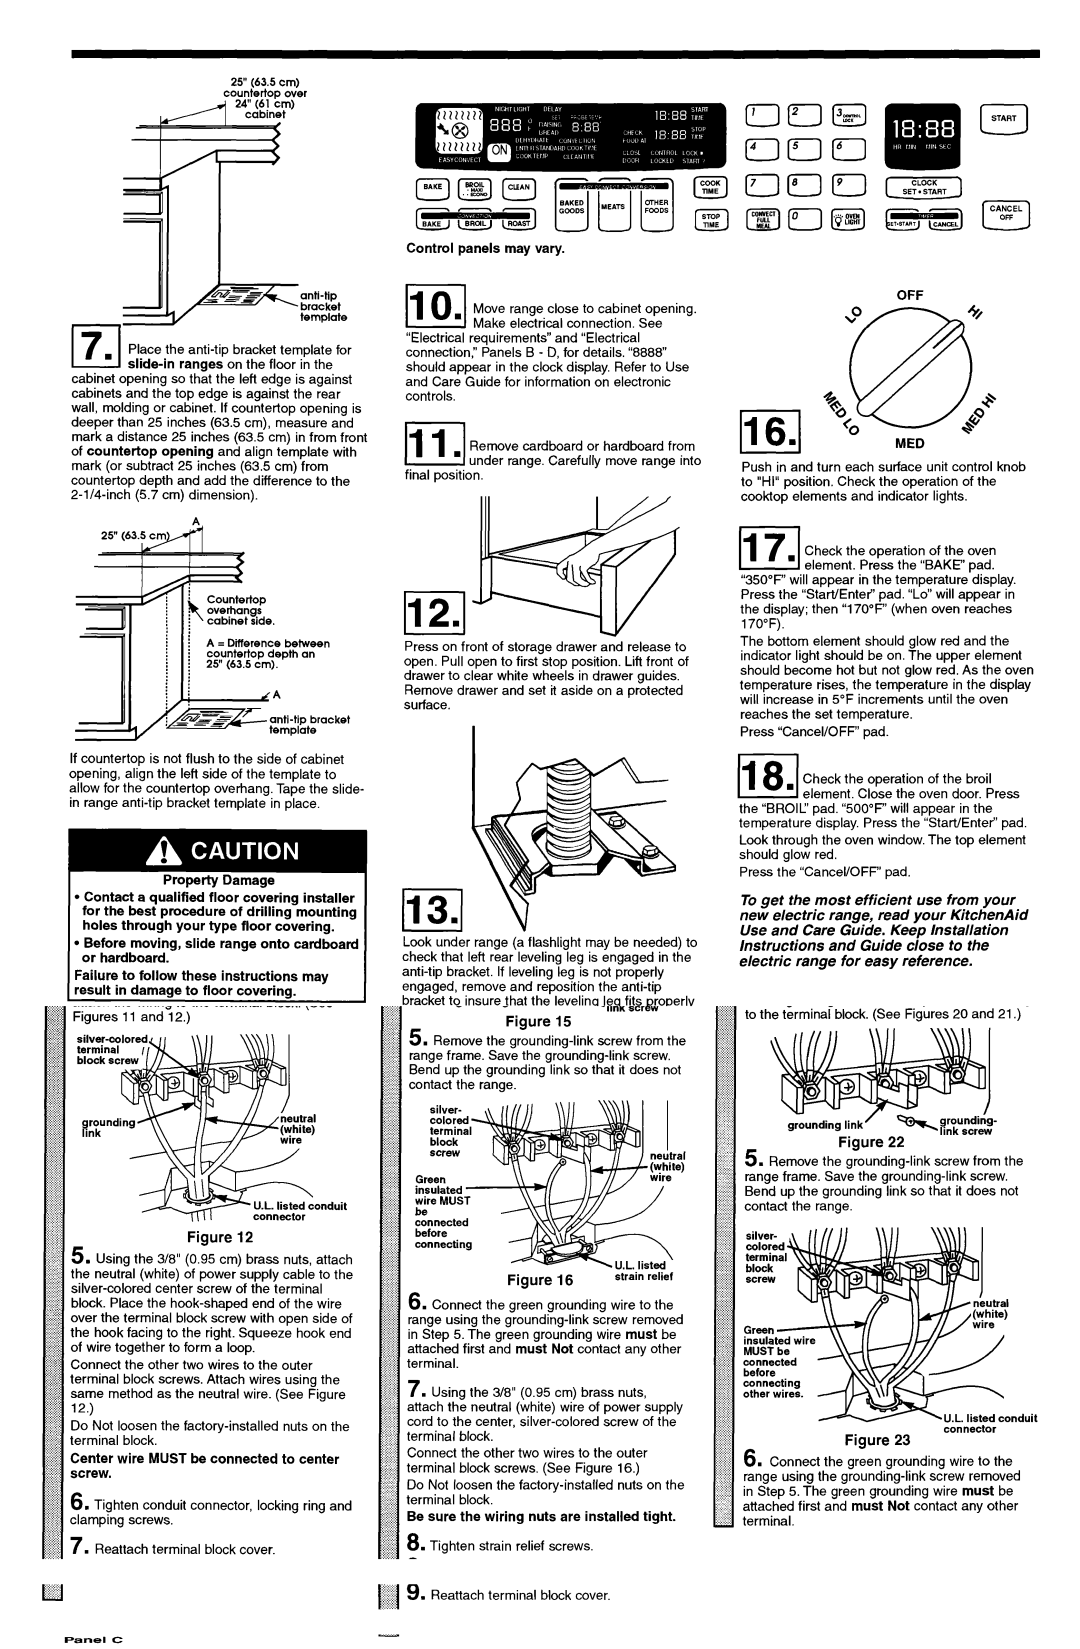
P-. JPlace the anti-tip bracket template for slide-in ranaes on the floor in the

cabinet opening so that the left edge is against cabinets and the top edge is against the rear wall, molding or cabinet. If countertop opening is deeper than 25 inches (63.5 cm), measure and mark a distance 25 inches (63.5 cm) in from front of countertop opening and align template with mark (or subtract 25 inches (63.5 cm) from countertop depth and add the difference to the 2-l/4-inch (5.7 cm) dimension).

25” (63.5 cm&

Control panels may vary.

Move range close to cabinet opening. Make electrical connection. See

“Electrical requirements” and “Electrical connection,” Panels B - D, for details. “8888” should appear in the clock display. Refer to Use and Care Guide for information on electronic controls.

IIRemove cardboard or hardboard from

under range. Carefully move range into final position.

OFF

11n

Push in and turn each surface unit control knob to “HI”position. Check the operation of the cooktop elements and indicator lights.

Check the operation of the oven element. Press the “BAKE” pad.

A = Difference between countertop depth an

If countertop is not flush to the side of cabinet opening, align the left side of the template to allow for the countertop overhang. Tape the slide- in range anti-tip bracket template in place.

l Contact a qualified floor covering installer for the best procedure of drilling mounting holes through your type floor covering.

l Before moving, slide range onto cardboard or hardboard.

Failure to follow these instructions may result in damaae to floor coverina.

(8.1

To mount anti-tip bracket to wood floor, use the anti-tip bracket template to mark where to drill mounting holes. Use a drill with a l/8” (0.3 cm) drill bit to drill the two holes. Remove template from floor.

To mount anti-tip bracket to concrete or ceramic floor, use the anti-tip bracket template to mark where to drill mounting holes. Use a drill with a 3/16” (0.48 cm) masonry drill bit to drill the two holes. Remove template from floor. Tap plastic anchors into mounting holes in floor with hammer.

Line up holes in anti-tip bracket with holes in floor. Use the screws provided to fasten anti-tip brack

to floor.

NOTE: Anti-tip bracket must be mounted securely to the

sub floor. Depending on the thic

of your flooring, longer screws may be

necessary to anchor the bracket to the sub floor. Longer screws are available from your local hardware store.

r2.1

Press on front of storage drawer and release to open. Pull open to first stop position. Lift front of drawer to clear white wheels in drawer guides.

Remove drawer and set it aside on a protected surface.

(13.1

Lookunder range (lflashlight may be needed) to check that left rear leveling leg is engaged in the anti-tip bracket. If leveling leg is not properly engaged, remove and reposition the anti-tip bracket to insure that the leveling leg fits properly in the anti-tip bracket.

,I

Place rack in oven. Place level on rack, first side to side; then front to back. If the range is not level, pull range forward until the rear leveling leg is removed from the anti-tip bracket. Adjust the leveling legs up or down. Then slide range back into position. Check that leveling leg is engaged in anti-tip bracket.

NOTE: Oven must be level for satisfactory baking conditions.

II5.1

Insert storage drawer into slide rails on sides of drawer opening. Lift front of drawer slightly and push firmly to close drawer.

“350°F” will appear in the temperature’display. Press the “Start/Enter” pad. “Lo”will appear in the display; then “170°F” (when oven reaches 170°F).

The bottom element should glow red and the indicator light should be on. The upper element should become hot but not glow red. As the oven temperature rises, the temperature in the display will increase in 5°F increments until the oven reaches the set temperature.

Press “Cancel/OFF” pad.

(18. Check the operation of the broil element. Close the oven door. Press

the “BROIL’ pad. “500°F” will appear in the temperature display. Press the ‘Start/Enter” pad.

Look through the oven window. The top element should glow red.

Press the “Cancel/OFF” pad.

To get the most efficient use from your new electric range, read your KitchenAid Use and Care Guide. Keep Installation Instructions and Guide close to the electric range for easy reference.

Panel E

Page 6
Image 6
KitchenAid 9751596 installation instructions R2.1, Panel E, Control panels may vary

9751596 specifications

The KitchenAid 9751596 is a versatile and powerful stand mixer designed to elevate your culinary experience. Known for its robust build and innovative features, this appliance is a favorite among both amateur and professional chefs. With a strong emphasis on performance, durability, and style, the KitchenAid 9751596 stands out in the crowded kitchen appliance market.

One of the standout characteristics of the KitchenAid 9751596 is its powerful motor. Equipped with a high-efficiency motor, it effortlessly handles heavy mixtures, from bread dough to thick batters. This makes it an excellent choice for anyone who enjoys baking, as it can mix, knead, and whip with ease. The direct-drive transmission ensures that power is efficiently transferred to the mixing bowl, which enhances its performance while reducing wear and tear.

The 9751596 features multiple speed settings, allowing users to select the optimal speed for various tasks. With a total of ten speeds, you can achieve everything from a gentle stir to a vigorous whip, giving you complete control over your mixing process. The inclusion of a power hub expands its versatility even further, enabling you to attach a range of optional accessories. These can include pasta makers, food grinders, and vegetable spiralizers, making this mixer a multifunctional kitchen companion.

The design of the KitchenAid 9751596 is both functional and aesthetically pleasing. Its iconic, retro-style design is available in a variety of colors, allowing it to seamlessly blend into any kitchen décor. The stainless steel bowl is not only durable and easy to clean but also has a capacity that can cater to large batches, making it perfect for family gatherings or entertaining.

Another notable feature is the tilt-head design, which allows easy access to the bowl and beaters. This design simplifies the process of adding ingredients and cleaning, providing convenience for everyday use. The included accessories, such as the flat beater, dough hook, and wire whip, are crafted for efficiency and effectiveness, ensuring that you achieve the desired consistency with minimal effort.

In summary, the KitchenAid 9751596 stand mixer combines power, versatility, and elegance. With its strong motor, multiple speed settings, and the ability to add various attachments, it provides unmatched functionality. The tilt-head mechanism and stylish design further enhance its appeal, making it an essential tool for any kitchen enthusiast. Whether you're baking bread, whipping cream, or making homemade pasta, the KitchenAid 9751596 is designed to help you achieve your culinary aspirations with ease.