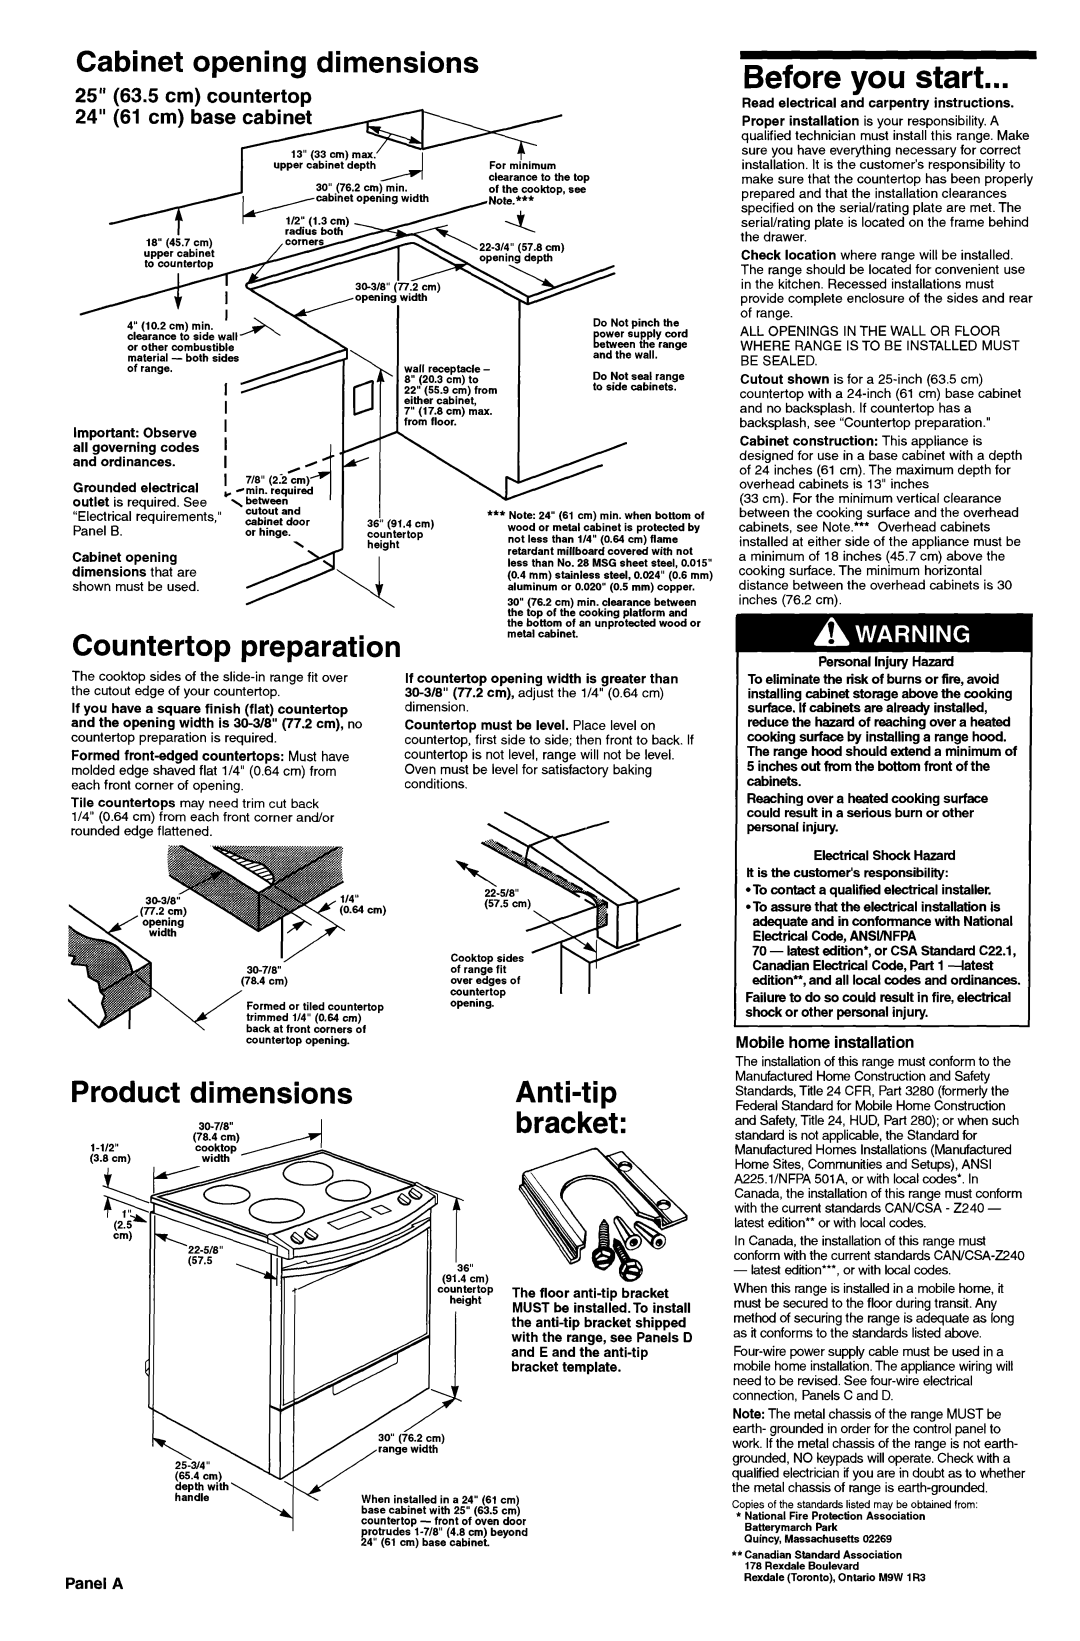
Cabinet opening dimensions

25” (63.5 cm) countertop

Before you start...

Read electrical and carpentry instructions.

upper cabinet depth

18” (45.7 cm)

4” (10 2 cm) min

clearance to side will A \ or other combustible

material of range.

I

For minimum clearance to the top of the cooktop, see


Do

Not

pinch

the


ower supply

cord


Eetween

the

range


and

the

wall.


wall

receptacle -

Do

Not

seal

range

8”

(20.3

cm)

to

to side

cabinets.

22”

(55.9

cm)

from


either

cabinet,


7”

(17.8

cm)

max.


from

floor.


Proper installation is your responsibility. A qualified technician must install this range. Make sure you have everything necessary for correct installation. It is the customer’s responsibility to make sure that the countertop has been properly prepared and that the installation clearances specified on the serial/rating plate are met. The serial/rating plate is located on the frame behind the drawer.

Check location where range will be installed. The range should be located for convenient use in the kitchen. Recessed installations must provide complete enclosure of the sides and rear of range.

ALL OPENINGS IN THE WALL OR FLOOR WHERE RANGE IS TO BE INSTALLED MUST BE SEALED.

Cutout shown is for a 25inch (63.5 cm) countertop with a 24-inch (61 cm) base cabinet and no backsplash. If countertop has a backsplash, see “Countertop preparation.”

Important: Observe all governing codes and ordinances.

Grounded electrical outlet is required. See “Electrical requirements,” Panel B.

Cabinet opening dimensions that are shown must be used.

I


I

-H 3

1718” (2:2%) 1 e H min. required

\between cutout and

cabinet door

36” (91.4 cm)

or hinge.

countertop

\

height


I

Yw

***Note: 24” (61 cm) min. when bottom of wood or metal cabinet is protected by not less than l/4” (0.64 cm) flame retardant millboard covered with not less than No. 28 MSG sheet steel, 0.015” (0.4 mm) stainless steel, 0.024” (0.6 mm) aluminum or 0.020” (0.5 mm) copper.

30” (76.2 cm) min. clearance between the top of the cooking platform and the bottom of an unprotected wood or metal cabinet.

Cabinet construction: This appliance is designed for use in a base cabinet with a depth of 24 inches (61 cm). The maximum depth for overhead cabinets is 13” inches

(33 cm). For the minimum vertical clearance between the cooking surface and the overhead cabinets, see Note.*** Overhead cabinets installed at either side of the appliance must be a minimum of 18 inches (45.7 cm) above the cooking surface. The minimum horizontal distance between the overhead cabinets is 30 inches (76.2 cm).

Countertop preparation

Personal Injury Hazard

The cooktop sides of the slide-in range fit over the cutout edge of your countertop.

If you have a square finish (flat) countertop and the opening width is 30-3/8” (77.2 cm), no countertop preparation is required.

Formed front-edged countertops: Must have molded edge shaved flat l/4” (0.64 cm) from each front corner of opening.

Tile countertops may need trim cut back l/4” (0.64 cm) from each front corner and/or rounded edge flattened.

If countertop opening width is greater than 30-318” (77.2 cm), adjust the l/4” (0.64 cm) dimension.

Countertop must be level. Place level on countertop, first side to side; then front to back. If countertop is not level, range will not be level. Oven must be level for satisfactory baking conditions.

To eliminate the risk of burns or fire, avoid installing cabinet storage above the cooking surface. If cabinets are already installed, reduce the hazard of reaching over a heated cooking surface by installing a range hood. The range hood should extend a minimum of 5 inches out from the bottom front of the cabinets.

Reaching over a heated cooking surface could result in a serious burn or other personal injury.

Electrical Shock Hazard lt is the customer’s responsibility:

.To contact a qualified electrical installer.

*To assure that the electrical installation is adequate and in conformance with National Electrical Code, ANWNFPA

70 - latest edition’, or CSA Standard C22.1, Canadian Electrical Code, Part 1 -latest edition”, and all local codes and ordinances.

countertoo

I

I

Formed or tiled countertop trimmed l/4” (0.64 cm) back at front corners of countertop opening.

Product dimensions

Anti-tip


bracket:

MUST be installed.To install the anti-tip bracket shipped with the range, see Panels D and E and the anti-tip bracket template.

30” 176.2 cm) Yl7 range width ’

-4

When installed

in a 24” (61 cm)


base cabinet with 25” (63.5 cm)


countertop

- front of oven door


protrudes

l-7/8”

(4.8 cm) beyond


24” (61 cm) base cabinet.

Panel A

Failure to do so could result in fire, electrical shock or other personal injury.

Mobile home installation

The installation of this range must conform to the Manufactured Home Construction and Safety Standards, Tile 24 CFR, Part 3280 (formerly the Federal Standard for Mobile Home Construction and Safety, Title 24, HUD, Part 280); or when such standard is not applicable, the Standard for Manufactured Homes Installations (Manufactured Home Sites, Communities and Setups), ANSI A2251/NFPA 501A, or with local codes’. In Canada, the installation of this range must conform with the current standards CANKSA - 2240 - latest edition** or with local codes.

In Canada, the installation of this range must conform with the current standards CAN/CSA-Z240

-latest edition***, or with local codes.

When this range is installed in a mobile home, it must be secured to the floor during transit. Any method of securing the range is adequate as long as it conforms to the standards listed above.

Four-wire power supply cable must be used in a mobile home installation. The appliance wiring will need to be revised. See four-wire electrical connection, Panels C and D.

Note: The metal chassis of the range MUST be earth- grounded in order for the control panel to work. If the metal chassis of the range is not earth- grounded, NO keypads will operate. Check with a qualified electrician if you are in doubt as to whether the metal chassis of range is earth-grounded.

Copies of the standards listed may be obtained from:

*National Fire Protection Association Batterymarch park

Guincy, Massachusetts 02269

**Canadian Standard Association 178 Rexdale Boulevard

Rexdale (Toronto), Ontario M9W 1R3

Page 2
Image 2
KitchenAid 9751596 installation instructions Before you start, Bracket, Panel a, Mobile home installation

9751596 specifications

The KitchenAid 9751596 is a versatile and powerful stand mixer designed to elevate your culinary experience. Known for its robust build and innovative features, this appliance is a favorite among both amateur and professional chefs. With a strong emphasis on performance, durability, and style, the KitchenAid 9751596 stands out in the crowded kitchen appliance market.

One of the standout characteristics of the KitchenAid 9751596 is its powerful motor. Equipped with a high-efficiency motor, it effortlessly handles heavy mixtures, from bread dough to thick batters. This makes it an excellent choice for anyone who enjoys baking, as it can mix, knead, and whip with ease. The direct-drive transmission ensures that power is efficiently transferred to the mixing bowl, which enhances its performance while reducing wear and tear.

The 9751596 features multiple speed settings, allowing users to select the optimal speed for various tasks. With a total of ten speeds, you can achieve everything from a gentle stir to a vigorous whip, giving you complete control over your mixing process. The inclusion of a power hub expands its versatility even further, enabling you to attach a range of optional accessories. These can include pasta makers, food grinders, and vegetable spiralizers, making this mixer a multifunctional kitchen companion.

The design of the KitchenAid 9751596 is both functional and aesthetically pleasing. Its iconic, retro-style design is available in a variety of colors, allowing it to seamlessly blend into any kitchen décor. The stainless steel bowl is not only durable and easy to clean but also has a capacity that can cater to large batches, making it perfect for family gatherings or entertaining.

Another notable feature is the tilt-head design, which allows easy access to the bowl and beaters. This design simplifies the process of adding ingredients and cleaning, providing convenience for everyday use. The included accessories, such as the flat beater, dough hook, and wire whip, are crafted for efficiency and effectiveness, ensuring that you achieve the desired consistency with minimal effort.

In summary, the KitchenAid 9751596 stand mixer combines power, versatility, and elegance. With its strong motor, multiple speed settings, and the ability to add various attachments, it provides unmatched functionality. The tilt-head mechanism and stylish design further enhance its appeal, making it an essential tool for any kitchen enthusiast. Whether you're baking bread, whipping cream, or making homemade pasta, the KitchenAid 9751596 is designed to help you achieve your culinary aspirations with ease.