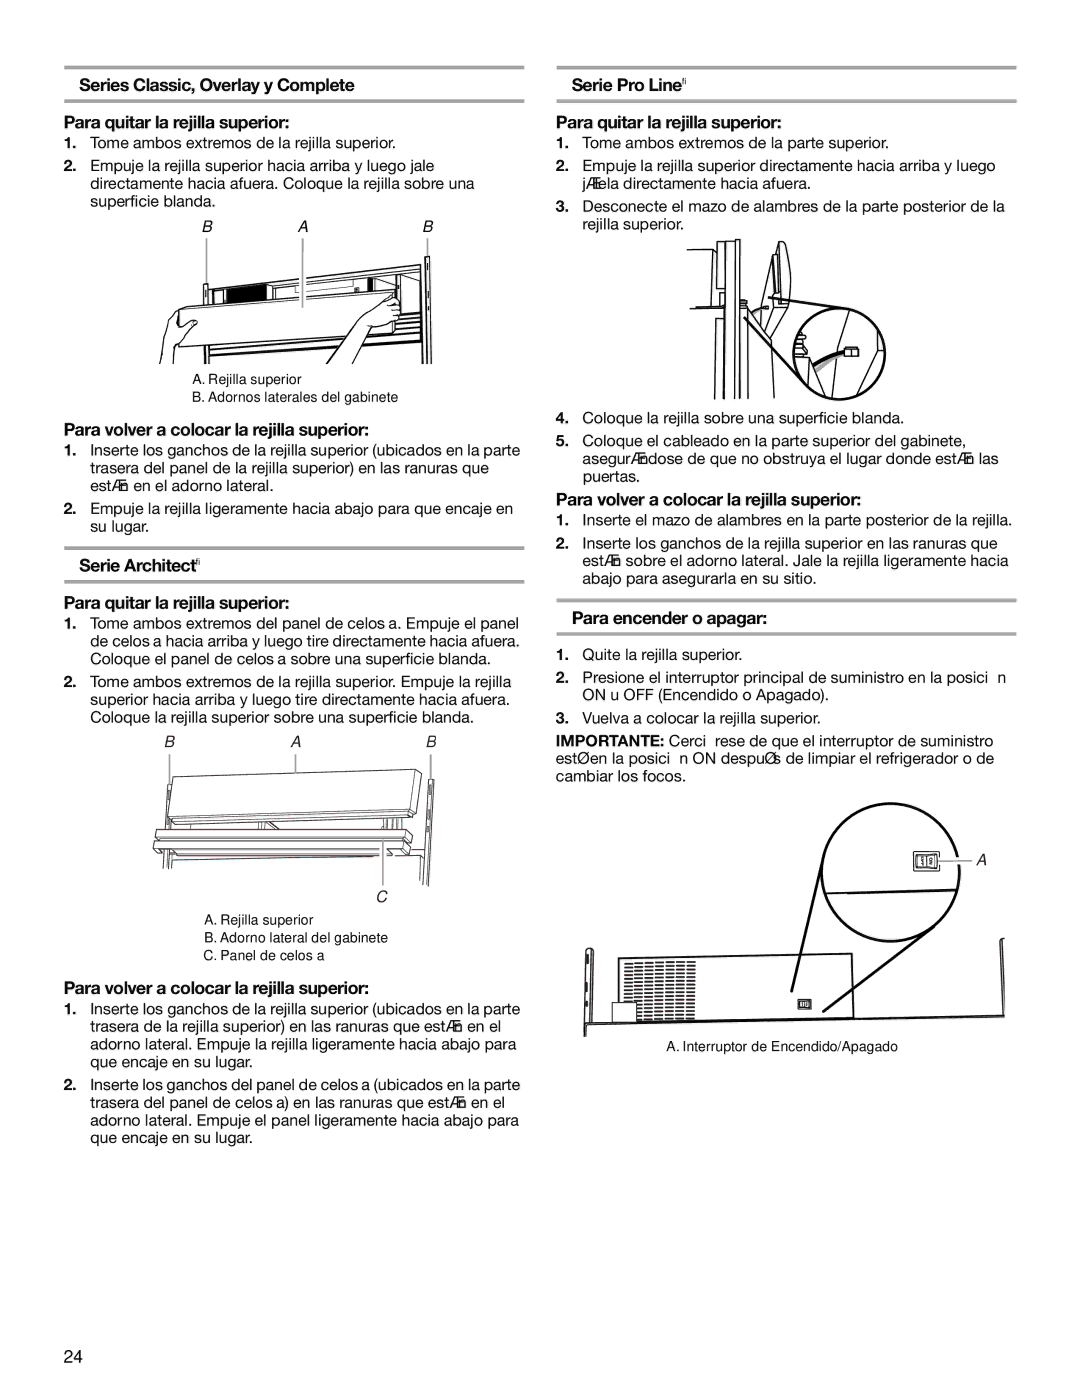
Series Classic, Overlay y Complete

Para quitar la rejilla superior:

1.Tome ambos extremos de la rejilla superior.

2.Empuje la rejilla superior hacia arriba y luego jale directamente hacia afuera. Coloque la rejilla sobre una superficie blanda.

BAB

A. Rejilla superior

B. Adornos laterales del gabinete

Para volver a colocar la rejilla superior:

1.Inserte los ganchos de la rejilla superior (ubicados en la parte trasera del panel de la rejilla superior) en las ranuras que están en el adorno lateral.

2.Empuje la rejilla ligeramente hacia abajo para que encaje en su lugar.

Serie Architect®

Para quitar la rejilla superior:

1.Tome ambos extremos del panel de celosía. Empuje el panel de celosía hacia arriba y luego tire directamente hacia afuera. Coloque el panel de celosía sobre una superficie blanda.

2.Tome ambos extremos de la rejilla superior. Empuje la rejilla superior hacia arriba y luego tire directamente hacia afuera. Coloque la rejilla superior sobre una superficie blanda.

BAB

C

A. Rejilla superior

B. Adorno lateral del gabinete

C. Panel de celosía

Para volver a colocar la rejilla superior:

1.Inserte los ganchos de la rejilla superior (ubicados en la parte trasera de la rejilla superior) en las ranuras que están en el adorno lateral. Empuje la rejilla ligeramente hacia abajo para que encaje en su lugar.

2.Inserte los ganchos del panel de celosía (ubicados en la parte trasera del panel de celosía) en las ranuras que están en el adorno lateral. Empuje el panel ligeramente hacia abajo para que encaje en su lugar.

Serie Pro Line®

Para quitar la rejilla superior:

1.Tome ambos extremos de la parte superior.

2.Empuje la rejilla superior directamente hacia arriba y luego jálela directamente hacia afuera.

3.Desconecte el mazo de alambres de la parte posterior de la rejilla superior.

4.Coloque la rejilla sobre una superficie blanda.

5.Coloque el cableado en la parte superior del gabinete, asegurándose de que no obstruya el lugar donde están las puertas.

Para volver a colocar la rejilla superior:

1.Inserte el mazo de alambres en la parte posterior de la rejilla.

2.Inserte los ganchos de la rejilla superior en las ranuras que están sobre el adorno lateral. Jale la rejilla ligeramente hacia abajo para asegurarla en su sitio.

Para encender o apagar:

1.Quite la rejilla superior.

2.Presione el interruptor principal de suministro en la posición ON u OFF (Encendido o Apagado).

3.Vuelva a colocar la rejilla superior.

IMPORTANTE: Cerciórese de que el interruptor de suministro esté en la posición ON después de limpiar el refrigerador o de cambiar los focos.

A

A. Interruptor de Encendido/Apagado

24

Page 24
Image 24
KitchenAid BUILT-IN REFRIGERATOR Para volver a colocar la rejilla superior, Serie Pro Line Para quitar la rejilla superior

BUILT-IN REFRIGERATOR specifications

The KitchenAid Built-In Refrigerator is a blend of style, functionality, and advanced technology tailored for modern kitchens. Engineered to fit seamlessly into your cabinetry, this refrigerator not only enhances the aesthetic appeal of your kitchen but also offers outstanding performance. With its flush installation and customizable panel options, it can match the look of your cabinets, creating a cohesive design that elevates your culinary space.

One of the standout features of the KitchenAid Built-In Refrigerator is its advanced cooling system. It incorporates a dual cooling system that ensures optimal temperature and humidity levels for both the refrigerator and freezer compartments. This technology prevents the transfer of odors and ensures fresh, flavorful food preservation. The refrigerator also features a Produce Preserver, which utilizes ethylene gas-absorbing packets to delay over-ripening of fruits and vegetables, helping to extend their freshness.

Additionally, this model is equipped with an In-Door-Ice System, which maximizes usable shelf space while providing easy access to ice. The system is designed to keep ice readily available without impinging on the storage capabilities of the refrigerator. With its sleek design, the refrigerator also includes a water dispenser that provides filtered water at the touch of a button, further enhancing convenience.

Another technological advancement in the KitchenAid Built-In Refrigerator is the Smart Feature compatibility. With Wi-Fi connectivity, users can monitor and manage the refrigerator remotely using their smartphones. This feature allows for the adjustment of temperature settings and even alerts when the door is left open, ensuring food safety.

Energy efficiency is also a priority with this model. The KitchenAid Built-In Refrigerator is designed to meet ENERGY STARĀ® guidelines, helping consumers save on electricity bills while minimizing environmental impact. With a focus on durability and performance, this refrigerator boasts a robust stainless-steel finish, making it resistant to fingerprints and easy to clean.

In summary, the KitchenAid Built-In Refrigerator is an exceptional choice for those seeking a high-end appliance that combines style, innovative features, and energy efficiency. Its smart technologies, advanced cooling capabilities, and customizable options make it a must-have for discerning homeowners looking to enhance their kitchen experience.