gas supply line

Installation

1. Remove the top wood sheet from over the top of the cooktop.

2. Remove the shipping brackets and discard.

WARNING

Excessive Weight Hazard

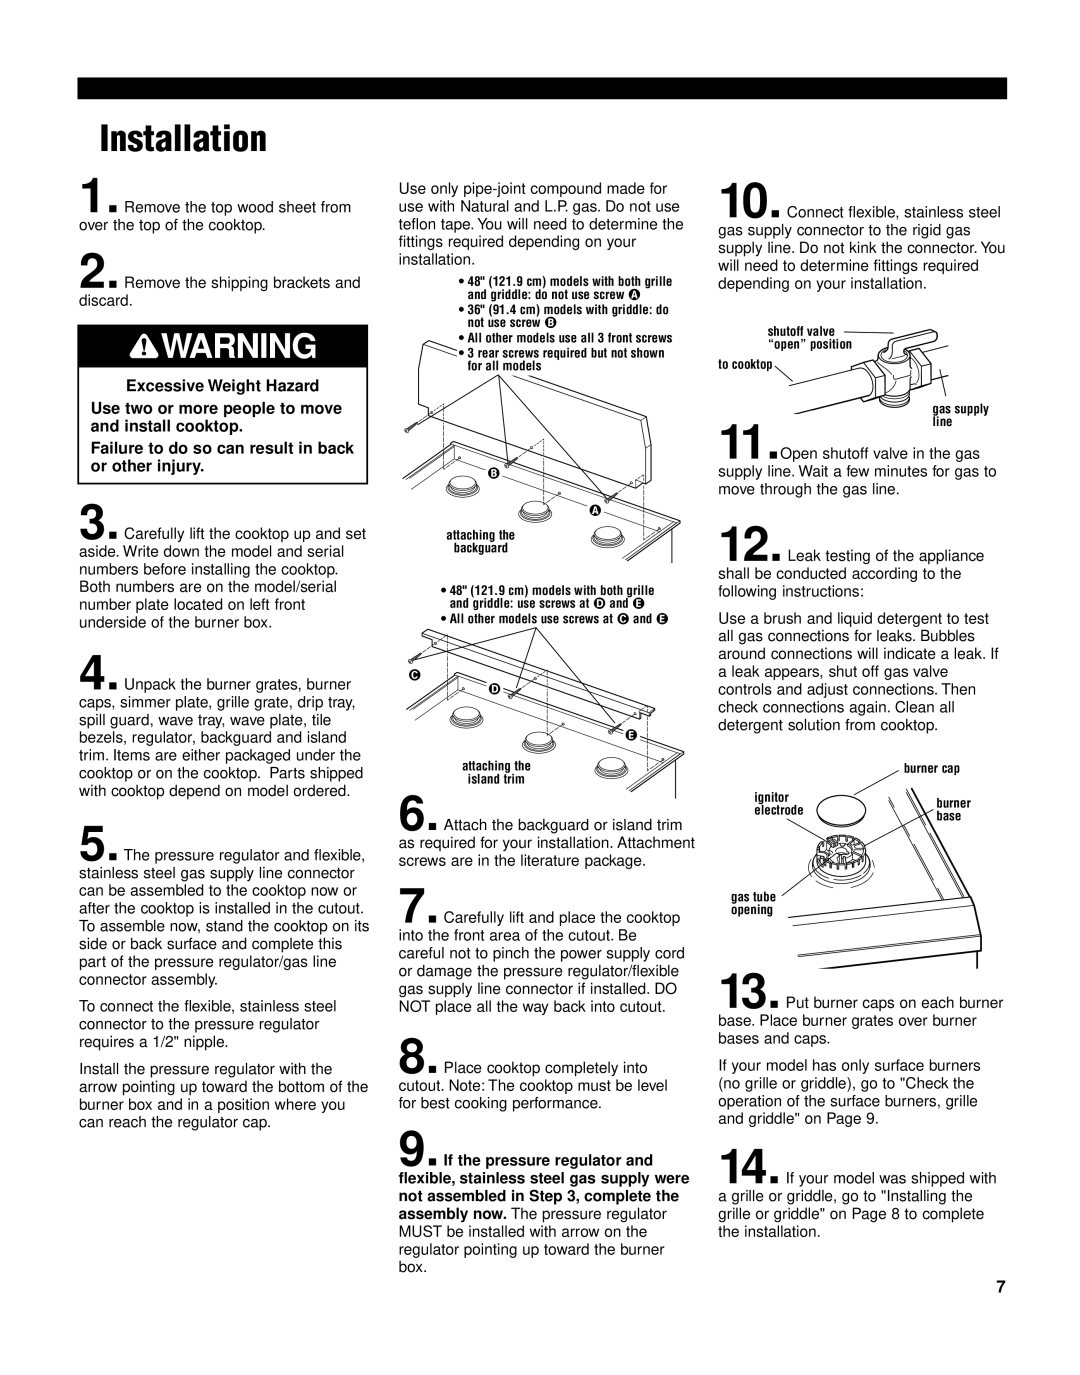
Use only pipe-joint compound made for use with Natural and L.P. gas. Do not use teflon tape. You will need to determine the fittings required depending on your installation.

48" (121.9 cm) models with both grille and griddle: do not use screw

36" (91.4 cm) models with griddle: do not use screw

All other models use all 3 front screws

3 rear screws required but not shown for all models

10. Connect flexible, stainless steel gas supply connector to the rigid gas supply line. Do not kink the connector. You will need to determine fittings required depending on your installation.

shutoff valve “open” position

to cooktop

Use two or more people to move and install cooktop.

Failure to do so can result in back or other injury.

3. Carefully lift the cooktop up and set aside. Write down the model and serial numbers before installing the cooktop. Both numbers are on the model/serial number plate located on left front underside of the burner box.

4. Unpack the burner grates, burner caps, simmer plate, grille grate, drip tray, spill guard, wave tray, wave plate, tile bezels, regulator, backguard and island trim. Items are either packaged under the cooktop or on the cooktop. Parts shipped with cooktop depend on model ordered.

5.The pressure regulator and flexible, stainless steel gas supply line connector can be assembled to the cooktop now or after the cooktop is installed in the cutout. To assemble now, stand the cooktop on its side or back surface and complete this part of the pressure regulator/gas line connector assembly.

To connect the flexible, stainless steel connector to the pressure regulator requires a 1/2" nipple.

Install the pressure regulator with the arrow pointing up toward the bottom of the burner box and in a position where you can reach the regulator cap.

attaching the

backguard

• 48" (121.9 cm) models with both grille

and griddle: use screws at

and


• All other models use screws at

and

attaching the

island trim

6. Attach the backguard or island trim as required for your installation. Attachment screws are in the literature package.

7. Carefully lift and place the cooktop into the front area of the cutout. Be careful not to pinch the power supply cord or damage the pressure regulator/flexible gas supply line connector if installed. DO NOT place all the way back into cutout.

8. Place cooktop completely into cutout. Note: The cooktop must be level for best cooking performance.

9. If the pressure regulator and flexible, stainless steel gas supply were not assembled in Step 3, complete the assembly now. The pressure regulator MUST be installed with arrow on the regulator pointing up toward the burner box.

11.Open shutoff valve in the gas supply line. Wait a few minutes for gas to move through the gas line.

12. Leak testing of the appliance shall be conducted according to the following instructions:

Use a brush and liquid detergent to test all gas connections for leaks. Bubbles around connections will indicate a leak. If a leak appears, shut off gas valve controls and adjust connections. Then check connections again. Clean all detergent solution from cooktop.


burner cap

ignitor

burner

electrode

base


gas tube opening

13. Put burner caps on each burner base. Place burner grates over burner bases and caps.

If your model has only surface burners (no grille or griddle), go to "Check the operation of the surface burners, grille and griddle" on Page 9.

14. If your model was shipped with a grille or griddle, go to "Installing the grille or griddle" on Page 8 to complete the installation.

7

Page 7
Image 7
KitchenAid KGCP462K installation instructions Installation, Excessive Weight Hazard

KGCP462K specifications

The KitchenAid KGCP462K is a range designed for culinary enthusiasts who appreciate both functionality and aesthetics. This model, featuring a powerful gas cooking system, provides a versatile cooking experience with its innovative technologies and high-quality construction.

One of the standout features of the KGCP462K is its 6-burner gas cooktop. With a range of burner sizes, including a large, high-power burner that delivers up to 20,000 BTUs, users can quickly sear meats or boil water, while the smaller burners are ideal for gentle simmering or melting chocolate. This flexibility allows for multitasking in the kitchen, accommodating various cooking techniques and recipes.

The cooktop also includes a dual-stacked burner design that ensures even heating and precise control over the flame. This technology is particularly beneficial for achieving the perfect simmer or maintaining ideal temperatures for delicate sauces without the risk of scorching.

Another notable characteristic of the KGCP462K is its spacious convection oven. The convection technology circulates hot air around the food for consistent cooking results, reducing cooking times and enhancing flavor. Whether baking, roasting, or broiling, the oven delivers professional-grade results, transforming everyday cooking into a gourmet experience.

The oven's large capacity allows for the preparation of multiple dishes simultaneously, making it an excellent choice for family gatherings or entertaining guests. The self-cleaning feature simplifies maintenance, allowing users to spend more time enjoying their culinary creations rather than cleaning up.

In addition to its impressive cooking capabilities, the KitchenAid KGCP462K also boasts an elegant design, with a sleek stainless steel finish and sturdy, heavy-duty knobs that enhance its professional kitchen aesthetic. The integrated infrared broiler offers an additional layer of cooking versatility, perfect for achieving perfectly grilled steaks or crispy toppings.

Safety features are also prioritized in the design of this range, including a flame failure device that automatically shuts off the gas supply if the flame goes out. This added security, combined with its professional performance and pleasing aesthetic, makes the KitchenAid KGCP462K an excellent choice for anyone seeking to elevate their cooking experience. This range not only meets the demands of passionate home cooks but also enhances the overall kitchen environment with its sophisticated appearance and robust functionality.