Complete Installation

(Exterior-Mounted Motor)

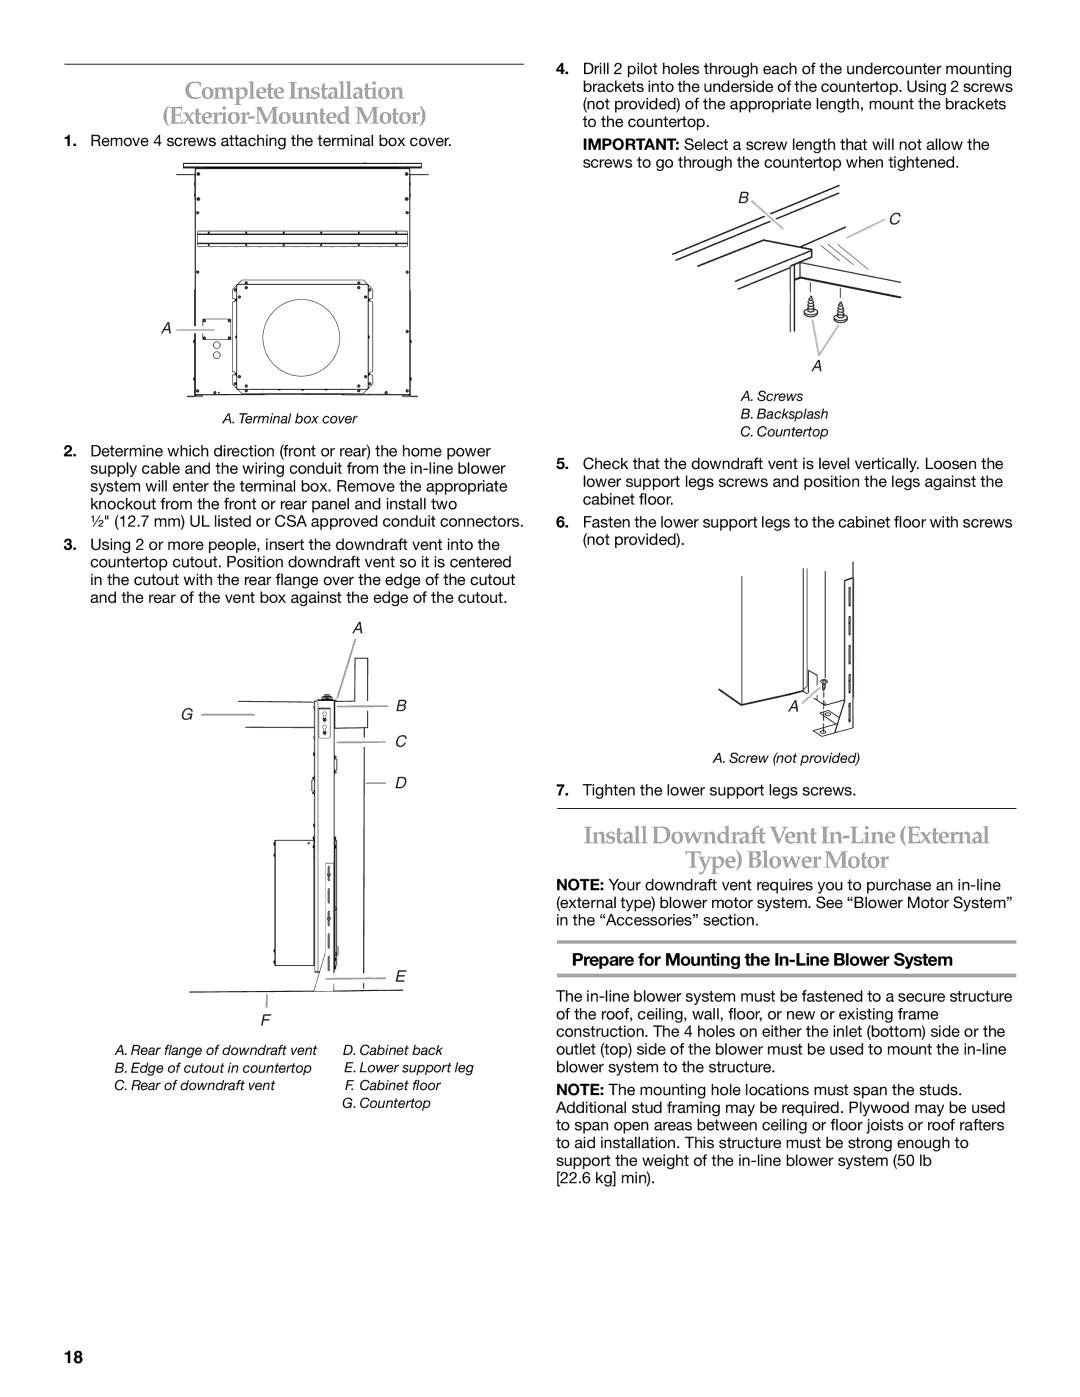
1.Remove 4 screws attaching the terminal box cover.

A

A. Terminal box cover

2.Determine which direction (front or rear) the home power supply cable and the wiring conduit from the in-line blower system will enter the terminal box. Remove the appropriate knockout from the front or rear panel and install two

¹⁄₂" (12.7 mm) UL listed or CSA approved conduit connectors.

3.Using 2 or more people, insert the downdraft vent into the countertop cutout. Position downdraft vent so it is centered in the cutout with the rear flange over the edge of the cutout and the rear of the vent box against the edge of the cutout.

A

G B

C

D


E


F


A. Rear flange of downdraft vent


D. Cabinet back

B. Edge of cutout in countertop


E. Lower support leg

C. Rear of downdraft vent


F. Cabinet floor


G. Countertop

4.Drill 2 pilot holes through each of the undercounter mounting brackets into the underside of the countertop. Using 2 screws (not provided) of the appropriate length, mount the brackets to the countertop.

IMPORTANT: Select a screw length that will not allow the screws to go through the countertop when tightened.

B

C

A

A.Screws

B.Backsplash

C.Countertop

5.Check that the downdraft vent is level vertically. Loosen the lower support legs screws and position the legs against the cabinet floor.

6.Fasten the lower support legs to the cabinet floor with screws (not provided).

A

A. Screw (not provided)

7.Tighten the lower support legs screws.

Install Downdraft Vent In-Line (External

Type) Blower Motor

NOTE: Your downdraft vent requires you to purchase an in-line (external type) blower motor system. See “Blower Motor System” in the “Accessories” section.

Prepare for Mounting the In-Line Blower System

The in-line blower system must be fastened to a secure structure of the roof, ceiling, wall, floor, or new or existing frame construction. The 4 holes on either the inlet (bottom) side or the outlet (top) side of the blower must be used to mount the in-line blower system to the structure.

NOTE: The mounting hole locations must span the studs. Additional stud framing may be required. Plywood may be used to span open areas between ceiling or floor joists or roof rafters to aid installation. This structure must be strong enough to support the weight of the in-line blower system (50 lb

[22.6 kg] min).

18

Page 18
Image 18
KitchenAid UXI0600DYS Complete Installation Exterior-Mounted Motor, Prepare for Mounting the In-Line Blower System

UXI01200DYS, UXI0600DYS specifications

The KitchenAid UXI0600DYS and UXI01200DYS are two innovative under-cabinet range hoods designed to enhance kitchen functionality while adding a touch of elegance. These range hoods provide homeowners with the ideal balance of performance and style, making them popular choices for modern kitchens.

The UXI0600DYS, with its sleek design and powerful performance, is a 36-inch hood that offers a maximum airflow of 600 CFM to efficiently eliminate smoke, odors, and moisture from the cooking area. Its three-speed fan allows users to select the appropriate level of ventilation based on cooking needs, ensuring a comfortable environment. The convenience of a dishwasher-safe filter simplifies maintenance, allowing for easy cleaning and longevity of the unit.

On the other hand, the UXI01200DYS is designed for smaller spaces, offering a compact 30-inch option that does not compromise on performance. With a maximum airflow of 300 CFM and a two-speed fan, it provides adequate ventilation for everyday cooking tasks. Its stainless steel finish complements a variety of kitchen styles, providing a seamless addition to any decor.

Both models incorporate advanced noise-reduction technology, ensuring that the operation of the fan remains quiet, allowing for conversation and enjoyment during cooking. The easy-to-use control panel features sleek push button controls, making it simple to operate even while preparing meals.

Each range hood is equipped with LED lighting, enhancing visibility over the cooking surface. This not only provides a practical solution but also contributes to the overall ambiance of the kitchen. The illumination helps home chefs keep an eye on their dishes while adding a modern touch to the space.

Installation versatility is another noteworthy characteristic, as both range hoods can be mounted under cabinets, optimizing kitchen space without compromising functionality. The UXI0600DYS and UXI01200DYS are ideal for homeowners seeking effective ventilation solutions that blend performance with an attractive design.

In summary, the KitchenAid UXI0600DYS and UXI01200DYS range hoods are excellent choices for any kitchen, providing powerful ventilation, quiet operation, easy maintenance, and stylish design, thus fulfilling the diverse needs of home chefs.