Prepare the In-line Blower System

WARNING

Excessive Weight Hazard

Use two or more people to move and install in-line blower motor system.

Failure to do so can result in back or other injury.

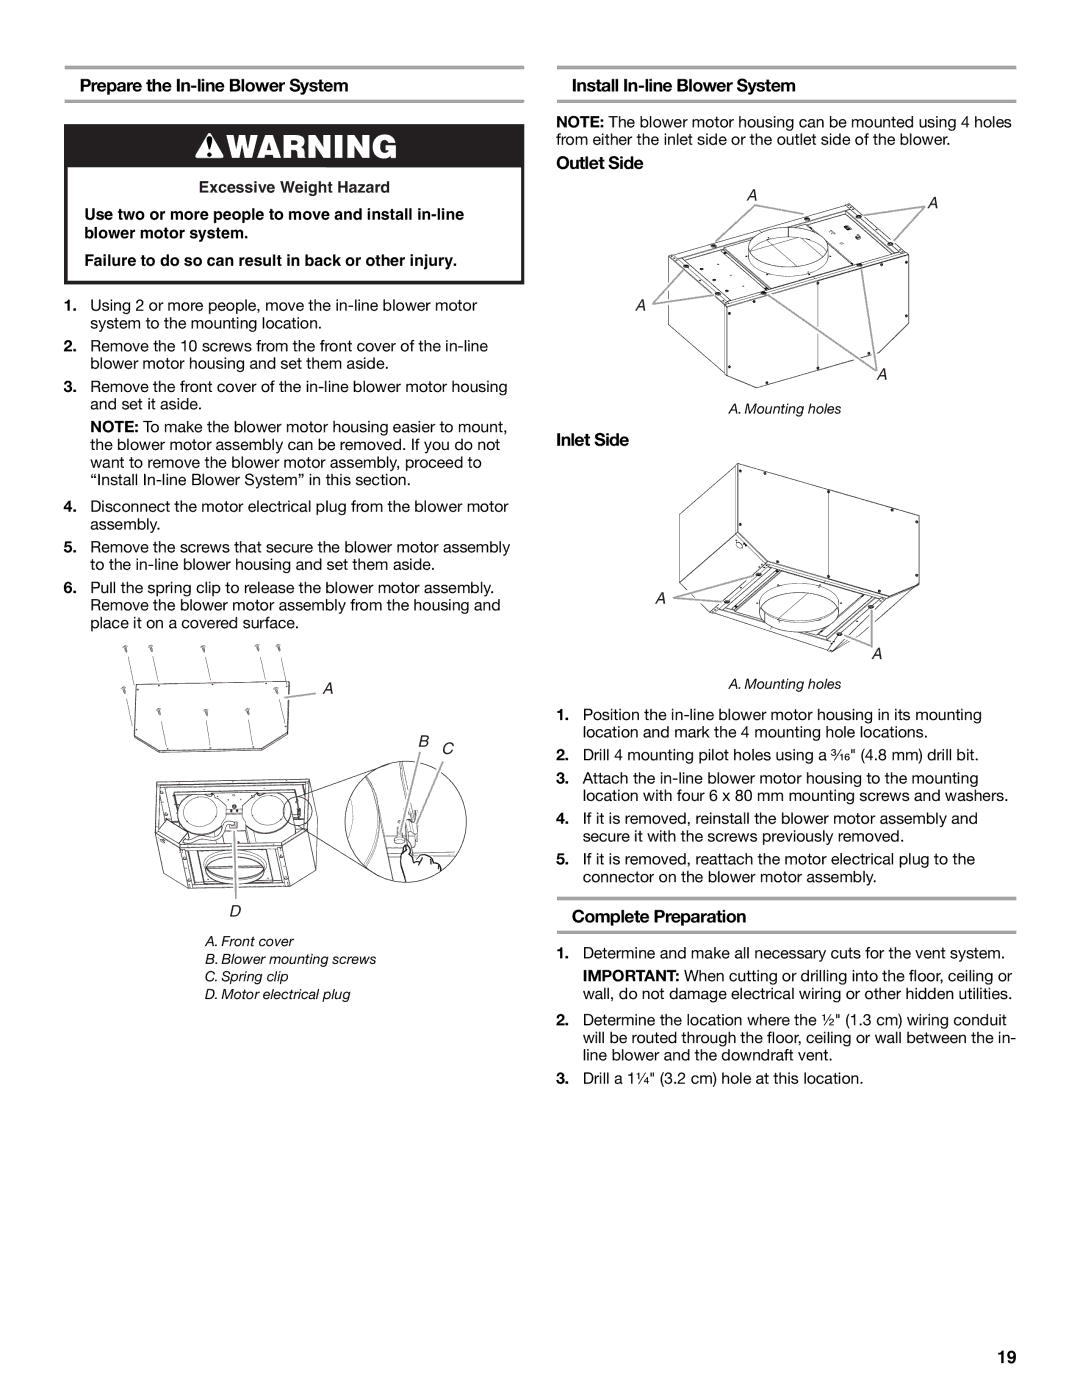
1.Using 2 or more people, move the in-line blower motor system to the mounting location.

2.Remove the 10 screws from the front cover of the in-line blower motor housing and set them aside.

3.Remove the front cover of the in-line blower motor housing and set it aside.

NOTE: To make the blower motor housing easier to mount, the blower motor assembly can be removed. If you do not want to remove the blower motor assembly, proceed to “Install In-line Blower System” in this section.

4.Disconnect the motor electrical plug from the blower motor assembly.

5.Remove the screws that secure the blower motor assembly to the in-line blower housing and set them aside.

6.Pull the spring clip to release the blower motor assembly. Remove the blower motor assembly from the housing and place it on a covered surface.

A

B C

D

A. Front cover

B. Blower mounting screws

C. Spring clip

D. Motor electrical plug

Install In-line Blower System

NOTE: The blower motor housing can be mounted using 4 holes from either the inlet side or the outlet side of the blower.

Outlet Side

AA

A

A

A. Mounting holes

Inlet Side

A

A

A. Mounting holes

1.Position the in-line blower motor housing in its mounting location and mark the 4 mounting hole locations.

2.Drill 4 mounting pilot holes using a ³⁄₁₆" (4.8 mm) drill bit.

3.Attach the in-line blower motor housing to the mounting location with four 6 x 80 mm mounting screws and washers.

4.If it is removed, reinstall the blower motor assembly and secure it with the screws previously removed.

5.If it is removed, reattach the motor electrical plug to the connector on the blower motor assembly.

Complete Preparation

1.Determine and make all necessary cuts for the vent system.

IMPORTANT: When cutting or drilling into the floor, ceiling or wall, do not damage electrical wiring or other hidden utilities.

2.Determine the location where the ¹⁄₂" (1.3 cm) wiring conduit will be routed through the floor, ceiling or wall between the in- line blower and the downdraft vent.

3.Drill a 1¹⁄₄" (3.2 cm) hole at this location.

19

Page 19
Image 19
KitchenAid UXI01200DYS Prepare the In-line Blower System, Install In-line Blower System Outlet Side, Inlet Side

UXI01200DYS, UXI0600DYS specifications

The KitchenAid UXI0600DYS and UXI01200DYS are two innovative under-cabinet range hoods designed to enhance kitchen functionality while adding a touch of elegance. These range hoods provide homeowners with the ideal balance of performance and style, making them popular choices for modern kitchens.

The UXI0600DYS, with its sleek design and powerful performance, is a 36-inch hood that offers a maximum airflow of 600 CFM to efficiently eliminate smoke, odors, and moisture from the cooking area. Its three-speed fan allows users to select the appropriate level of ventilation based on cooking needs, ensuring a comfortable environment. The convenience of a dishwasher-safe filter simplifies maintenance, allowing for easy cleaning and longevity of the unit.

On the other hand, the UXI01200DYS is designed for smaller spaces, offering a compact 30-inch option that does not compromise on performance. With a maximum airflow of 300 CFM and a two-speed fan, it provides adequate ventilation for everyday cooking tasks. Its stainless steel finish complements a variety of kitchen styles, providing a seamless addition to any decor.

Both models incorporate advanced noise-reduction technology, ensuring that the operation of the fan remains quiet, allowing for conversation and enjoyment during cooking. The easy-to-use control panel features sleek push button controls, making it simple to operate even while preparing meals.

Each range hood is equipped with LED lighting, enhancing visibility over the cooking surface. This not only provides a practical solution but also contributes to the overall ambiance of the kitchen. The illumination helps home chefs keep an eye on their dishes while adding a modern touch to the space.

Installation versatility is another noteworthy characteristic, as both range hoods can be mounted under cabinets, optimizing kitchen space without compromising functionality. The UXI0600DYS and UXI01200DYS are ideal for homeowners seeking effective ventilation solutions that blend performance with an attractive design.

In summary, the KitchenAid UXI0600DYS and UXI01200DYS range hoods are excellent choices for any kitchen, providing powerful ventilation, quiet operation, easy maintenance, and stylish design, thus fulfilling the diverse needs of home chefs.