7.Press the CLEAN button. See “Using the Controls.” The light will blink, indicating that the cleaning cycle is in process. When the indicator light turns green (approximately

70 minutes), the cleaning cycle is complete. During the cleaning cycle, the system will both clean and rinse itself.

8.After the cleaning cycle is complete, remove the drain cap from the water pan. Look for any cleaning solution left in the water pan. If cleaning solution drains from the water pan, you should run the clean cycle again. Be sure to replace the drain cap securely on the water pan. If the drain cap is loose, water will empty from the water pan and you will have either thin ice or no ice.

NOTE: Severe scale buildup may require repeated cleaning with a fresh quantity of cleaning solution.

9.Push the selector switch to ON to resume ice production.

Condenser

A dirty or clogged condenser:

Obstructs proper airflow.

Reduces ice making capacity.

Causes higher than recommended operating temperatures which may lead to component failure.

WARNING

Electrical Shock Hazard

Disconnect power before cleaning.

Replace all parts and panels before operating.

Failure to do so can result in death or electrical shock.

1.Unplug ice maker or disconnect power.

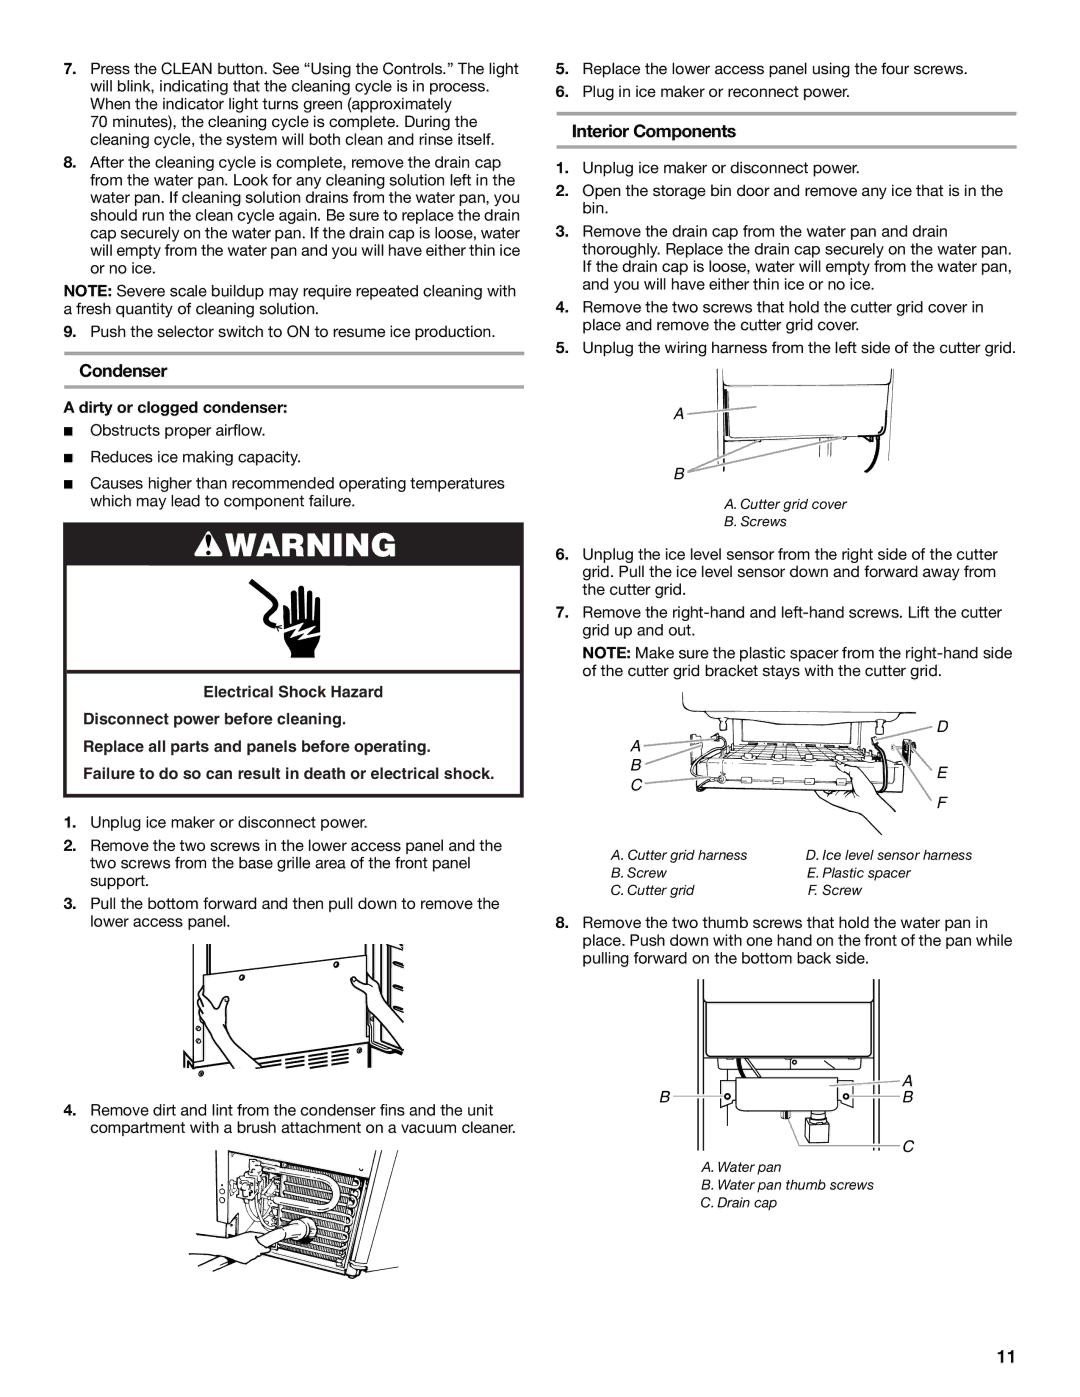
2.Remove the two screws in the lower access panel and the two screws from the base grille area of the front panel support.

3.Pull the bottom forward and then pull down to remove the lower access panel.

4.Remove dirt and lint from the condenser fins and the unit compartment with a brush attachment on a vacuum cleaner.

5.Replace the lower access panel using the four screws.

6.Plug in ice maker or reconnect power.

Interior Components

1.Unplug ice maker or disconnect power.

2.Open the storage bin door and remove any ice that is in the bin.

3.Remove the drain cap from the water pan and drain thoroughly. Replace the drain cap securely on the water pan. If the drain cap is loose, water will empty from the water pan, and you will have either thin ice or no ice.

4.Remove the two screws that hold the cutter grid cover in place and remove the cutter grid cover.

5.Unplug the wiring harness from the left side of the cutter grid.

A

B

A. Cutter grid cover

B.Screws

6.Unplug the ice level sensor from the right side of the cutter grid. Pull the ice level sensor down and forward away from the cutter grid.

7.Remove the right-hand and left-hand screws. Lift the cutter grid up and out.

NOTE: Make sure the plastic spacer from the right-hand side of the cutter grid bracket stays with the cutter grid.

D

A


B

E

C

F


A. Cutter grid harness

D. Ice level sensor harness

B. Screw

E. Plastic spacer

C. Cutter grid

F. Screw

8.Remove the two thumb screws that hold the water pan in place. Push down with one hand on the front of the pan while pulling forward on the bottom back side.

B

A

B

C

A. Water pan

B. Water pan thumb screws

C. Drain cap

11

Page 11
Image 11
KitchenAid W10206423A manual Condenser, Interior Components, Dirty or clogged condenser

W10206423A specifications

The KitchenAid W10206423A is a highly versatile and efficient appliance that enhances the culinary experience in any modern kitchen. Designed with attention to detail, this kitchen tool boasts several features and technologies that make it a must-have for both amateur cooks and professional chefs alike.

One of the standout features of the KitchenAid W10206423A is its powerful motor, which provides superior mixing capabilities. With an impressive wattage, the motor ensures consistent results whether you are whipping, kneading, or blending ingredients. This heavy-duty performance means you can tackle even the most demanding recipes with ease, making it an indispensable ally for baking, cooking, or food preparation tasks.

Equipped with a range of speed settings, the Kitchenaid W10206423A allows for personalized control over mixing techniques. From slow stirring for gentle ingredients to high-speed whipping for airy mixtures, the adjustable speeds provide the flexibility needed for a variety of recipes. This feature also minimizes splatter and promotes thorough ingredient incorporation, ensuring that your dishes yield professional-quality results.

Another characteristic that sets the KitchenAid W10206423A apart is its robust construction. Crafted from durable materials, this kitchen appliance is built to withstand the rigors of daily use. The design not only contributes to its longevity but also makes it easy to clean after use, enhancing your overall kitchen experience. The sleek design fits seamlessly in any kitchen décor, combining practicality with style.

Additionally, the KitchenAid W10206423A comes with a selection of attachments that broaden its functionality. From dough hooks to whisk attachments, these tools enable users to expand their culinary repertoire. Whether you're making bread, whipping cream, or mixing cake batter, the versatility of attachment options allows the appliance to adapt to various cooking needs.

In terms of safety, the KitchenAid W10206423A incorporates built-in features that ensure safe operation. The appliance is designed with a secure locking mechanism to prevent accidental start-ups, giving users peace of mind while they work.

In summary, the KitchenAid W10206423A is a powerful and adaptable kitchen appliance that caters to the needs of a diverse range of cooking tasks. With its robust motor, adjustable speed settings, durable construction, and versatility provided by various attachments, this model stands as an excellent investment for anyone looking to elevate their culinary skills. Whether you are a seasoned cook or just beginning your culinary journey, the KitchenAid W10206423A is sure to become an essential tool in your kitchen.