KitchenAid W10206423A manual Connect Water Supply, Connecting the Water Line, Rear View

Models: W10206423A

1 32
Download 32 pages 48.94 Kb
Page 6
Image 6

Connect Water Supply

Read all directions before you begin.

IMPORTANT:

Plumbing shall be installed in accordance with the International Plumbing Code and any local codes and ordinances.

Use copper tubing or Whirlpool supply line, Part Number 8212547RP, and check for leaks.

Install tubing only in areas where temperatures will remain above freezing.

Tools needed:

Gather the required tools and parts before starting installation.

Flat-blade screwdriver

⁷⁄₁₆" and ¹⁄₂" open-end wrenches or two adjustable wrenches

¹⁄₄" nut driver

NOTE: Do not use a piercing-type or ³⁄₁₆" (4.76 mm) saddle valve which reduces water flow and clogs more easily.

Connecting the Water Line

1.Turn off main water supply. Turn on nearest faucet long enough to clear line of water.

2.Using a ¹⁄₂" copper supply line with a quarter-turn shutoff valve or the equivalent, connect the ice maker as shown.

NOTE: To allow sufficient water flow to the ice maker a minimum ¹⁄₂" size copper supply line is recommended.

A

B

4.Place the free end of the tubing into a container or sink, and turn on main water supply and flush out tubing until water is clear. Turn off shutoff valve on the water pipe.

NOTE: Always drain the water line before making the final connection to the inlet of the water valve to avoid possible water valve malfunction.

5.Bend the copper tubing to meet the water line inlet which is located on the back of the ice maker cabinet as shown. Leave a coil of copper tubing to allow the ice maker to be pulled out of the cabinet or away from the wall for service.

REAR VIEW

A

B

C

D

A. Water supply tube clamp

B. Vent hose (drain pump models only)

C. Inlet water tube clamp and supply line connector

D. Drain hose (drain pump models only)

6.Remove and discard the short, black plastic tube from the end of the water line inlet.

7.Thread the nut onto the end of the tubing. Tighten the nut by hand. Then tighten it with a wrench two more turns. Do not overtighten.

NOTE: To avoid rattling, be sure the copper tubing does not touch the cabinet’s side wall or other parts inside the cabinet.

A.Bulb

B.Nut

3.Now you are ready to connect the copper tubing. Use ¹⁄₄" (6.35 mm) OD soft copper tubing for the cold water supply.

Ensure that you have the proper length needed for the job. Be sure both ends of the copper tubing are cut square.

Slip compression sleeve and compression nut on copper tubing as shown. Insert end of tubing into outlet end squarely as far as it will go. Screw compression nut onto outlet end with adjustable wrench. Do not overtighten.

A B

C

A. Compression sleeve

C. Copper tubing

B. Compression nut


A

B

C

D

A. Line to ice maker


C. Ferrule (purchased)

B. Nut (purchased)


D. Supplied line from ice maker

8.Install the water supply tube clamp around the water supply line to reduce strain on the coupling.

9.Turn shutoff valve ON.

10.Check for leaks. Tighten any connections (including connections at the valve) or nuts that leak.

6

Page 6
Image 6
KitchenAid W10206423A manual Connect Water Supply, Connecting the Water Line, Rear View

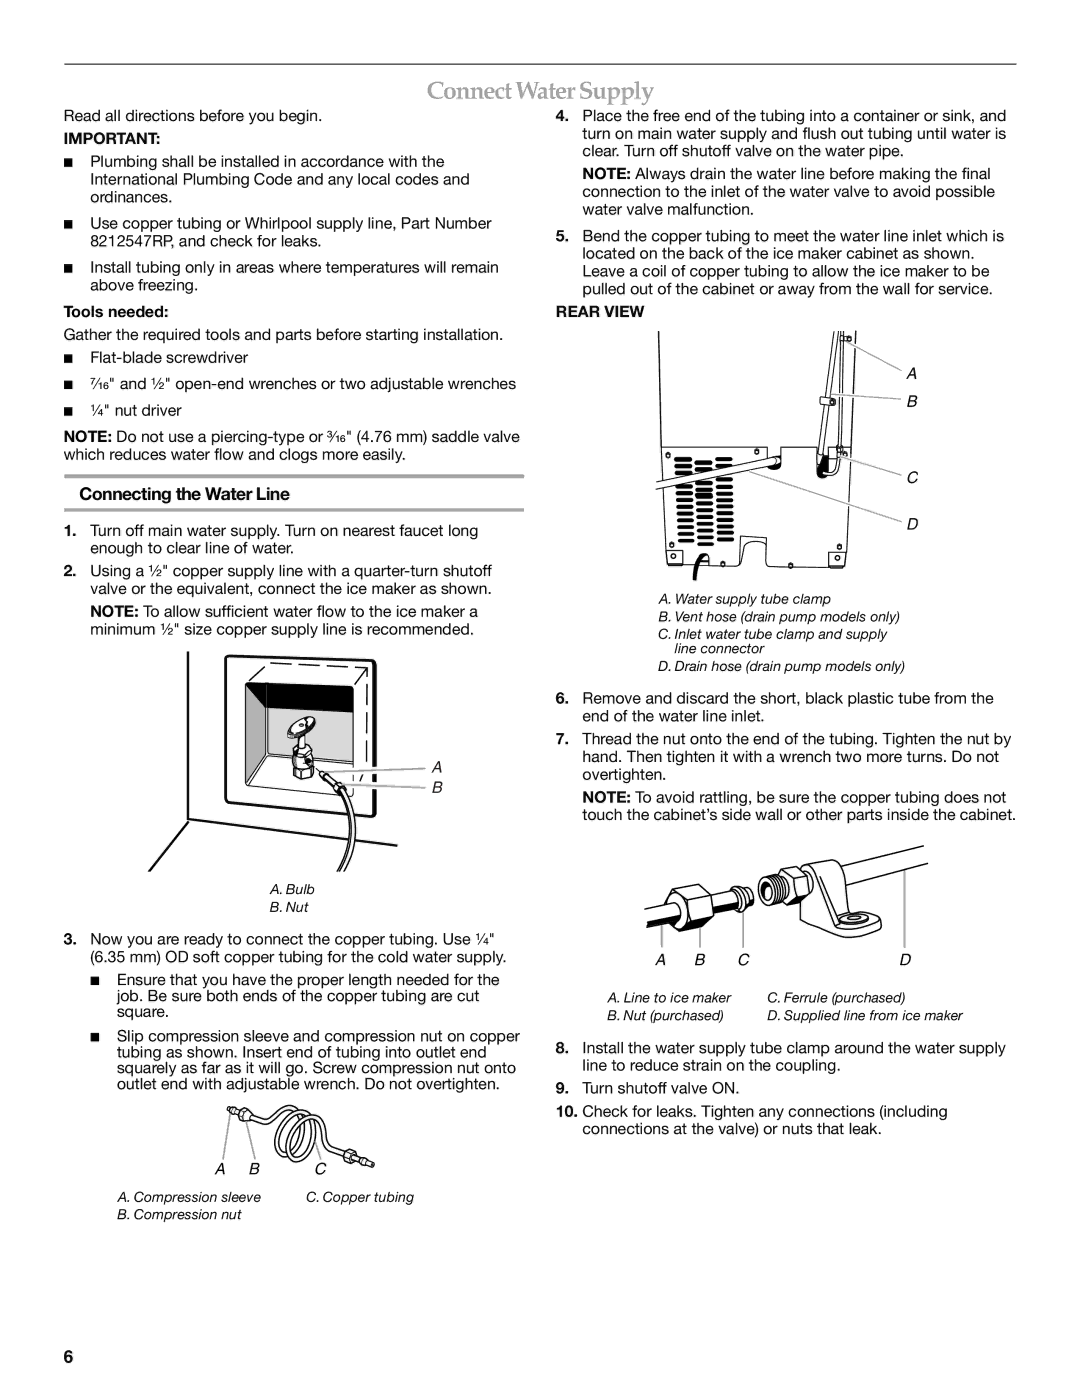
W10206423A specifications

The KitchenAid W10206423A is a highly versatile and efficient appliance that enhances the culinary experience in any modern kitchen. Designed with attention to detail, this kitchen tool boasts several features and technologies that make it a must-have for both amateur cooks and professional chefs alike.

One of the standout features of the KitchenAid W10206423A is its powerful motor, which provides superior mixing capabilities. With an impressive wattage, the motor ensures consistent results whether you are whipping, kneading, or blending ingredients. This heavy-duty performance means you can tackle even the most demanding recipes with ease, making it an indispensable ally for baking, cooking, or food preparation tasks.

Equipped with a range of speed settings, the Kitchenaid W10206423A allows for personalized control over mixing techniques. From slow stirring for gentle ingredients to high-speed whipping for airy mixtures, the adjustable speeds provide the flexibility needed for a variety of recipes. This feature also minimizes splatter and promotes thorough ingredient incorporation, ensuring that your dishes yield professional-quality results.

Another characteristic that sets the KitchenAid W10206423A apart is its robust construction. Crafted from durable materials, this kitchen appliance is built to withstand the rigors of daily use. The design not only contributes to its longevity but also makes it easy to clean after use, enhancing your overall kitchen experience. The sleek design fits seamlessly in any kitchen décor, combining practicality with style.

Additionally, the KitchenAid W10206423A comes with a selection of attachments that broaden its functionality. From dough hooks to whisk attachments, these tools enable users to expand their culinary repertoire. Whether you're making bread, whipping cream, or mixing cake batter, the versatility of attachment options allows the appliance to adapt to various cooking needs.

In terms of safety, the KitchenAid W10206423A incorporates built-in features that ensure safe operation. The appliance is designed with a secure locking mechanism to prevent accidental start-ups, giving users peace of mind while they work.

In summary, the KitchenAid W10206423A is a powerful and adaptable kitchen appliance that caters to the needs of a diverse range of cooking tasks. With its robust motor, adjustable speed settings, durable construction, and versatility provided by various attachments, this model stands as an excellent investment for anyone looking to elevate their culinary skills. Whether you are a seasoned cook or just beginning your culinary journey, the KitchenAid W10206423A is sure to become an essential tool in your kitchen.