Table of Contents/Índice/Table des matières
Side by Side BUILT-IN Refrigerator
Table DES Matières
Table of Contents
Índice
Refrigerator Safety
Your safety and the safety of others are very important
Architect Series
Models
Side by Side Non-Dispensing Refrigerators
Classic Series
Side by Side Dispensing Refrigerators
Complete Series
Tools and Parts
Installation Requirements
Opening Dimensions
Location Requirements
Recommended Grounding Method
Model Width a as shown above Dimension B As shown Above
Electrical Requirements
Water Pressure
Water Supply Requirements
Tipping Radius
Reverse Osmosis Water Supply
Top View Front View
Product Dimensions
Side View
Model Width a Trim edge to trim edge
42 106.7 cm Models
Door Swing Dimensions
36 91.4 cm Models
48 121.9 cm Models
Overlay Panel
Overlay Series Door Panel and Cabinetry Clearance
90˚ Door Stop Position Hinge
Decorative Overlay Panel
Represents placement of dispenser frame
Overlay Series Custom Panels and Handle Kits
Model
To remove the dispenser frame
Backer Panels
Dispenser Frame dispenser models only
Classic Series Factory Panels and Kits
Top Grille Panel
Classic Series Custom Panels
Door Panels for Non-dispenser Models
Top grille panel should not weigh more than 10 lbs 4.5 kg
Door Panels for Dispenser Models
Dispenser Frame Classic series dispenser models
Classic, Architect and Complete Series Custom Side Panels
Overlay Series Custom Side Panels
Measure the distance from point a as shown to back wall
Installation Instructions
Unpack the Refrigerator
Reduce Tipping Radius
Install Anti-Tip Boards
To Install Anti-tip Boards
Move the Refrigerator into House
Style 1 Shutoff Valve Connection
Connect the Water Supply
Connect to Water Line Parts Needed
Style 2 Copper Line Connection
Parts Supplied
Plug in Refrigerator
Move Refrigerator to Final Location
Connect to Refrigerator
Door Panels
Install Classic Series Custom Panels
Level and Align Refrigerator
Check refrigerator level and adjustment. Adjust if needed
Install Overlay Series Custom Panels
Door Panel Installation
Door Swing Adjustment
Adjust Doors
Door Height Adjustment
Classic and Architect Models
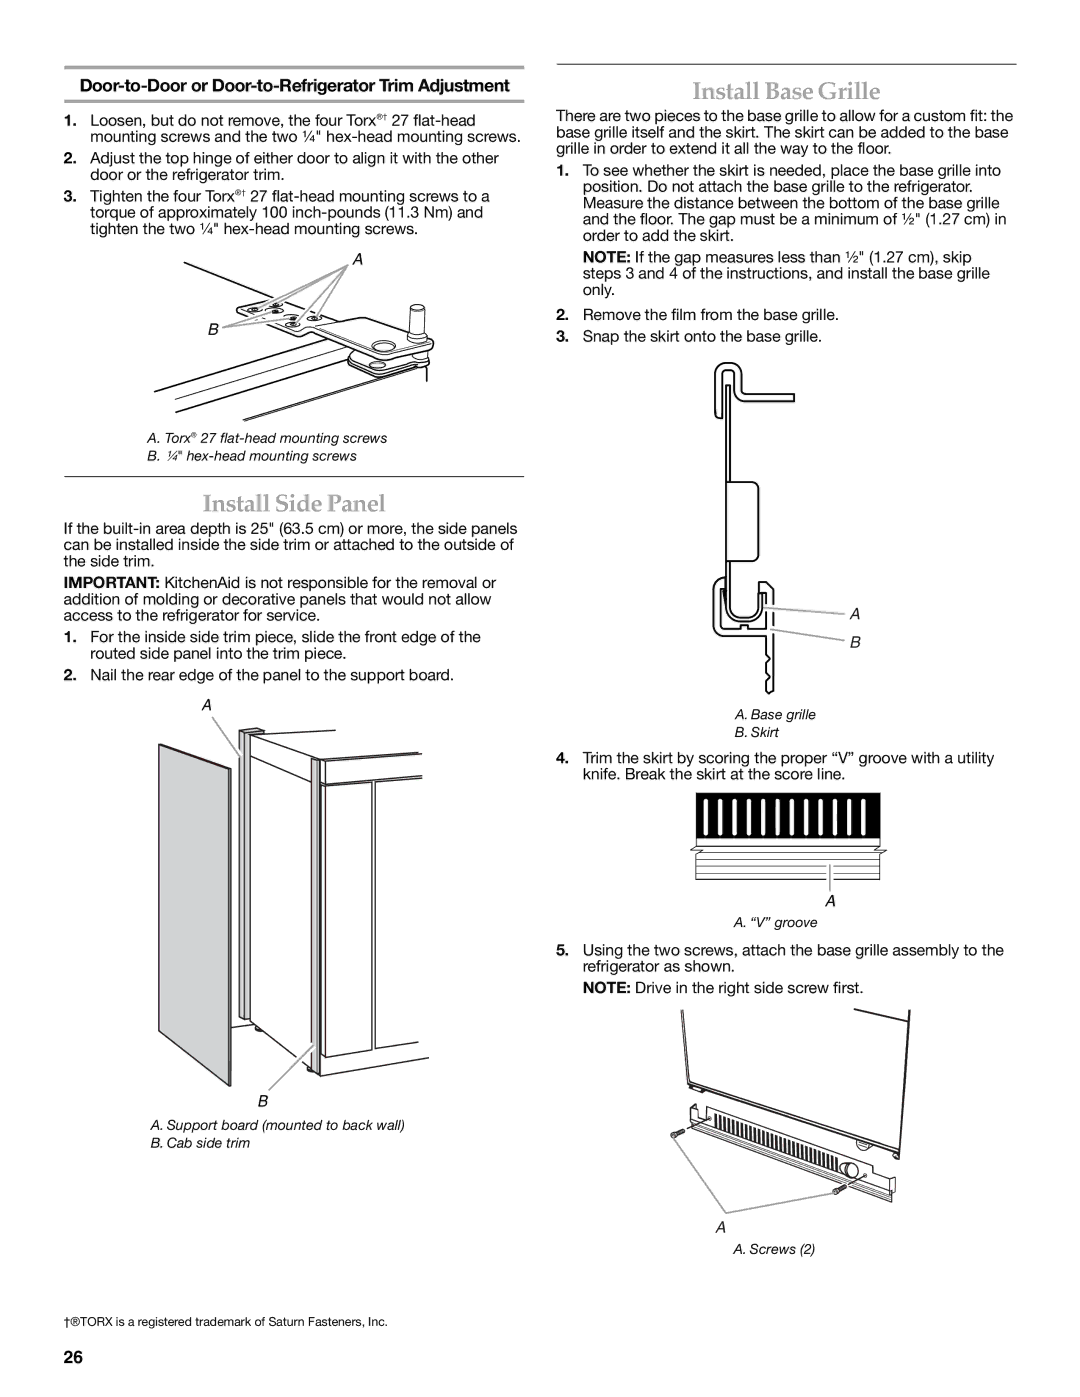
Door-to-Door or Door-to-Refrigerator Trim Adjustment
Install Base Grille
Install Side Panel
Style 1 Dispenser Models
Complete Installation
Water System Preparation
Style 2 Non-Dispenser Models
Seguridad DEL Refrigerador
Su seguridad y la seguridad de los demás es muy importante
Serie Architect
Modelos
Refrigeradores de dos puertas sin despachador
Serie Classic
Refrigeradores de dos puertas con despachador
Serie Complete
Requisitos de ubicación
Requisitos DE Instalación
Piezas y herramientas
Medidas de la abertura
Requisitos eléctricos
Método de conexión a tierra recomendado
Presión del agua
Requisitos del suministro de agua
Arco de vuelco
Suministro de agua de ósmosis inversa
Vista superior
Medidas del producto
Vista lateral Vista frontal
Modelo Ancho a
Modelos de 48 121,9 cm
Medidas de oscilación de las puertas
Modelos de 36 91,4 cm Modelos de 42 106,7 cm
Puerta
Recubierto
34³/₄ 88,27 cm
Panel decorativo con revestimiento
Modelo
40³/₄ 103,51 cm
Notas
Paneles de soporte
Marco del despachador Solamente en modelos con despachador
Para quitar el marco del despachador
Paneles y juegos de fábrica de la Serie Classic
Panel de la rejilla superior
Paneles a la medida para la serie Classic
Paneles de puerta para modelos sin despachador
34 ¹⁄₄ 87,0 cm 40 ¹⁄₄ 102,2 cm 46 ¹⁄₄ 117,5 cm
Paneles de puerta para modelos con despachador
Refrigerador Medidas para la instalación al ras
Medidas del refrigerador y del adorno lateral
Medidas para la instalación empotrada
Adorno laterale
Adornos laterales
Paneles laterales a la medida para la serie Overlay
Refrigerador
Cómo reducir el arco de vuelco
Instrucciones DE Instalación
Desempaque el refrigerador
Cómo hacer entrar el refrigerador en la casa
Conexión a la línea de agua Piezas necesarias
Conexión del suministro de agua
Cómo instalar los tableros antivuelco
Cómo instalar los tableros antivuelco
Piezas suministradas
Estilo 2 Conexión de la tubería de cobre
Conexión al refrigerador
18 cm cercana al refrigerador
Nivelación y alineamiento del refrigerador
Cómo mover el refrigerador a Su ubicación final
Cómo enchufar el refrigerador
Cómo instalar los paneles a la medida Para la serie Classic
Paneles de la puerta
Acceso al refrigerador para darle servicio
Cómo instalar los paneles a la medida Para la serie Overlay
Instalación del panel de la puerta
Cómo ajustar la oscilación de las puertas
Ajuste las puertas
Cómo ajustar la altura de la puerta
Modelos Classic y Architect
Cómo instalar el panel lateral
Cómo instalar la rejilla de la base
Estilo 1 Modelos con despachador
Cómo terminar la instalación
Preparación del sistema de agua
Estilo 2 Modelos sin despachador
Sécurité DU Réfrigérateur
Votre sécurité et celle des autres est très importante
Série Architect
Modèles
Réfrigérateurs côte à côte sans distributeur
Série Classic
Réfrigérateurs côte à côte avec distributeur
Série Complète
Dimensions de l’ouverture
Exigences D’INSTALLATION
Exigences d’emplacement
Outillage et pièces
Méthode recommandée de mise à la terre
Spécifications électriques
Pression de leau
Spécifications de l’alimentation en eau
Rayon de basculement
Alimentation en eau par osmose inverse
Vue de dessus Vue avant
Dimensions du produit
Vue latérale
Modèle Largeur a ’un bord à l’autre De la garniture
Modèles de 48 121,9 cm
Dimensions pour louverture des portes
Modèles de 36 91,4 cm Modèles de 42 106,7 cm
Série Overlay Panneau de porte et placard espace libre
Charnière Placard
Panneau
Modèle
Panneaux personnalisés et poignées de la série Overlay
Panneau décoratifs Overlay
39³/₄ 100,97 cm
Panneaux dappui
Remarques
45³/₄ 116,21 cm
Ensembles de panneaux dorigine De la série Classic
Panneaux de porte pour modèles sans distributeur
Remarque Les dimensions indiquées ont une tolérance de
Panneaux personnalisés de la série Classic
Panneau de la grille supérieure
Cm en prévision dun dégagement pour les doigts
Panneaux de porte pour modèles avec distributeur
’ouverture du distributeur est centrée de gauche à droite
Le cadre du distributeur se fixe au panneau avec 4 vis
Dimensions pour un panneau en affleurement
Dimensions du réfrigérateur et des garnitures latérales
Dimensions pour un panneau inséré
Dimensions pour un panneau inséré en retrait
Déballage du réfrigérateur
Instructions ’INSTALLATION
Panneaux latéraux personnalisés De la série Overlay
Modèle Rayon de basculement réduit
Réduction du rayon de basculement
Faire entrer le réfrigérateur dans le domicile
Saisir les deux extrémités de la grille supérieure
Installation de planches antibasculement
Raccordement à lalimentation en eau
25 cm à 3,18 cm à proximité du réfrigérateur
Raccordement au réfrigérateur
Pièces fournies
Vérifier quil sagit dune canalisation deau froide
Réglage de laplomb et alignement Du réfrigérateur
Déplacement du réfrigérateur à Lemplacement final
Brancher le réfrigérateur
Installation des panneaux personnalisés De la série Classic
Panneaux de porte
Intervention de réparation
Installation des panneaux personnalisés De la série Overlay
Installation des panneaux de porte
Ajustement de louverture des portes
Ajustement des portes
Ajustement de la hauteur des portes
Modèles Classic et Architect
Installation du panneau latéral
Installation de la grille de la base
Style 1 Modèles avec distributeur
Achever l’installation
Préparation du système d’eau
Style 2 Modèles sans distributeur
W10379133A
All rights reserved