Interruptor de Encendido/Apagado

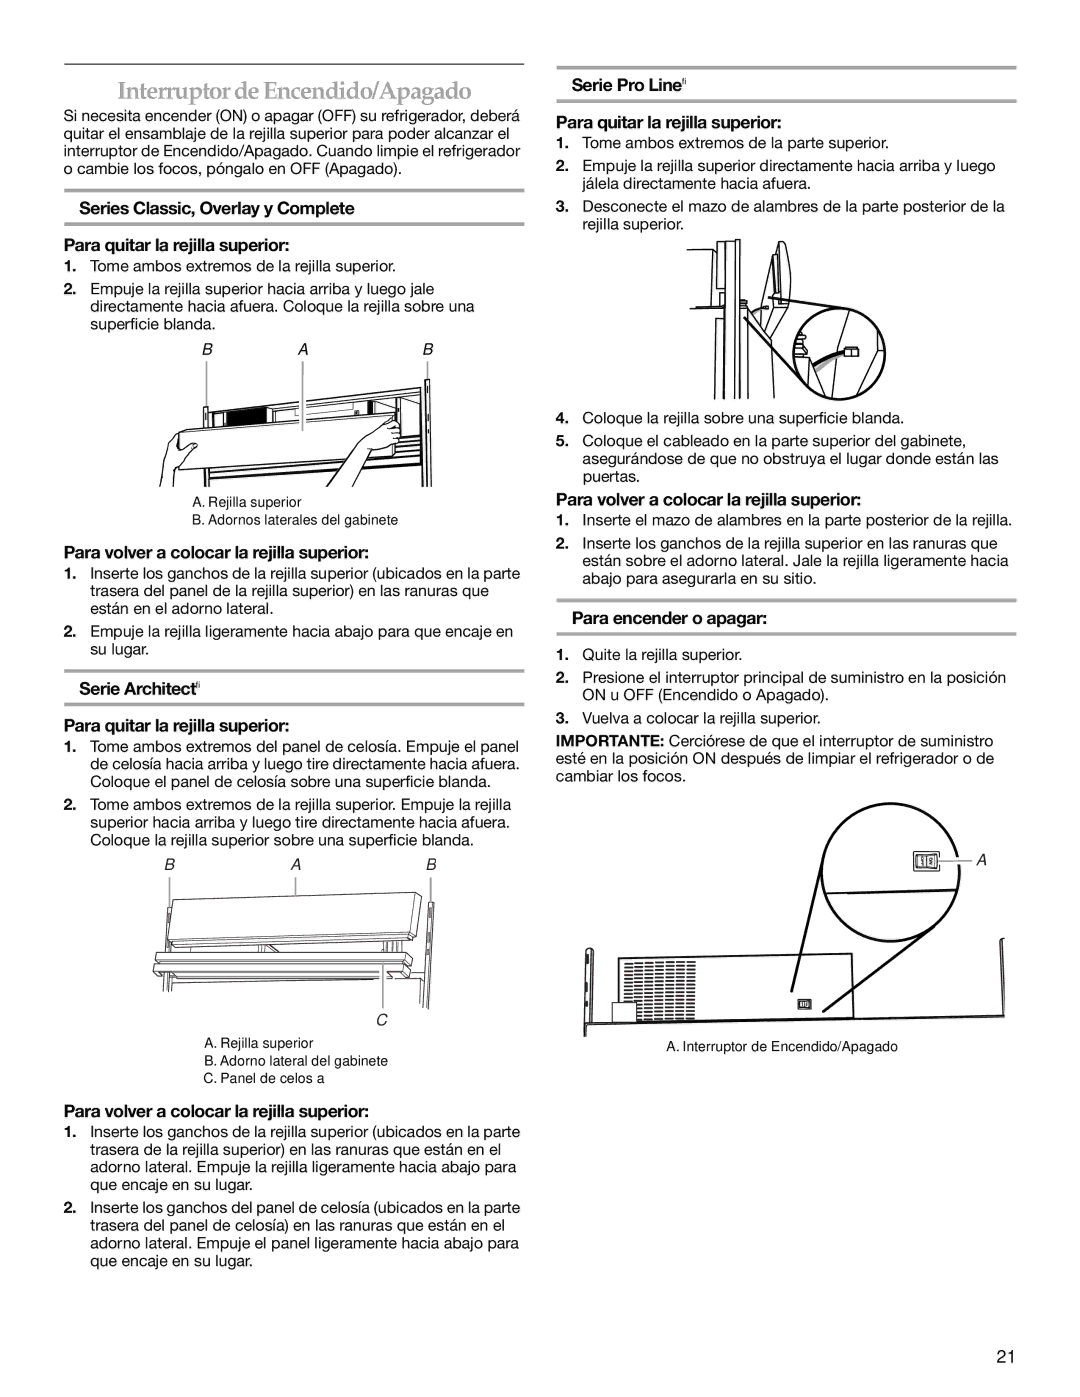
Si necesita encender (ON) o apagar (OFF) su refrigerador, deberá quitar el ensamblaje de la rejilla superior para poder alcanzar el interruptor de Encendido/Apagado. Cuando limpie el refrigerador o cambie los focos, póngalo en OFF (Apagado).

Series Classic, Overlay y Complete

Para quitar la rejilla superior:

1.Tome ambos extremos de la rejilla superior.

2.Empuje la rejilla superior hacia arriba y luego jale directamente hacia afuera. Coloque la rejilla sobre una superficie blanda.

BAB

A. Rejilla superior

B. Adornos laterales del gabinete

Para volver a colocar la rejilla superior:

1.Inserte los ganchos de la rejilla superior (ubicados en la parte trasera del panel de la rejilla superior) en las ranuras que están en el adorno lateral.

2.Empuje la rejilla ligeramente hacia abajo para que encaje en su lugar.

Serie Architect®

Para quitar la rejilla superior:

1.Tome ambos extremos del panel de celosía. Empuje el panel de celosía hacia arriba y luego tire directamente hacia afuera. Coloque el panel de celosía sobre una superficie blanda.

2.Tome ambos extremos de la rejilla superior. Empuje la rejilla superior hacia arriba y luego tire directamente hacia afuera. Coloque la rejilla superior sobre una superficie blanda.

BAB

C

A. Rejilla superior

B. Adorno lateral del gabinete

C. Panel de celosía

Para volver a colocar la rejilla superior:

1.Inserte los ganchos de la rejilla superior (ubicados en la parte trasera de la rejilla superior) en las ranuras que están en el adorno lateral. Empuje la rejilla ligeramente hacia abajo para que encaje en su lugar.

2.Inserte los ganchos del panel de celosía (ubicados en la parte trasera del panel de celosía) en las ranuras que están en el adorno lateral. Empuje el panel ligeramente hacia abajo para que encaje en su lugar.

Serie Pro Line®

Para quitar la rejilla superior:

1.Tome ambos extremos de la parte superior.

2.Empuje la rejilla superior directamente hacia arriba y luego jálela directamente hacia afuera.

3.Desconecte el mazo de alambres de la parte posterior de la rejilla superior.

4.Coloque la rejilla sobre una superficie blanda.

5.Coloque el cableado en la parte superior del gabinete, asegurándose de que no obstruya el lugar donde están las puertas.

Para volver a colocar la rejilla superior:

1.Inserte el mazo de alambres en la parte posterior de la rejilla.

2.Inserte los ganchos de la rejilla superior en las ranuras que están sobre el adorno lateral. Jale la rejilla ligeramente hacia abajo para asegurarla en su sitio.

Para encender o apagar:

1.Quite la rejilla superior.

2.Presione el interruptor principal de suministro en la posición ON u OFF (Encendido o Apagado).

3.Vuelva a colocar la rejilla superior.

IMPORTANTE: Cerciórese de que el interruptor de suministro esté en la posición ON después de limpiar el refrigerador o de cambiar los focos.

A

A. Interruptor de Encendido/Apagado

21

Page 21
Image 21
KitchenAid WF-LC400V Interruptor de Encendido/Apagado, Para volver a colocar la rejilla superior, Para encender o apagar

WF-LC400V specifications

The KitchenAid WF-LC400V is a versatile and innovative kitchen appliance designed to elevate culinary experiences. As a food processor, it offers a range of features and technologies that cater to both amateur cooks and seasoned chefs, making meal preparation simpler, faster, and more enjoyable.

At the heart of the WF-LC400V is its powerful motor, which delivers consistent performance across a variety of tasks. Whether you're chopping vegetables, blending sauces, or kneading dough, this food processor handles it all with ease. Its robust 400-watt motor provides the strength needed to tackle tough ingredients, ensuring that users can achieve the desired texture and consistency every time.

One of the standout features of the WF-LC400V is its patented ExactSlice system. This technology allows users to easily adjust the thickness of slices with a simple external lever, providing precision control over how ingredients are prepared. This feature is particularly beneficial for those who appreciate uniformity in their dishes, as it ensures that vegetables, cheeses, and meats are cut to the perfect thickness for even cooking or presentation.

The food processor also comes equipped with multiple stainless-steel blades and discs, each designed to perform specific tasks. The slicing blade provides clean, precise cuts, while the shredding blade effortlessly grates cheese or vegetables. Additionally, the chopping blade can quickly mince herbs, nuts, or ingredients for dips, showcasing the appliance’s adaptability for various recipes.

The WF-LC400V is designed with user convenience in mind. Its generous 4-cup capacity bowl allows for processing larger quantities at once, reducing the need for multiple batches and saving time in the kitchen. Furthermore, the bowl is designed with a locking mechanism, ensuring safety during operation while also making it easy to detach and clean.

Cleaning the KitchenAid WF-LC400V is straightforward, with dishwasher-safe parts that simplify the cleaning process. This feature, combined with its compact design, makes it easy to store away when not in use.

In conclusion, the KitchenAid WF-LC400V food processor stands out in the crowded kitchen appliance market thanks to its powerful performance, innovative features, and user-friendly design. With its reliability and versatility, it has become a staple for those looking to streamline their cooking experience and achieve professional-level results at home. Whether you're making a simple salad or an intricate meal, the WF-LC400V is an essential tool that enhances every culinary adventure.