Kodak EasyShare Z1015 is Digital camera
Eastman Kodak Company Rochester, NY
Front view
Optional
Back view
Table of contents
Table of contents
Attaching the strap Loading the battery
Setting up your camera
Charging the KLIC-8000 battery
Purchase accessories Learn more about USB charging
Charging the battery using optional accessories
Kodak 5V AC adapter 2 amp
Kodak EasyShare camera and printer docks
Language
Turning on the camera Setting the language, date/time
To change OK to accept
Date/Time
Storing pictures on an optional SD or Sdhc card
Taking a picture
Taking pictures/videos
Using the framing marks to take pictures
Taking a video
Press the Shutter button halfway
Capture modes
Scene modes
Take the picture or video Use the auto focus framing marks,
Using the 15X optical zoom
Using the flash
Using focus modes
Icon Mode Description
Macro
Or press the Shutter button completely down
Using the self-timer
Mode Icon Description Purpose First
Using the burst feature
Capture an expected event
Burst
Take the first picture
Taking panoramic pictures
Understanding the picture-taking icons
Status icons indicate mode, feature, and camera status
Magnifying a picture during review
Reviewing pictures/videos
Deleting pictures/videos
Playing a video
Viewing picture/video information
Using the undo delete feature
Protecting pictures/videos from deletion
Press the Menu button to exit the menu
Using the menu button in Review
Adding sound tags
Recording a sound tag
Cropping pictures
Playing a sound tag
Edit tab Press to highlight Crop. Press OK
Using the RAW Develop feature
Using Kodak Perfect Touch technology
Making a picture from a video
Editing videos
Trimming a video
Press to navigate through video frames
Using video bookmarks
Setting bookmarks
Using bookmarks
Making a video action print
Running a slide show
Running a continuous slide show loop
Changing the slide show display interval
Creating a multimedia slide show
You can set the display interval from 3-60 seconds
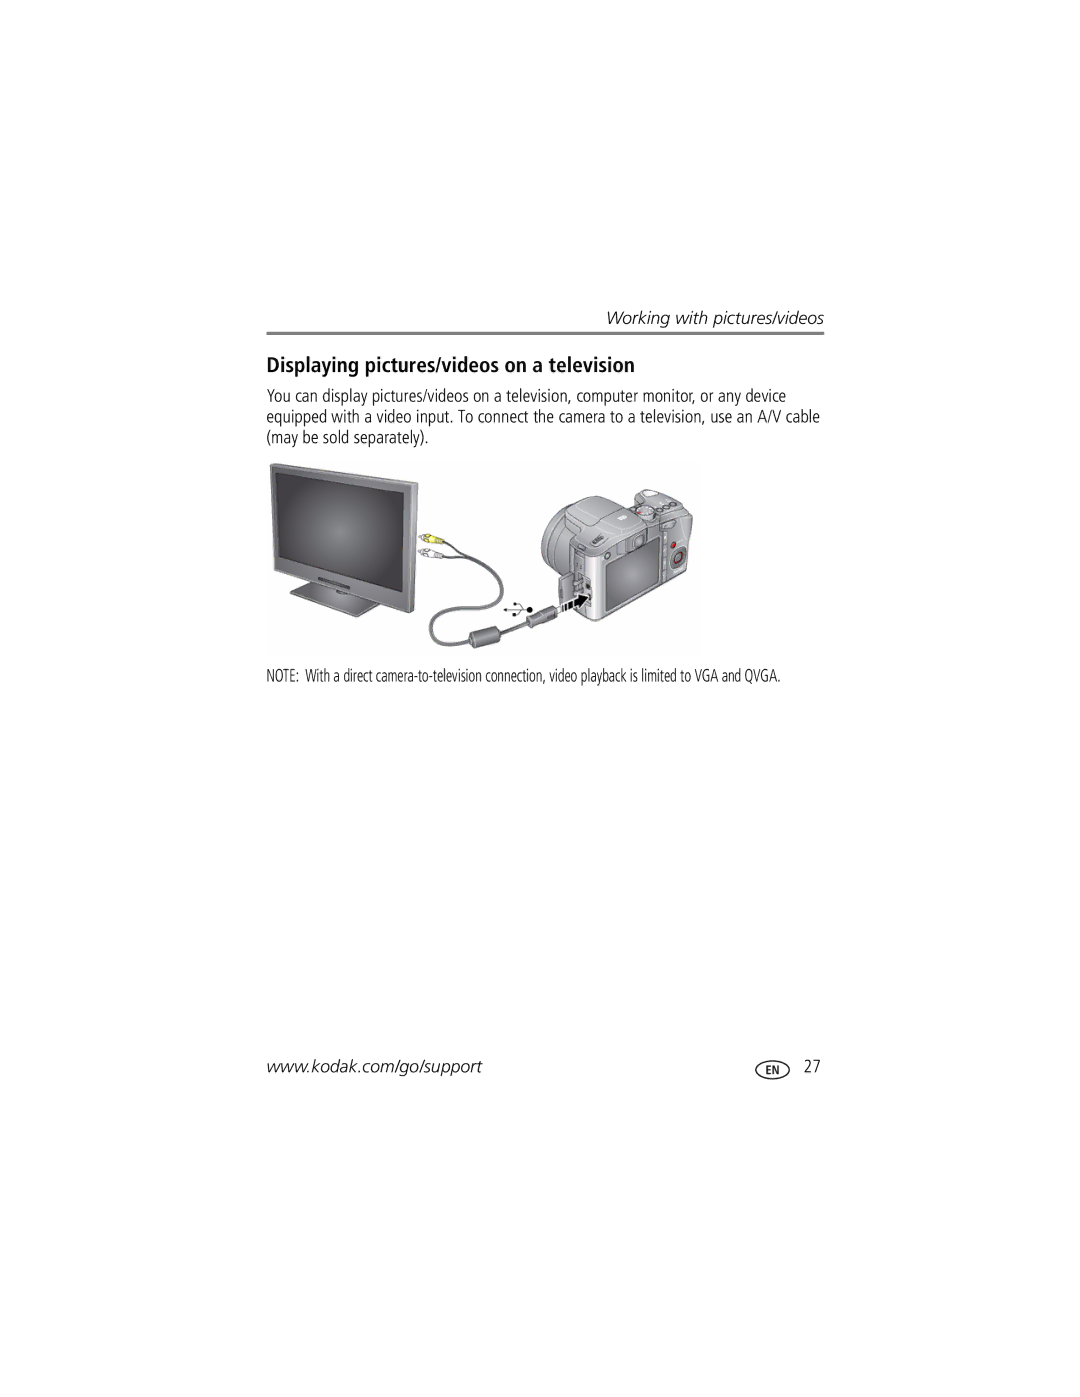
Displaying pictures/videos on a television
Viewing pictures/videos in different ways
Viewing as thumbnails multi-up
Searching pictures by date, favorites, or other tag
Selecting multiple pictures/videos
Copying pictures/videos
Copy pictures/videos
Understanding the review icons
Pictures
Videos
Using the Menu button to change settings
Picture Size in Smart 10.0 MP Capture mode
Capture Options
Picture Size in all other 10.0 MP Still capture modes
Color Mode High Color
Video Size
Picture Quality
AF Control
Using the Capture + menu
Capture + Options
White Balance
Face Detect Capture
Exposure Metering
AF Zone
Using the Setup menu
Horizontally Date Stamp
Capture Frame Grid
Image Stabilizer
Pressed halfway down
Protected
Pictures/videos
S, and M modes
Mode When to use
Turn the Mode dial to P, A, S, or M
Changing P, A, S, or M mode settings
Using exposure compensation with exposure bracketing
Using the histogram to view picture brightness
Using the framing grid to compose a picture
Tagging pictures for printing
Sharing your pictures
Press the Share button to exit the menu
Printing tagged pictures
First-create email addresses
Tagging pictures/videos for email
Second-tag pictures/videos on your camera
Third-transfer and email
Pre-tagging
Tagging pictures/videos with tags that you create
Tagging pictures/videos as favorites
Tag pictures as favorites
Follow the on-screen instructions to install the software
Installing the software
Also available for transferring
Transferring pictures with the USB cable
Printing pictures
Connecting the camera to an EasyShare all-in-one printer
Direct printing with an EasyShare all-in-one printer
Printing from an EasyShare all-in-one printer
Printing from an optional SD/SDHC card
Using a printer that is not PictBridge enabled
Camera problems
Try one or more of the following
Including protected files
Try one or more of the following
Camera/computer communications
Troubleshooting
Videos, including protected files. Formatting
LCD messages
Help
Videos, including protected files
Getting help from your camera
Great news
Turning on camera Help
Getting help on the Web
Getting help on the telephone
Combined zoom-75X
Camera specifications
ISO speed-Smart Capture mode Auto
Self-timer-2 seconds, 10 seconds, or 2-shot
Flash compensation-+/-1.0 in 1/3 steps
Smart Capture Mode Other Modes
Auto power off-Selectable 1, 3, 5, 10 minutes
Output image size
Compression-Fine, Basic, Standard, RAW
When removing the battery, allow it to cool it may be hot
Extending battery life
Battery life
CRV3 lithium digital camera battery 300 pictures
Keep batteries out of the reach of children
Care and maintenance
Limited warranty
Limited warranty coverage
Limitations
FCC compliance and advisory
Regulatory compliance
Your rights
Outside the United States and Canada
Australian C-Tick
Canadian DOC statement
N137
Appendix
Eastman Kodak Company Rochester, NY AIO-40
Russian GOST-R
Out
Backlight, 9 battery
Enhancement, 22 flash Focus framing marks
Audio/video, 27 USB
Mode dial, 8 picture-taking, 16 review
Settings, 11 flower, 9 focus
About pictures, videos, 18 installing
EVF electronic viewfinder, ii EVF/LCD button, ii exposure
Lens, cleaning, 60 loading
Kodak EasyShare software installing, 44 upgrading
Self-timer
Setting
After taking
Running a slide show
Index
Turning camera on/off Undelete
Installing software
USB cable
Size