How-To’sfor all Band Saw Blades
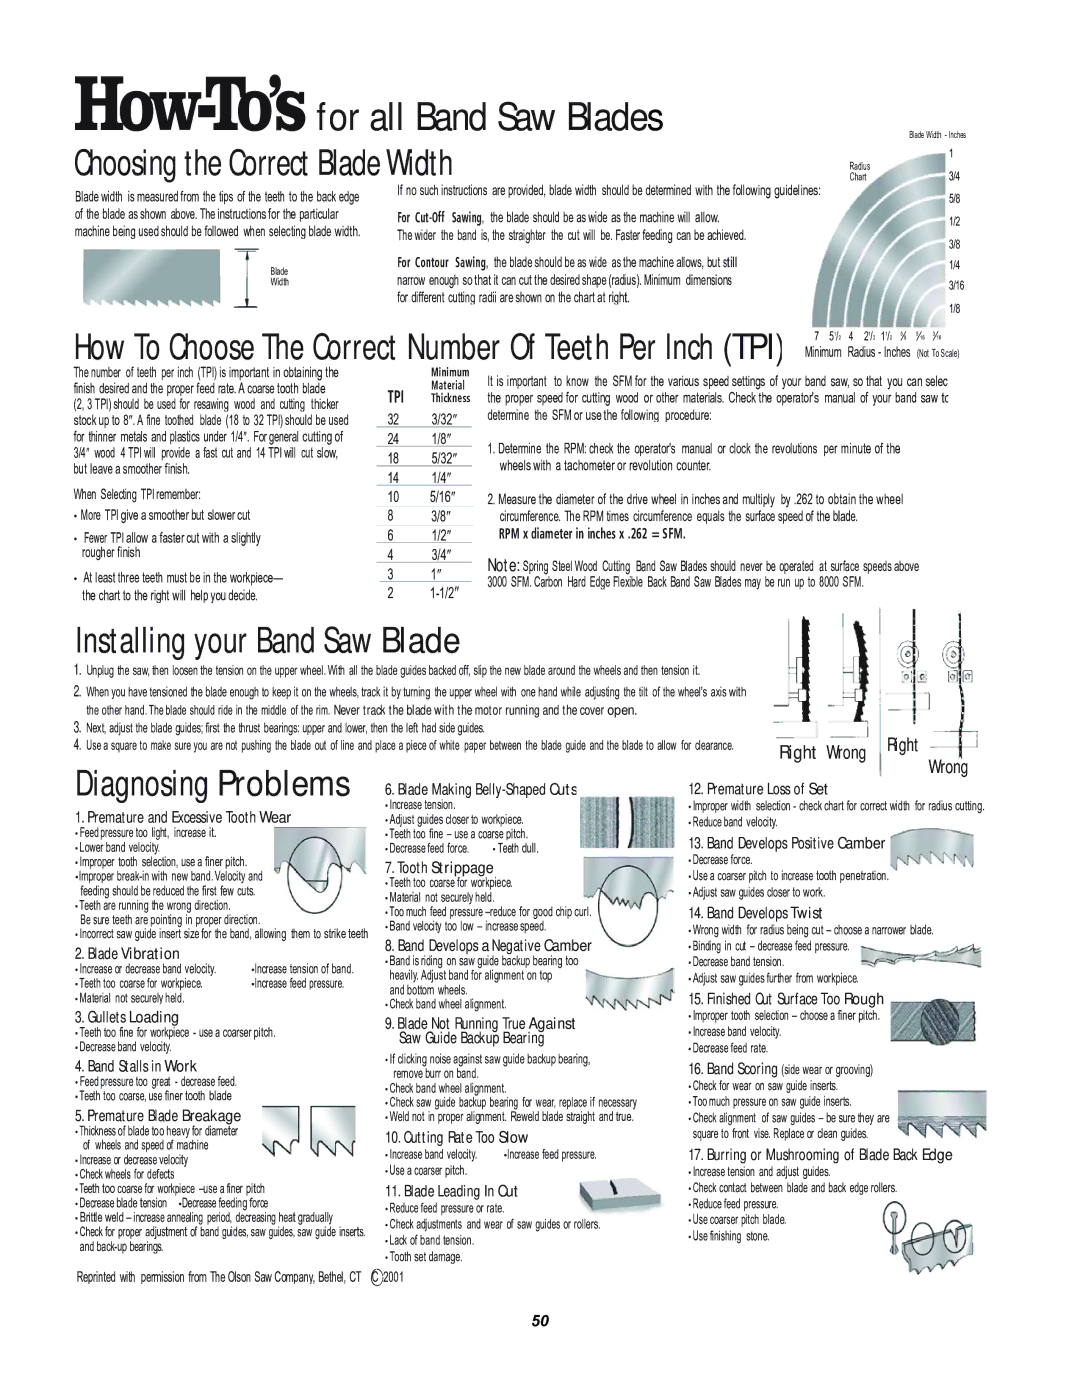
Blade Width - Inches
Choosing the Correct Blade Width
Blade width is measured from the tips of the teeth to the back edge | If no such instructions | are provided, blade width should be determined with the following guidelines: | ||
|
| |||
of the blade as shown above. The instructions for the particular | For | the blade should be as wide as the machine will allow. | ||
machine being used should be followed when selecting blade width. | The wider the band is, the straighter the cut will be. Faster feeding can be achieved. | |||
|
| Blade | For Contour Sawing, | the blade should be as wide as the machine allows, but still |
|
| |||
|
| narrow enough so that it can cut the desired shape (radius). Minimum dimensions | ||
|
| Width | ||
for different cutting radii are shown on the chart at right.
1
Radius
Chart3/4
5/8
1/2
3/8
1/4
3/16
1/8
How To Choose The Correct Number Of Teeth Per Inch (TPI) | Minimum Radius - Inches (Not To Scale) |
| 7 51/2 4 21/2 11/2 5⁄8 5⁄16 3⁄16 |
The number of teeth per inch (TPI) is important in obtaining the finish desired and the proper feed rate. A coarse tooth blade (2, 3 TPI) should be used for resawing wood and cutting thicker stock up to 8″. A fine toothed blade (18 to 32 TPI) should be used for thinner metals and plastics under 1/4″. For general cutting of 3/4″ wood 4 TPI will provide a fast cut and 14 TPI will cut slow, but leave a smoother finish.
When Selecting TPI remember:
•More TPI give a smoother but slower cut
•Fewer TPI allow a faster cut with a slightly rougher finish
•At least three teeth must be in the workpiece— the chart to the right will help you decide.
| Minimum |
TPI | Material |
Thickness | |
32 | 3/32″ |
24 | 1/8″ |
18 | 5/32″ |
14 | 1/4″ |
10 | 5/16″ |
83/8″
61/2″
43/4″
31″
21-1/2″
It is important to know the SFM for the various speed settings of your band saw, so that you can select the proper speed for cutting wood or other materials. Check the operator's manual of your band saw to determine the SFM or use the following procedure:
1.Determine the RPM: check the operator's manual or clock the revolutions per minute of the wheels with a tachometer or revolution counter.
2.Measure the diameter of the drive wheel in inches and multiply by .262 to obtain the wheel circumference. The RPM times circumference equals the surface speed of the blade.
RPM x diameter in inches x .262 = SFM.
Note: Spring Steel Wood Cutting Band Saw Blades should never be operated at surface speeds above 3000 SFM. Carbon Hard Edge Flexible Back Band Saw Blades may be run up to 8000 SFM.
Installing your Band Saw Blade
1.Unplug the saw, then loosen the tension on the upper wheel. With all the blade guides backed off, slip the new blade around the wheels and then tension it.
2.When you have tensioned the blade enough to keep it on the wheels, track it by turning the upper wheel with one hand while adjusting the tilt of the wheel's axis with the other hand. The blade should ride in the middle of the rim. Never track the blade with the motor running and the cover open.
3.Next, adjust the blade guides; first the thrust bearings: upper and lower, then the left had side guides.
4. Use a square to make sure you are not pushing the blade out of line and place a piece of white paper between the blade guide and the blade to allow | for clearance. | Right Wrong | Right |
| |||||
Diagnosing Problems |
|
|
|
| Wrong | ||||
|
|
|
|
| |||||
6. Blade Making | 12. Premature Loss of Set |
|
| ||||||
1. Premature and Excessive Tooth Wear | • Increase tension. |
| • Improper width | selection - check chart for correct width for radius cutting. | |||||
• Adjust guides closer to workpiece. | • Reduce band velocity. |
|
| ||||||
• Feed pressure too light, | increase it. |
| • Teeth too fine – use a coarse pitch. | 13. Band Develops Positive Camber |
|
| |||
• Lower band velocity. |
|
| • Decrease feed force. | • Teeth dull. |
|
| |||
|
| • Decrease force. |
|
|
| ||||
• Improper tooth selection, use a finer pitch. |
| 7. Tooth Strippage |
|
|
| ||||
•Improper | • Use a coarser pitch to increase tooth penetration. |
| |||||||
• Teeth too coarse for workpiece. |
| ||||||||
feeding should be reduced the first few cuts. | • Adjust saw guides closer to work. |
|
| ||||||
• Material not securely held. |
|
| |||||||
• Teeth are running the wrong direction. |
|
|
|
|
| ||||
| • Too much feed pressure | 14. Band Develops Twist |
|
| |||||
Be sure teeth are pointing in proper direction. |
|
| |||||||
• Band velocity too low – increase speed. | • Wrong width for radius being cut – choose a narrower blade. | ||||||||
• Incorrect saw guide insert size for the band, allowing them to strike teeth | |||||||||
2. Blade Vibration |
| 8. Band Develops a Negative Camber | • Binding in cut – decrease feed pressure. |
|
| ||||
| • Band is riding on saw guide backup bearing too | • Decrease band tension. |
|
| |||||
• Increase or decrease band velocity. | •Increase tension of band. |
|
| ||||||
heavily. Adjust band for alignment on top | • Adjust saw guides further from workpiece. |
|
| ||||||
• Teeth too coarse for workpiece. | •Increase feed pressure. |
|
| ||||||
and bottom wheels. |
|
|
|
|
| ||||
• Material not securely held. |
|
| 15. Finished Cut Surface Too Rough |
|
| ||||
| • Check band wheel alignment. |
|
| ||||||
3. Gullets Loading |
| • Improper tooth | selection – choose a finer pitch. |
|
| ||||
| 9. Blade Not Running True Against |
|
| ||||||
• Teeth too fine for workpiece - use a coarser pitch. | • Increase band velocity. |
|
| ||||||
Saw Guide Backup Bearing |
|
| |||||||
• Decrease band velocity. |
|
| • Decrease feed rate. |
|
| ||||
|
| • If clicking noise against saw guide backup bearing, |
|
| |||||
4. Band Stalls in Work |
| 16. Band Scoring (side wear or grooving) |
|
| |||||
| remove burr on band. |
|
|
| |||||
• Feed pressure too great - decrease feed. |
| • Check band wheel alignment. | • Check for wear on saw guide inserts. |
|
| ||||
• Teeth too coarse, use finer tooth blade |
| • Check saw guide backup bearing for wear, replace if necessary | • Too much pressure on saw guide inserts. |
|
| ||||
5. Premature Blade Breakage |
|
|
| ||||||
| • Weld not in proper alignment. Reweld blade straight and true. | • Check alignment of saw guides – be sure they are |
| ||||||
• Thickness of blade too heavy for diameter |
| 10. Cutting Rate Too Slow | square to front | vise. Replace or clean guides. |
|
| |||
of wheels and speed of machine |
| • Increase band velocity. | •Increase feed pressure. | 17. Burring or Mushrooming of Blade Back Edge | |||||
• Increase or decrease velocity |
| ||||||||
| • Use a coarser pitch. |
| • Increase tension and adjust guides. |
|
| ||||
• Check wheels for defects |
|
|
|
|
| ||||
• Teeth too coarse for workpiece | 11. Blade Leading In Cut | • Check contact between blade and back edge rollers. |
| ||||||
• Decrease blade tension | •Decrease feeding force | • Reduce feed pressure or rate. | • Reduce feed pressure. |
|
| ||||
• Brittle weld – increase annealing period, decreasing heat gradually | • Check adjustments and wear of saw guides or rollers. | • Use coarser pitch blade. |
|
| |||||
• Check for proper adjustment of band guides, saw guides, saw guide inserts. | • Lack of band tension. |
| • Use finishing stone. |
|
| ||||
and |
|
| • Tooth set damage. |
|
|
|
|
| |
|
|
|
|
|
|
|
| ||
Reprinted with permission from The Olson Saw Company, Bethel, CT | C 2001 |
|
|
|
|
| |||
50