0FHC9

First Watch Weather Station

USER MANUAL

(FIG. 1)

1


2


3


4

6

5


(FIG. 2)

1


2

5

3

6


4

7

8

(FIG. 3)

2

1

4

35

(FIG. 4)

OVERVIEW

FRONT VIEW (FIG. 1)

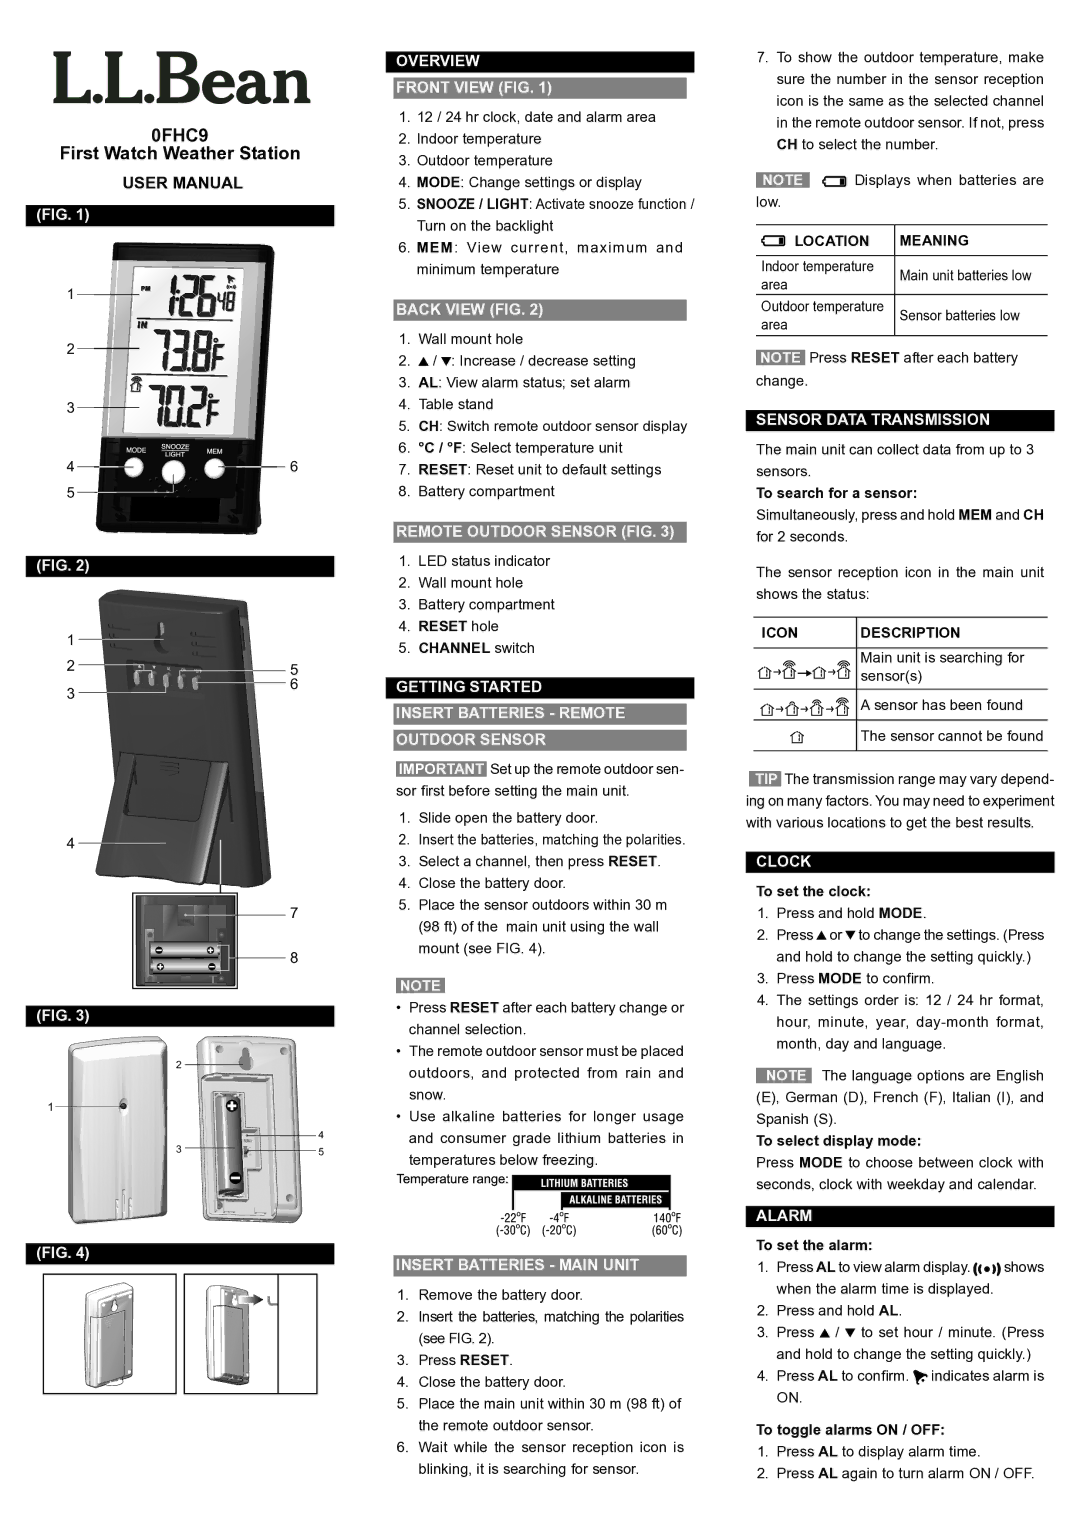
1.12 / 24 hr clock, date and alarm area

2.Indoor temperature

3.Outdoor temperature

4.MODE: Change settings or display

5.SNOOZE / LIGHT: Activate snooze function / Turn on the backlight

6.MEM: View current, maximum and minimum temperature

BACK VIEW (FIG. 2)

1.Wall mount hole

2. / : Increase / decrease setting

3.AL: View alarm status; set alarm

4.Table stand

5.CH: Switch remote outdoor sensor display

6.°C / °F : Select temperature unit

7.RESET: Reset unit to default settings

8.Battery compartment

REMOTE OUTDOOR SENSOR (FIG. 3)

1.LED status indicator

2.Wall mount hole

3.Battery compartment

4.RESET hole

5.CHANNEL switch

GETTING STARTED

INSERT BATTERIES - REMOTE OUTDOOR SENSOR

IMPORTANT Set up the remote outdoor sen- sor fi rst before setting the main unit.

1.Slide open the battery door.

2.Insert the batteries, matching the polarities.

3.Select a channel, then press RESET.

4.Close the battery door.

5.Place the sensor outdoors within 30 m (98 ft) of the main unit using the wall mount (see FIG. 4).

NOTE

Press RESET after each battery change or channel selection.

The remote outdoor sensor must be placed outdoors, and protected from rain and snow.

Use alkaline batteries for longer usage and consumer grade lithium batteries in temperatures below freezing.

INSERT BATTERIES - MAIN UNIT

1.Remove the battery door.

2.Insert the batteries, matching the polarities (see FIG. 2).

3.Press RESET.

4.Close the battery door.

5.Place the main unit within 30 m (98 ft) of the remote outdoor sensor.

6.Wait while the sensor reception icon is blinking, it is searching for sensor.

7.To show the outdoor temperature, make sure the number in the sensor reception icon is the same as the selected channel in the remote outdoor sensor. If not, press CH to select the number.

NOTE Displays when batteries are low.

LOCATION MEANING

Indoor temperature

Main unit batteries low

area


Outdoor temperature

Sensor batteries low

area


NOTE Press RESET after each battery

change.


SENSOR DATA TRANSMISSION

The main unit can collect data from up to 3 sensors.

To search for a sensor:

Simultaneously, press and hold MEM and CH for 2 seconds.

The sensor reception icon in the main unit

shows the status:

ICON DESCRIPTION

Main unit is searching for

sensor(s)

A sensor has been found The sensor cannot be found

TIP The transmission range may vary depend- ing on many factors. You may need to experiment with various locations to get the best results.

CLOCK

To set the clock:

1.Press and hold MODE.

2.Press or to change the settings. (Press and hold to change the setting quickly.)

3.Press MODE to confi rm.

4.The settings order is: 12 / 24 hr format, hour, minute, year, day-month format, month, day and language.

NOTE The language options are English (E), German (D), French (F), Italian (I), and Spanish (S).

To select display mode:

Press MODE to choose between clock with seconds, clock with weekday and calendar.

ALARM

To set the alarm:

1.Press AL to view alarm display. shows when the alarm time is displayed.

2.Press and hold AL.

3.Press / to set hour / minute. (Press and hold to change the setting quickly.)

4.Press AL to confi rm. indicates alarm is ON.

To toggle alarms ON / OFF:

1.Press AL to display alarm time.

2.Press AL again to turn alarm ON / OFF.

Page 1
Image 1
L.L. Bean 0FHC9 user manual Overview Front View FIG, Back View FIG, Remote Outdoor Sensor FIG, Insert Batteries Main Unit

0FHC9 specifications

L.L. Bean has long been synonymous with quality outdoor gear, and their 0FHC9 jacket exemplifies this commitment to excellence. Specifically designed for the avid outdoor enthusiast, the 0FHC9 combines functionality with style, ensuring that wearers are prepared for any adventure, regardless of the weather.

One of the standout features of the 0FHC9 is its advanced insulation technology. Utilizing high-performance synthetic materials, the jacket provides exceptional warmth without adding excessive bulk. This ensures that the wearer stays comfortable even in frigid temperatures, making it ideal for those who partake in winter sports or enjoy outdoor activities during the colder months.

Durability is another critical characteristic of the 0FHC9. The outer fabric is crafted from a rugged water-resistant material that repels moisture and wind. This breathability is essential for maintaining comfort while engaging in dynamic movements, as it prevents overheating and allows for moisture wicking to keep the body dry. L.L. Bean employs innovative vapor management technologies that regulate body temperature effectively, ensuring the wearer feels invigorated rather than weighed down.

The design of the 0FHC9 also prioritizes user experience. Equipped with multiple pockets, including secure storage for essentials such as phones, keys, and snacks, the jacket facilitates easy access to necessary items during outings. A detachable hood offers versatility, allowing for customizable levels of coverage depending on the weather conditions. Additionally, adjustable cuffs and hemlines provide a tailored fit that prevents cold air from seeping in, enhancing overall warmth.

Notably, the jacket is available in a range of sizes and colors, catering to diverse preferences and body types. This inclusivity has made the 0FHC9 a favorite among outdoor lovers from various backgrounds.

In summary, L.L. Bean's 0FHC9 jacket is a remarkable piece of outdoor apparel that seamlessly marries advanced insulation technology with durable materials. With a focus on comfort, utility, and adaptability, this jacket stands out as a reliable choice for anyone looking to explore the great outdoors, no matter the season. For those in search of a rugged yet stylish solution for their outdoor wardrobe, the L.L. Bean 0FHC9 jacket should be at the top of their list.